One day, earlier in this excruciatingly hot and humid summer, my brother stopped by to drop some things off. He was wearing a 'thing' around his neck that he ran under some cold water to chill it, and said he got it from "Tilley's Endurables". Rob (my husband), had been complaining about how hot and sweaty the commuter train is in the afternoons and needed something to cool him down. I did some googling, and found that Tilley's sells "
Cobber Neck Wrap". I realized quickly that I could probably make one for much less than $20. But what to fill it with? They use tiny beads that when soaked in water (hot or cold), swell up enormously and as long as the fabric is still wet, will feel cold (or hot) for hours. Eventually, they can dry up again, and be re-used. I was stumped as to the filler, until I found the answer from an unusual source.
The machine knitting groups I'm in are hosted through Yahoo! Groups, and you have a choice of getting each message as a separate email, or getting a day's worth of messages in one neat and tidy, organized, "digest". For most groups, I'm now on digest (this really curbed my need to answer questions as soon as someone asked one, as now, often the answer has already been given by the time I read it). One complaint with these groups is that a subject will meander away from the original heading, but the subject line is still the original topic. So, if someone posts about their Brother machine, I don't read any of the messages, but then some day I might be scanning through the digest on the way to another message, and something might catch my eye. That's what happened here. In a subject I had not been following, the talk turned to neck coolers! The writer posted that she bought these crystals at the garden center. They're for mixing with the dirt so it holds water longer. Bingo!
Immediately, I gathered up the children and headed on a crystal hunt. We cruised "Man Row" (Canadian Tire, Sport Check, Staples, Home Depot and Lowes all within a few blocks), but got too hot and hungry to make it all the way to Lowe's. The next day I went to Michaels' and forgot to take my flyer coupon for 40% off. Of course, they had something that seemed the same, but intended for fake flower arranging "Cracked Ice". I bought it, even without the coupon, because for $9.99 it seemed it would last a long time and I was tired.
Of course, I had to Google to see if there were instructions on how to actually sew them, and then I found all kinds of links to the crystals. One woman even took apart disposable diapers to get the crystals! Because mine were not the same product, I decided to soak them in water first, and fill the coolers this way so I'd know just how much to put in.
When I searched my stash for "manly" fabrics, all I could find was a brown cotton gauze with a subtle embroidery. I cut it to the size suggested, sewed, and filled. We tried it for a day, and it felt rather heavy. Then I made one with quilter's cotton, to the same measurements. I quickly realized that the cotton gauze had stretched out it's crinkleness as the crystals grew! So, it had surgery and I removed probably half the crystals. Rob tried it on the train and said he felt better, but he was still sweating like crazy (the cooler lays against the carotid artery and cools the blood heading to your brain, so you stay clear headed, but can't really lower your body temperature overall).

I dug down deeper in the bin and found the blue print, and the flowered one was a remnant from the fabric store (I was very disappointed that they had barely any quilter cotton remnants! This was the only one!). The pink and black one is to match Lucy's dress. The black one with beige stitching was to go with a dress I haven't yet posted about. I made all of these (except the pink and black one) plus three more, out of the one package of "Cracked Ice". It wasn't all wine and roses though, I did have an issue with trying to dry out the crystals...in the oven...
Then, we were tree shopping, and went to the Lowe's I hadn't gone to in my initial search. I quick stroll through the houseplant section, and guess what I found? The "real" crystals, for $3. Although I don't predict a need for another 10 neck coolers, I had to stock up with another package!

For all but the last one, I made closed tubes so I wouldn't have to finish the raw edges. I decided to do Lucy's differently, so it'd be more like a scarf with her new dress. I placed the tube seam in the middle (instead of the edge), so the tails could open up.

My edge finishing sucks. But it's cute. The kids aren't really into them though. Rob also doesn't take his anymore. He also won't even take a water bottle! But I did get him to move to the lower level of the two level train, LOL!

 It's called Judy's Grandmother's Baby Sweater
 And here it is! I'm really happy with it! I do see that the skirt pulls up in the middle of the bodice seam and the ribbon (not sewn down) emphasizes this as it's straight across. I really wanted to use the ribbon. A little history now. This fabric is the same fabric as the very first dress, but in a different colour. I had bought about 1.5m and sliced it down the length, then stitched the ends together, and made a really long ring sling. I liked the length, but it was a little slippery. Later on, I took one of the pieces and using this ribbon, made a bathing suit wrap for the cruise. However, once wet, it was cold and icky (it's a 'washable rayon'). And it looked odd. So, the two pieces sat around just waiting. I bought some FOE (fold over elastic) in turquoise, thinking I might make a shirt like I've done before, or a dress. But Meg got it and cut it into a couple pieces. I probably could have used it across the back instead of making an 'invisible casing'. I thought I might use the ribbon for the straps, but after reading the sundress tutorial, and seeing how it improved the fit and look of the test dresses, I assumed it would work for this one too.

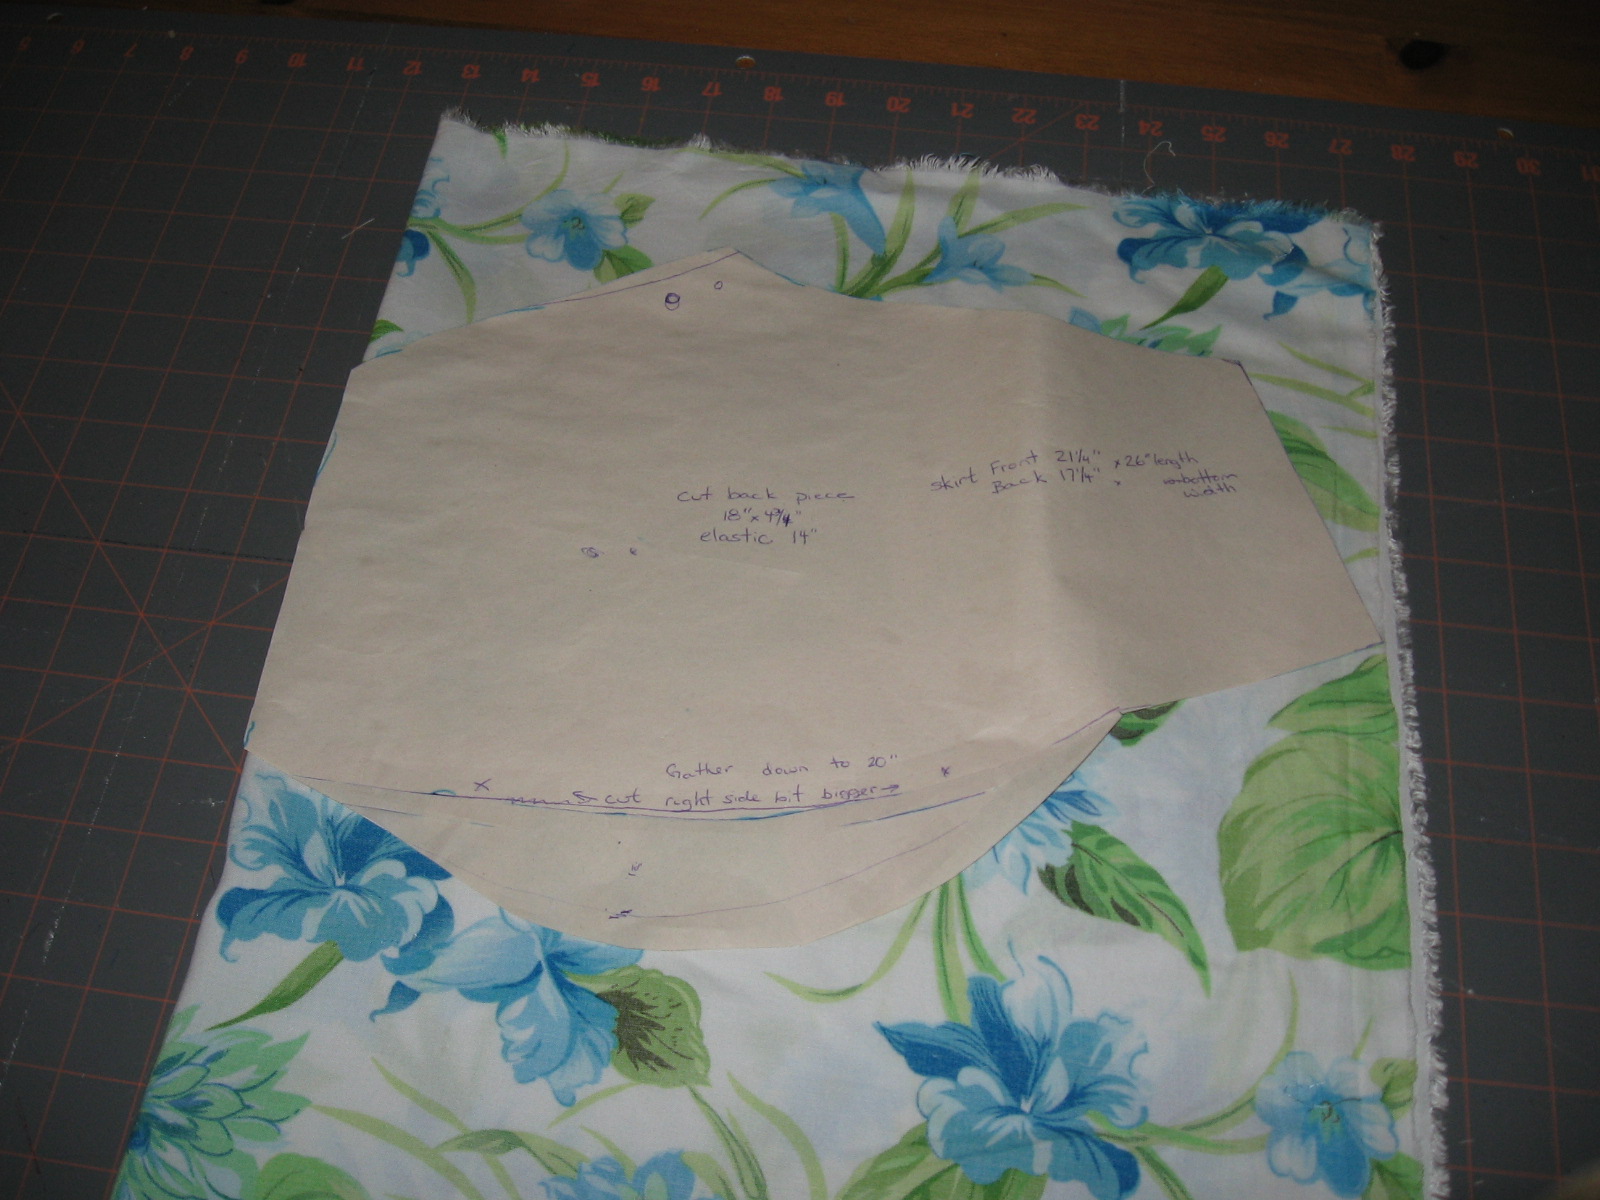
 The flat area at the bottom gets gathered. This pulls the short angled parts downwards into line with the flat area. Wow, that really got my brain rolling. Along with finding a forum where another lady had a similar issue and was told she needed more curvature along the bottom.
 I did much googling and found out that the type of skirt I wanted had 'godets' not gores. This would mean 4-6 panels, with triangles at the bottom. I thought this was going to be a great way to make the narrow fabric be wider and 'swishier'. However, there are a lot of seams...each eating away at some fabric....
 I was happy with the construction, however, the cups didn't offer enough coverage on the sides, but they did lay flat on the chest! And lets not talk about how the skirt portion fits. I could pull it up quite a bit and find it's "sweet spot" but that made the skirt too short!
 I moved onto a few other sewing projects but I was hesitant to make anything more for me, especially tops. And, I seemed to be ...ummm...growing. Recently, I felt that my skills were improving enough to try again. I decided to make a top using the same pattern. I drafted a slightly larger size, and altered the back so there wouldn't be a zipper.
 At first, I was happy, but really, it just didn't 'cup' me enough and didn't have the coverage. Plus, I HATE tieing things behind my neck. I gave it to my mom. As I mentioned a few posts ago, while we have the same chest size, we do not have the same bra size. It fit her fine.
 I used the sewing techniques from the dresses I just made for the girls, but this made it hard to tell exactly how the dress was going to look until quite a bit had actually been done. I dress the pieces larger where I thought I needed it, but I wasn't sure what to do with the bottom curve. Trying it on showed that while I could get the right coverage and fit, the pieces would not be sewn straight along the original seam line. I just didn't have enough hands to hold it, pin it, mark it, etc. I knew that something was still not quite right.
 I could see that it was pulling at the base of the V neck so I needed more width. I was pretty much happy with it though. So I got a better fabric--some blah beige quilter's cotton I had bought off Cheapcycle. It's rose blooms, actually. I didn't like how it looked in the middle (the skirt seam goes straight across, but the bodice seems to dip in), but I was pretty happy, although it was still not 'cupping' me. I wanted to be able to go braless, and not have elastic under the bust, which would gather the skirt and make it look like a maternity dress (even though I have a permanently maternity shaped body). There were some issues with the skirt. The fabric is only 44" wide!
 For ease of adding photos, I'm just going to start another entry for the rest of the story!
 Meg chose a wild orange flower print, a very light weight woven cotton (I don't know the 'proper' names for all the different cottons). I lined the bust with off-white bastite on the advice of the fabric cutter, and I was glad she pointed it out because it was what I needed for other projects too. For Meg, I cut the top as a size 10! and I think they both got size 7 skirts but Lucy's I eased out to a size 8 for her tush :) Lucy's top was a 7, I think.
 Lucy's dress is an unusual quilter's cotton. She "doesn't do" flowers, pink, cute, or "weird polka dots". I was hoping to get them in co-ordinating fabrics, but oh well. LOL. They are both a smidge too big in the bust, causing some gaping when they move around, but they are cute dresses. I hope to make the other view someday, although Lucy thinks it's too pouffy. While Meg loves anything I make for her, Lucy is another story!
 Instead of the cross over pieces laying flat on my chest wall, they pull out (I've stitched it together) so it's like a V-neck. I'm going to re-shape the pieces so there's a bit more coverage, but I still don't know what to do where it overlaps. Should they be closer together? Further apart? Further apart and then the overlap needs to get tucked under a girl. I thought of cutting it a bit larger and gathering it to fit between the same notches on the body. I don't need to extend the side seams, I need more? in the middle.