I mentioned to my mom that if she had time before leaving town on Monday morning, could she please drop by V & S Stedman's and see if they still had the 1lb bags of "unknown fiber" in the creamy, off white. And she did, and they did, and now I have 592 grams of Patons Lace in the Vintage colour. Yes, that's more than one pound, but all the bags were opened and had different amounts in them, so Mom put a few balls into one of the bags to make it full again :) This is equivalent to 6.9 balls of the yarn, or 3468.4 yds, or $62.30 (HST inc, based on $7.99 per ball (85g) at Michaels')....all for the lovely price of $7.90!!! Oh boy, does this skew my totals for the year, LOL. There is so much yarn here! Being a solid colour, it would be lovely for an intricate lace shawl or cardigan. I could even dye some, though it's only 20% wool/mohair, so the results would be not too intense. Any shawl suggestions? So many current shawls are actually based on garter stitch, which wouldn't be necessary with this yarn. I need an older style shawl, LOL. Anyway, lets look at how it affected my totals:
Yarn In: 14 236r + 592gr = 14 828gr
Yarn Out: 12 317gr
Balance: 2511gr more In than Out
Costs: $309.69 + 7.90 = $317.59/249 days =$1.27/day
Well, I'm glad I'm doing this by grams, and not by yards, LOL. I'm still bringing in more than I'm using, but I have another crochet square blankie that's almost done, a pair of socks on the needles, the test pair of mittens, felted clogs almost done, and the short row shawl I made that the dye ran out (it's sitting in a dye bath right now). It has been really interesting to keep track. I think this is better than saying "I'm not buying yarn this year". I have resisted buying yarn at times, but being accountable for what I DO buy is great. Now, if only summer break would end and I can get back to knitting!!
Friday, August 31, 2012
Monday, August 27, 2012
Naughty Kid Knits
It's my 6th Blogiversary, right about now. Wow. I had actually started up a blog in December 2005....with a newborn (child #3) and no digital camera and no brain power to remember how to log in....it was quickly abandoned. My second attempt has stuck though!
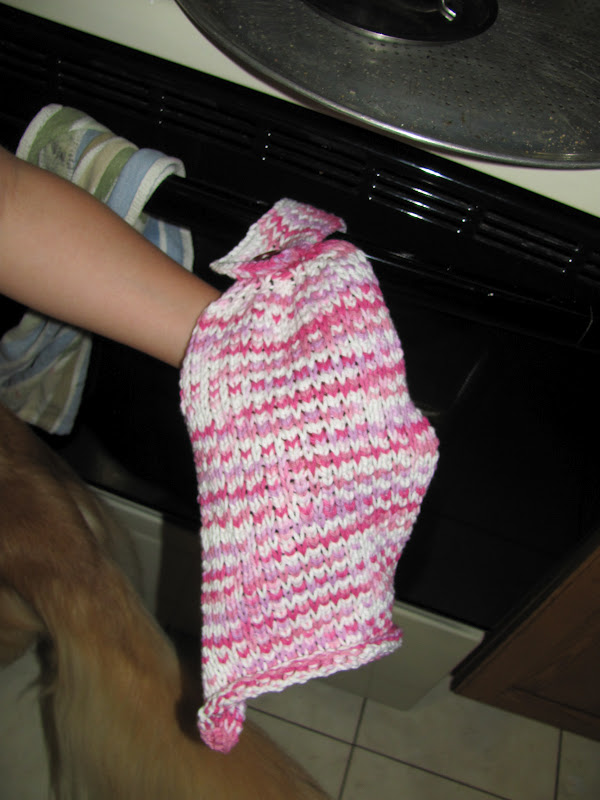
That child #3 is now closing in on turning 7, going to start grade 2 in a week, and is frequently my campanion in the knitting room. Recently she wanted to do "something", and rather than have another "doll blanket", I guided her towards a dish towel with hanging loop, done in a 1x1 tuck on the LK150. Similar to the scarves she had helped with in winter. For some reason though, this time, maybe because of the cotton yarn, we had troubles. I think I might have knit (and unknit) more than she did. I did do the entire strap part myself, she's not up to reforming stitches for ribbing yet.

 Yeah, the pictures aren't that great. There is a bit of curling, but actually, it's the whole cloth that is curling, not just the typical edge curl. I could probably steam it out but, hey, it's a dish towel. Actually, I use these types that tie onto the stove for just hand drying. Whatever. It used up 50gr of cotton that I've had since she was 1 or 2 when I made her a dress :)
Yarn In: 14 236gr
Yarn Out: 12 267gr + 50gr = 12 317gr
Balance: 1919gr more In than Out
Costs: $309.69/245 days = $1.26/day
That child #3 is now closing in on turning 7, going to start grade 2 in a week, and is frequently my campanion in the knitting room. Recently she wanted to do "something", and rather than have another "doll blanket", I guided her towards a dish towel with hanging loop, done in a 1x1 tuck on the LK150. Similar to the scarves she had helped with in winter. For some reason though, this time, maybe because of the cotton yarn, we had troubles. I think I might have knit (and unknit) more than she did. I did do the entire strap part myself, she's not up to reforming stitches for ribbing yet.

Yarn In: 14 236gr
Yarn Out: 12 267gr + 50gr = 12 317gr
Balance: 1919gr more In than Out
Costs: $309.69/245 days = $1.26/day
Thursday, August 23, 2012
Awesome Dress Refashion
Last year, I bought some dresses to refashion, I showed the black flowery one recently. I decided after that I needed a quick project. This dress, I had already detached the skirt from the bodice to see how much fabric I had to work with. Quite a bit, though there was a curve to the front piece (it was a faux wrap skirt, in a plus size). I was concerned about the bodice, since it seemed to be designed for a woman with a large booty...the back was longer than the front, the exact opposite of what I need! The bust and shoulder width fit well, so I just had to take the shoulders in a touch, and the sides quite a bit, and then evened out the bottom of the bodice.

I really didn't want another empire waist dress though--I made/bought quite a few last summer, and I'm hoping that my weight loss meant that I could start having a waist in my clothes again. But I had to do something to make a midriff!

Since the dress was long, I figured I'd cut a band and shir it. After getting the first piece done, I realized that it had shrunk in width and was now about 1/2 the width I needed. Once shirred, it wouldn't stretch out fully to the original width. I ended up cutting three more same size pieces (due to the shape of the pieces I had left) and shirring them individually, though I wish I had seamed them and shirred it all at once.

I sewed the leftover skirt pieces together to make a fuller skirt, and there is a little bit of curvature to the hem, but it's okay.
Then I used the serger to seam the skirt to the midriff, and the midriff to the bodice.

I had a bit of issue with the seam in the center of the front shirring; I tried to line it up really carefully, but one line of shirring didn't quite pull right to the seam. Also, the join of the skirt to the midriff was a bit uneven. I hope the busy print hides it.

I LOVE this dress. It's a crinkle fabric, very lightweight (100% rayon) and cool. No back sweat in the shirred section. The skirt is full, but drapes so nicely from the midriff, and it "pouffs" in the wind or when walking down the stairs, but I don't think there's any risk of blow up, LOL. I'll have to compare the midriff size to the dress I showed yesterday. I like that this dress has more coverage than many of my other summer dresses, but is not hot at all. I feel feminine and pretty, even if it's not a "fashion" dress.
Yesterday I was wearing that black flowered dress I recently refashioned. I'm really not happy with the sleeves. Dowdy. I could make it sleeveless (maybe, not sure), or I could raise the top of the armhole (the shoulders are clearly too wide), and make a center seam/dart into the sleeves to get rid of the fullness. Hard to decide. I really need dresses with sleeves but I don't know if I want to do the work...but I don't think it's stylish enough with those sleeves to thrift it the way it is. I love how it's flowy and shows some leg when I walk, but the sleeves...ugh.
Wednesday, August 22, 2012
Refashion
I've mentioned how I like to look for yarn at V & S Stedman's when I go to my parents, and I'm regretting not trusting my instincts last time I was there. There were the 1lb Mill End bags, and several were full of a slightly fuzzy cream coloured yarn. I thought it might be Patons Lace, since I had bought that there before, and there was one mixed bag that had a ball of the beautiful brown/roses along with other yarn (and since I didn't want the other yarn, that would have made the one ball the same price as at Michaels--$7.99). I'm not familiar with the solid colours of Patons Lace, but yesterday I was at Michaels and they finally have it, and indeed, they have a cream colour. And, of course, my parents aren't at home this week to nip in and grab me a bag or two :(
Also at Stedman's are clothes. I don't usually look too much, since the change room seems to be an after thought in the store, and I usually have hooligans with me. But one time last summer I did look through a sales rack and found a maxi dress that I loved. It was very lightweight, and even lined. The top was beautifully smocked, with adjustable straps. It was a bit too long, and sized 3X. For the most part, it did fit, for some reason, though the elastic along the top of the bodice did not lay on my skin. I figured I could easily take it in and shorten it.
.JPG) Of course, the weather turned chilly right after I bought it, LOL. After I had worn it for a day, I noticed why it had been marked down. On the back, one of the turquoise embroidery threads had come undone. If I just cut off the lower bodice, it would have fallen across my chest at a really strange spot.
Of course, the weather turned chilly right after I bought it, LOL. After I had worn it for a day, I noticed why it had been marked down. On the back, one of the turquoise embroidery threads had come undone. If I just cut off the lower bodice, it would have fallen across my chest at a really strange spot.

I liked the smocking, and thought it might make a good bodice piece. I carefully cut it off just below the band that was partially missing, so that bit would be in the seam allowance and give the maximum amount available for the midriff. I shortened the top portion of the skirt, to save the lovely border print. I re-seamed it to the smocked midriff.
 But what to do about the bodice? At first, I envisioned a gathered top. This would add a bit of opaqueness to the thin fabric. However, it just did not look right. Bulky and weird. It was also too tall. I kept cutting and seaming until it seamed right. Originally I wanted it as high as possible so that when I put the straps on they would cover my bra straps, but when I tried it out, that also looked weird. I did find a strapless tube style bra though. I am undecided about sewing the straps back on...I could then put the straps on that came with the strapless bra, making it more secure, LOL. But I've also never had a strapless dress, so this is fun! I do wish I had planned a bit more and made a full bodice, especially after seeing the pictures.

I think the midriff might actually be too high, as you can see it doesn't sit right at my waist and it makes me look like I have a roll. Well, I am soft in the middle, LOL, but I didn't think I looked like this.

 I wore it to a boat festival, and it was quite nice and cool, though the smocking as usual, made my back sweat. I wish I had a picture of the embroidery that was done over the smocking. It add a really nice touch, something that I wouldn't do if I was making it myself!
Also at Stedman's are clothes. I don't usually look too much, since the change room seems to be an after thought in the store, and I usually have hooligans with me. But one time last summer I did look through a sales rack and found a maxi dress that I loved. It was very lightweight, and even lined. The top was beautifully smocked, with adjustable straps. It was a bit too long, and sized 3X. For the most part, it did fit, for some reason, though the elastic along the top of the bodice did not lay on my skin. I figured I could easily take it in and shorten it.
.JPG)

I liked the smocking, and thought it might make a good bodice piece. I carefully cut it off just below the band that was partially missing, so that bit would be in the seam allowance and give the maximum amount available for the midriff. I shortened the top portion of the skirt, to save the lovely border print. I re-seamed it to the smocked midriff.


I think the midriff might actually be too high, as you can see it doesn't sit right at my waist and it makes me look like I have a roll. Well, I am soft in the middle, LOL, but I didn't think I looked like this.

Perhaps there's too many horizontal lines? I kept pulling the midriff down trying to smooth it out, but maybe it just needs to be narrower.

Monday, August 20, 2012
Fuzzy Confession
So, I was recently up at my parents' house, in a small town in the middle of cottage country. I usually try to stop into their local "V&S Stedman's" store, which is like a mini-Wal-Mart. Very mini. But most of the Stedman's I have been in have had good yarn selection. There wasn't anything I wanted this time so I hopped over to the thrift store. I grabbed a bag of assorted cream coloured fuzzy yarns. No labels.

 Yarn In: 13 966+ 270gr = 14 236gr
Yarn Out: 12 267gr
Balance: 1969gr more In than Out
Costs: $3.39 + $306.30 = $309.69/238 days = $1.30/day

The one in the upper right is a very dense spool--but no actual spool. It's hard to tell what is real and what isn't; I'll have to do some burn tests, but even then I won't know too much more. The ball on the lower left looks like Patons Divine, and I think the upper left and middle top are the same yarn. But other than that, no ideas of what they are. Yarn for scarves.

Yarn Out: 12 267gr
Balance: 1969gr more In than Out
Costs: $3.39 + $306.30 = $309.69/238 days = $1.30/day
Sunday, August 19, 2012
Checking In
Sorry for the silence. I went away to my parents for a week, to house/dog/chicken sit, and my laptop died before I could do any blogging. Then we came home and had a "staycation" while my sister-in-law and her daughter were up, staying at her parents. It was fun playing tourists, and seeing the cousins having fun together, but there wasn't much time for blogging. Or sewing. Or machine knitting. I've been doing some sock hand knitting, that's about it. Got one pair finished up, but no pictures yet. Still have to show a re-fashion or two. Sewed a knit dress muslin from "Sew U for Knits" by Wendy. Not thrilled with it, so it's a nightgown. Oh, and while I was away, I picked up a bag of yarn at a thrift store. Other than that, it's been busy here, LOL. I'll post again later in this week, with an update on the yarn totals and some pictures!
Friday, August 03, 2012
Teacher Gifts
Yes, the last day of school was June 28, and today is August 4. So? One benefit of school getting out so late up here is that I can read on all the American blogs what the cool gifts are this year. These bags weren't actually from this year, but ikatbag mentioned in her teacher gift post that she had done them previously. Having had one of these bags from years ago, I thought what a neat gift idea, especially if the kids picked out the fabrics themselves. That sort of worked, sort of not. LOL.
The tutorial is at: http://sewmamasew.com/blog2/2011/05/wallet-to-tote-on-the-go-tutorial/ Like most tutorials, I seemed to have trouble. Mainly, it's just me, LOL. Sometimes though the tutorial writer doesn't realize that something they are very familiar with is not easy to explain, or known by the masses....I got going on the first bag, got the zipper sewn in the wallet and had fun zipping it up to show everyone my little creation. Do NOT zip it up at this point.
To sew the bag on, you want the zipper laying just like it was when you sewed it--laying over the outside of the wallet. Because I had zipped it up, the zipper was flipped to the inside, and I just could not figure out how/where to sew the bag on! Finally, with fiddling, I clued in. Then I sewed the wrong bag to the wallet :(
Two other points--pin the bag to the wallet. I thought I could just go ahead and sew it on. But I kept ending up with too much fabric! For these first three bags, I sewed new side seams to make them smaller (part of the issue seemed to be that my pattern printed out a touch small). For the third one, after measuring the pattern, measuring the wallet, re-measuring, getting Rob to measure....I gave up and pinned the bag to the wallet. And wouldn't you know? Absolutely perfect fitting! My other concern was where exactly to stitch the bag to the wallet...I didn't want to stitch over the wallet fabric but it was hard to know while sewing how it would look.

Also, when I sewed the zipper on the first wallet, I didn't get fussy with the spots where the zipper starts and also sticks out at the other side. On the other two, I tried to be fussy...and they were hard to zip up. She has on her blog a tutorial on how her dad does it, using one side of the zipper tape only, but you have to buy the zipper part separately.
Keep in mind too, when you sew the bag to the wallet, where the handles are. I read in the tutorial to make sure the handles are on the long side...I somehow misread it, and it wasn't until after I sewed it on that I realized the handles need to be centered on the long sides of the wallet.


After I finished these three, I dug out my old bag to see how it differs. Quite a lot! the wallet is a foam backed vinyl, and the bag is only one layer. It's shaped totally different, and would be much quicker to make and sew to the wallet. But to find the vinyl.....


Subscribe to:
Posts (Atom)