Friday, January 25, 2019

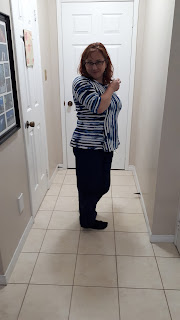
Riki Top

Blue is one of my capsule colours, but I don't actually have a lot of blue tops to go with my blue pants, especially longer sleeve tops. I went to Fabricland for something. I think thread for the last thing I was working on? And looked in the clearance racks at the very back. There was a bit of something left on a bolt. It had a spongy textured feel, stretch but not too stretchy. On the bill it says "Cruise Control" and there was 1.5m at $5/m. I liked the print and the fabric had a neat feel to it.


 I did the "Riki" dress again by George + Ginger.   With no pockets though that would be cool. I toyed with which way to have the stripes going. They had the most stretch with the stripes horizontal so I did that for the side pieces because they are bigger than the front pieces and I thought I'd want the stretch more there. I really had a hard time thinking about it. I wanted the stretch over my chest too. There is stretch that way, and in the end, it probably didn't matter.
 I feel a bit of tugging at the front of the armholes. Maybe because it's a thicker fabric?
I thought I had done a sway back adjustment and I didn't notice pooling on my original dress. It could be because it is perhaps a smidge too snug, being that it's a thicker fabric. 

 This angle isn't bad, but I really felt that my side view made me look large. The bottom of the shirt flares out. Perhaps because it's a dress pattern. And I'm just not sure about the princess seam placement. I believe I actually moved the seam over towards the centre (cut a bit off the side front and added it to the front middle piece. I just feel really wide in this top, more so than in the dress.

 Trying some model moves.
I think I was eating a cookie. Which could also be why it's a smidge too snug.

For the sleeves, I added elastic in the sleeve hems. I love the idea of 3/4 sleeves but I always push them up. I didn't want them to be a floppy mess when they fall down though LOL. Not sure it was needed.


I actually topstitched the neckband on this one. I don't normally do this, but since this had a high polyester/nylon content I couldn't press the seam a whole lot and it seemed to be flipping out a bit. I also lowered the neckline a smidge from the original.

Megan said this top is really good, so that's great. I'm pretty sure I won't wear it with my blue (or white, or white and blue) shorts, but it's prefect for my blue pants.

Friday, January 18, 2019

Astoria

One indie designer I follow (okay, George + Ginger) was having a sale and I was seriously considering a dress that seemed to be the current vogue...a swooping colour blocked gathered side panel. However, I wasn't sure how I would alter it for a FBA. Then, before I could decide, Peek-a-Boo Patterns released the Astoria.  With a sale. How could I not? This is also the name of an album by Canadian band, Marianas Trench. My middle girl, Lucy, became a Trencher and since I had to take her to concerts, I became one too. Perhaps not my favourite band  (some screeching, swearing, etc) but I do think they have a really unique talent for song writing.

I had just gotten some brown (or I bought it after the pattern release? Does it matter?). I wanted to make another top to go with this skirt . What? There's no skirt in that post? Um yeah. I still don't have a picture, because I haven't worn it since the summer. But I've worn this new top a few times. However, with brown pants, it feels like there's too much brown (especially since it's not an exact match LOL).

I was all eager to do the FBA. A princess seam! I had just done that on the Riki dress! No problem! Uh. The front piece for this top is cut flat, not on the fold. No problem! Just flip it over and do the FBA on the opposite half. Uh. There's a seam there, right through the bust. And the centre front piece is extra long because it's gathered.

Basically, I ended up joining the centre piece and the side piece together with tape and doing the FBA on it that way, and then separating the pieces. It made sense in my head, but I wasn't sure if it was going to all work, given the swoop shape and the gathers.


So much surgery on the pattern. And I thought when I had my surgery, I wouldn't need to do this sort of thing. Actually, when I had my surgery, I wasn't sewing for myself. So I had no clue. 


Gratuitous shot of hubby and me, at Queen's Homecoming


Hanger shot, cause I don't seem to have an actual on-the-body shot. It's a little washed out in this photo.

 This picture was actually about my curly hair. Which by the end of the day was flat and fluffy. I'm experimenting with "The Curly Girl Method" but I don't know that I like how it looks with a "cast" (when the hair is crispy with product, but the curls are defined).

I bought the brown from Midnight Mountains Fabrics. I'm sure you can google that. I really like the quality but got frustrated because they sent only half a meter instead of a full meter. I did make underwear with the 1/2 meter, so that was okay. I've ordered three times from them and twice they've messed it up. I've gotten to keep the mistake fabric both times though. This is nice stuff, but I'm not really used to such a elastic cotton and although it probably looks fine on, I kind of feel it should be slightly larger. I keep saying this every time I make something with these better cotton-lycra fabrics!  The other thing...the selvage of the fabric was odd. Never seen that before.

Overall, I'm quite happy with the shirt. I can't wait to wear it with the skirt. I thought it would be good with my brown pants too, but it's just too much brown. So I wear it with beige pants. I'm fine with that. I do plan to make more of these tops, but it does take a fair bit more fabric than just the plain short sleeve t-shirts I make. The front piece is quite a bit longer, so a meter isn't enough. And the long sleeves adds to the requirements. I don't like really long sleeves though, so I made them shorter. But if I remember, I was really squishing this in on the fabric.  I had hoped to make it with a cowl in the print fabric, but I didn't have enough. Since my printer is broken and I can't make any of the newer patterns I've bought, maybe I should make another of these....

Wednesday, January 16, 2019

Christmas Gifts

This year, due to me travelling at the start of December and expecting to get sick around Christmas as a result (I didn't!!!), I planned to not make Christmas gifts, or Christmas orders. This year I already have  4, possibly 7 Christmas stockings ordered from past clients LOL.

I had thought of making my son a shirt. I got this fabric that was a circuit board print. However, it wasnt' really enough for a shirt for a tall boy and I didn't have other fabric it worked well with. I thought I might make mittens cause he has a long walk to classes if he doesn't take the bus. Then one of the girls bought him expensive gloves. There wasn't much on his Christmas list, just odd things like a travel salt and pepper shaker and chopsticks. Yeah.

Then I decided he needed a bag for the salt and pepper shaker, and for the chopsticks. And while we're at it, let's add a re-usable straw!

It's hard to find a pattern for a little lined bag with a drawstring at the very top.  Most have the drawstring part way down, or made by sewing on bias tape/ribbon over the outside. As well, I wanted to box the bottom to make it fit better. I ended up taking too much out of the bottom corners but it's okay. The snaps are Transformers. I made it adjustable because I didn't know what he might want to attach it to, or if it was too loose it might bounce around.


The chopstick case was a bit of a dilemma too. Once they were in, it wasn't tight enough to keep them flat (there were two pairs and two straws and the brush). I was worried they could slide out between the snap and the flap. My youngest had suggested a sleeve divided front and back. Too much thinking. My husband suggested sewing vertical lines to divide the sections and make them tighter. That seems to work, as long as he's not whipping it around. No hanging loop on this one because I worried that if it hung at an angle, they could still slip out (they're metal chopsticks and slippery!). I also thought, being larger, that he might not want this hanging on the outside of his backpack.

The snaps are Captain America. I don't think he's really into Transformers or Captain America, but he is taking film studies LOL.

Sunday, January 13, 2019

Delayed Reyna

When I was looking at my 2018 yarn totals and looked back at my 2017 totals, I saw  that I included the Reyna shawl in the totals. Mmmmm.  I don't recall actually blogging about it...did I even photograph it?!

We were going on a big family trip to a luxury cottage in the Muskokas, July 2017. I wanted a simple shawl pattern that would look nice with a handpainted yarn. I'm not sure where I asked for recommendations--I think on my Facebook page. "Reyna Shawl" was mentioned a couple times. It seemed simple enough.

I did no prep before we went. I didn't even wind the yarn (Araucania "Ranco Sock").

What better way to ball up a skein than with a view like this? Muskoka chairs are perfect for this.

 Less than a month later, the shawl was being blocked.


Dappled shade on a warm August day was perfect for blocking.

But I'm not thrilled. The colours are kind of muddy. If mud was purple, magenta and turquoise. Part of the issue is garter stitch when it's very short colour sections. I've worn it as a scarf with my winter coat, but that's about it. 

Roadtrip Slippers

I mentioned going on a roadtrip to Florida, with my mom, Cheryl (my brother's partner), and Nicki, her mom who is also great friends with my mom. Cheryl was doing all the driving, Nicki provided the SUV, the timeshare is from my mom. What could be from me? I could document the trip--but I wasn't in the front seat so that was tricky for road shots, and I forgot my "good" camera. I wanted to do most of the cooking but no one seemed excited for that. One thing I wanted for myself was new, lightweight slippers. I had warm slippers but figured I'd like some light slippers to keep my feet warm on the tile floor and in the hotels.  I used Stitch Upon a Time's "Midnight Slipper" pattern. Free!

One of my girls went to Fabricland with me (I think it was Megan cause we needed to fancy up her skating dress). We looked at the quilting fabrics and found this tropical sea theme. We picked out some coordinating flannels for the insides. I wanted each to be a different colour. But I only picked three colours because I didn't know if there'd be enough of the main fabric for mine, so I figured I'd just piece together something. For the soles I used a non-stretch grey sweatshirt fleece.


 I got started and clearly had enough of the main fabric for mine. But no coordinating flannel, and I didn't want to repeat a colour. I found a light turquoise fleece in my stash so I used that for the insole of mine, and the turquoise flannel for the sides and top inside. It was lighter turquoise, and a different fabric...but a couple times Nicki (who got the turquoise flannel ones that were a smidge smaller) "stole" mine. At least her feet are smaller so they didn't get stretched out :)

I also wanted to make some accessories--like a case for my new reading glasses. But didn't get to it.

They were a nice little gesture, but a little underwhelming compared to six days of driving LOL

Thursday, January 03, 2019

Blanketed in Blankets

Two more blankets for Crochet Blankets for Seniors are done. The first one was to use up the Pipsqueak that was in the donated yarn. I made the first blanket, but didn't have enough for the second one. So I found a fuzzy white yarn that was nearly a full ball and added it as well as the rest of the soft white I bought earlier this fall. I ran out of the fuzzy white....and have some Pipsqueak left now LOL.  It's stockinette with a garter stitch border all around. I did one row of the Pipsqueak and one row of the fuzzy, and they were separated by either one or two rows of the white. I just kept that random. Sometimes this meant slipping the stitches back to the start of the needle and doing two rows from the same side. You just have to keep an eye on the garter stitch side borders to make sure those stay in garter stitch, because sometimes you'll have to purl those when doing it this way. Luckily, with all the texture, you can't see when I goofed LOL.


 The Pipsqueak tended to look very ...block like. There's white, light green and dark green and the segments are small. So with only one row, there's no blending. 203gr
The other blanket is a multi yarn fiesta. A garter stitch rectangle on the bias. Lots and lots of different yarns. I actually had to stop weaving in ends because my wrist was getting inflamed. So I didn't take it with me when I went away for New Year's, and finished the ends when I got home. However, the knitting was done before New Year's, so I'm counting it for this year!


I did a  crochet border all the way around. This gives a bit more space to weave those ends in. When you only do one or two rows, there tends to be a lot of ends in close proximity. 363gr

I'm updating this post with Grayson's stocking (100gr) from 2018. For pictures, see the 2019 posts on Christmas stockings.

Yarn In:  1501gr
Yarn Out: 203gr + 363gr + 3476gr + 100gr =4 142gr
Balance: 2641gr out
Costs:  $41.39/365 days = $0.11 per day.

For a comparison of the previous six years, take a look at this post

Seven Year Totals:
Yarn In: 72 480gr
Yarn Out: 71 189gr
Balance:  1291gr IN
Costs: $2 460.89

With this year being SO low in all categories, I don't think doing seven year averages is meaningful. I think comparing this year to the past six year averages is more interesting. I still have a surplus of yarn in, even though the past three years have all had more yarn out than in (one year by only 37gr though LOL). Ohhhh did I include that last stocking I made? Mmmm.  This might all need to be recalculated.....Off to search....


Wednesday, January 02, 2019

Road Trip Dishcloths

For the recent girls only road trip I went on, I wanted a super simple project to work on. Preferably knit (so I don't lose the crochet hook somewhere in the truck), one colour, and no pattern or even measuring. I was browsing Michaels for yarn for something else, and saw a big ball of Handicrafter yarn in pretty tropical colours, very similar to the slippers I was making for everyone. I instantly thought of dishcloths. I needed new ones. I wouldn't need to actually measure anything, only the start and end of the yarn to weave in, no grafting or assembly, no pattern, I could still do it in the dark. Perfect.

I started very soon after we left my sister-in-law's house. We had planned to leave at 4:30am but instead we got out at 5:50am. Ooops. Not my fault LOL. It was still dark, but no problem. I got started and by the end of the first day, had 2 1/2 dishcloths done. Once we got to our condo I wove in the tails (I think I had five done), put it away and worked on the blanket. I picked up the dishcloths as soon as we hit the road back. At one point I couldn't find my clippers and my mom's scissors went missing so once I got to the last stitch, I didn't cut the yarn. I just pulled the ball through, then left a length, then did another slip knot and started the next one. Yes, it got a little tangly, but it was fine.

I ran out of yarn before we ran out of road. I ended up with 9 1/3 dishcloths. The ombre balls are a bit smaller than the solids, so with a solid ball you might get 10. I wouldn't have wanted these much smaller just to get a 10th cloth. Even if I did them each two rows smaller, that wouldn't have been enough to get the 10th cloth.

One tip when knitting dishcloths, especially in garter stitch, or crocheting them, is to knit them loosely. Wash them in hot water. This will shrink the yarn enough so they are still flexible, and not too dense. Making them tighter, and then having them shrink with the wash--they come out dense and this encourages mold growth since they don't dry as quickly.

This shows the difference in size and tightness between washed and unwashed.
I shared the cloths with the other ladies. I'd rather have three now and make some more in a few months, then fill my basket with 10 and get them all grungy now LOL.
I can't find the receipt. The Yarnspiration site says it's $17.49 but every colour is out of stock. The Mary Maxim site says it's $9.97 and the Michael's site doesn't even list it. So I'm going with $10. Whatev. Still brings me in at under $50 in yarn for the entire year. We won't take a look at what I spent on fabric this year, will we? LOL.


I have a couple more things to blog about from 2018:
2 girls' shorts
turquoise cardi
snowflake shirt
road trip slippers
pink/purple/white charity blanket
green/white charity blanket

Yarn In:  1161gr + 340gr= 1501gr
Yarn Out: 340gr + 3136gr = 3476gr
Balance: 1975gr out
Costs: $31.39 + $10 = $41.39/365 days = $0.11 per day.

A quick glance at my averages from the past 6 years and I bought/used/spent about 1/10 of what I normally do.