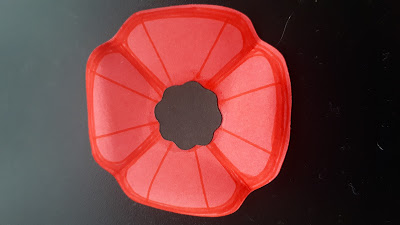
In Canada (and other Commonwealth countries), Remembrance Day is observed on November 11. It is a solemn occasion; often with cold, dreary weather appropriate to the seriousness of the day. To show our gratitude and thankfulness, Canadians wear a poppy on their left upper chest. We acquire these each year through donation boxes at work, stores, or volunteers at stores and events (such as veterans or young cadets, or other Royal Canadian Legion members. The RCL is a network of community centres for veterans). We are expected to donate each year to receive a new poppy. They are notorious for silently disappearing from our coats and shirts, and for sticking young children with the straight pins. Schools usually receive poppies to hand out but I don't know if they take donations. They also have had stickers in the past few years.
Poppies are a symbol of remembrance. They aren't intended to be used as decoration, except as applicable in events of remembrance. Poppy items are not to be sold for profit in any way. When you get a poppy through the Legion, you are not "buying" the poppy; you are donating to the Legion and the poppy is a token of appreciation. I strongly urge you to donate to your local Legion, or other veteran's centre if you make poppies with this file. I will be. If you see someone selling items on Etsy, or elsewhere, advertising that they are "donating $1 for every item sold" or "donating a set amount of profits", please be cautious and consider making your own donation directly to the Legion.
I created this simple layered poppy after some members in a Facebook Cricut group expressed an interest. Many were British, and I don't know if they have different standards about the poppy there. I had made a few layered designs and really enjoyed them, and wanted to try designing my own. Using a poppy shape was a way to get me to actually do it, instead of saying "some day". It wasn't about making a fabulous poppy; it was about learning to design. In some aspects, it's not too hard, but some parts were annoyingly challenging (getting it to import the right size into Design Space).Layered paper is obviously not suitable to be worn, though it could be laminated. It could be made in vinyl to make a sticker. That would be good for people with special needs or children who might struggle with the use and safety of a pin. Sometimes you want a poppy but the plastic ones with a pin aren't suitable. Some people are against the waste and non-renewable resources used in plastic poppies. The design could also be made larger for other uses. You can also cut just the solid red piece and the black piece for a more basic poppy. This would be good for teachers who are having their students make wreaths or items for ceremonies.
The poppy has 3 red layers, though I cut mine with the top 12 spoke layer in the same red as the solid bottom layer. The middle 4 spoke layer is in a darker red. Each layer is smaller by only a very tiny amount! It's intended to add a bit of depth, a shadow effect. You could skip the 4 spoke layer as they are tricky to line up accurately.
I cut the top layer using Intricate Cuts for Cardstock (Cricut Design Space, using the Maker). The design is not symmetrical, so I recommend you carefully lay the pieces out with the same orientation as they come off the mats. I am very much still a beginner at designing and using Inkscape! I used spray adhesive, no foam dots to make the layers elevated. I also curled the edges under a little, around the dental pick I use for weeding vinyl, and pressed the middle inwards. It's hard to make paper replicate what plastic can do when it's being molded while hot.
Please share with me if you make this poppy. You can email me at tracykm at yahoo dot com, or find me in various Facebook groups (as Tracy Kyla). I'm also on Instagram at tracykmvetzal. You can also comment here. And again, do not sell items made with this poppy.
Edited to add:
I made a large poppy for my front door. Sized for 8.5"x11" cardstock.
Lest We Forget


No comments:
Post a Comment