I have a niece who's 12, and quite fashion conscious. Slouchy hats are 'in' this year, and she loves orange and bright colours. I didn't really have any orange yarn that I felt would make a good hat for her, especially after seeing the tam pattern Diana Sullivan posted. I stopped into my LYS for the first time since we moved here (I was able to hold off for 15 months!), and found some Berroco Sox Metallic that I thought would fit the bill. My only problems were finding the time--I had gifts to make that had to be mailed, and I had a long list of gifts I wanted to make that didn't have to be mailed....LOL. Plus I wanted the hat a little slouchier than what Diana's seemed to be. Although I've read of people on the Yahoo lists making this hat, there aren't too many pictures or blog posts about it. I didn't have much to go on to figure it out.
I don't recall exactly what I did with my first effort....but it resulted in many more rows than the original pattern, which meant when I joined it to the ribbed band, it was very pouffy (lets not go into how on the first try of joining it, I made a math mistake and had to redo it!). It looked more like a wool shower cap than a slouchy hat.
For the second try, I loosened up the tension, and cast on 50st instead of the 45 in the pattern. To work these extra 5 sts into the short rowing and keep the same number of rows per wedge as Diana's pattern, I put a needle into work about every 10 rows, when the carriage was on the left (the pattern has you put the needles into work while the carriage is on the right, and as you do that every time the carriage is on the right, the extra sts have to be worked while COL, or I guess you could put two sts into work every 10 rows when COR....).
I kept the original ribbed band and re-hung it. I had figured out that there were about 33 ribbed stitches per wedge, so I'd pull forward 33 st and hang one wedge. I did the joining and took it off the machine. It still seemed a little pouffy, but I hoped steam would help.
 I think the above is the pre-steamed picture. I tried using a dinner plate, but mine were too small. I used a platter, and it was still a little small. I steamed it as much as I could on the platter, then put it on the head. I think I should have let it cool before moving it though, as I think the ribbing got stretched going over the platter as I took it off.
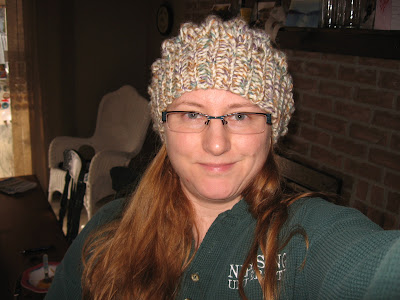
 It smoothed out quite a bit. I think using a looser tension helped to not get quite a sharp edge to the tam that you can see in others' pictures.
 I am not a great hat model, and my hair was all pulled up. It's not quite as orange as I would have liked, but I had showed her the failed first attempt, and she did like the yarn...how could she not--it has metallic glitter in it, LOL!
I haven't gotten it to her yet, I was hoping to get something else made with the leftover yarn. Diana says the tam takes just a smidge under 50gr, but this one took 62gr. That doesn't leave me enough to make fingerless gloves, but I have a few ideas...
(More details are on my Ravelry page).
 We gave my son Roxio Creator Pro to "play" with photos and videos for Christmas, and I tried it out with this photo. It has a dedicated "blemish remover" and a "wrinkle remover" too! The caption reads "Does this hat make me look like a 'shroom?" LOL!
 Mmmm. The colour is much lighter and clearer and brighter in life, not like pea soup on my monitor.
 Marg is the creator of a very popular circular knit dishcloth, and to thank her, I knit a couple of her dishcloths for a gift--I figure she's either sick of knitting them herself, or knits so many for others that she never gets any for herself (I've shown them on here before, they're quite pretty!).
 I could pretty much use what ever pattern of ribber needles that I wanted to--the more I had, the wider the fabric, however, it did seem that placing them in different spots relative to the out of work needles gave different widths too.
 But stretched out with the weights...It's rather neat. This is now the backdrop on my computer, LOL. Of course, it doesn't stay this taut once off the machine and washed.
 This is the needle set up I ended up with, I used T10 and I think needles 90L-90R, or at least 85-85. I was concerned about going all the way to the ends of the bed; I don't have extension rails.
  Because it's every other needle tucking, it didn't matter which needles were sent out of work, as long as it was at least two. I did keep track of the rows, but unfortunately forgot to look at the counter before starting the next project. It was at least 500 I think. I think I weighed it, but again, I don't have the info. It turned into a huge, fluffy, frothy, cotton candy squishy piece of fabric. I would have liked it wider, but I was also limited by the fact I had to mail it!

 Here, you can see, sort of, how the outer stitches that were increased, are pulled around and joined in the middle, not joined by the outer edges. If that step was too confusing, feel free to just rib those 10 st on each side separately (and
  To finish off the top, and the thumb, I used the "Smiles and Frowns" cast off from Diana Sullivan's Ribber Course videos. If you haven't seen those, you should, they are awesome.