Showing posts with label Paper Craft. Show all posts

Sunday, January 02, 2022

It's A New Year, Supposedly

 I see I haven't posted in a long time. What have I been doing? Working. Nearly full time this year as there is a shortage of supply (substitute) teachers. I do very little knitting. In the last post I mentioned the Handicrafter Cotton yarn I bought; I'm still knitting dishcloths with it. Thought I might finish it off before the end of the year, but no. If I sit and watch TV  and knit for the evening, my hands are too sore the next day. I also still have the tiny newborn hats I'm working on. I haven't done any sewing, but I am getting things out today because 1) my mom mentioned she's been using the Boxerwears I had made for Dad as pajamas, so I want to make her some of the woman's version 2) I want to make some for myself 3) I saw some snowflake fabric in my stash 4) I'd love some more Sunset Loungers as one pair seems to be missing (did I leave them when I visited my mom?), and one pair has faded and one pair was not a great fabric choice and 4) Megan asked for another Lovesick Bra. Of course, that's what I'm going to work on first LOL.

I have been doing a lot of digital drawing on Procreate, check out my Instagram for that. I've gotten the Cricut out again. Thought I had shared the card Megan made me make for her gym teacher. Apparently not, so here it is:

It's Print Then Cut, layered onto a few layers; the Thank You is cut from the black, the green is the full card and the black is glued on the front (there was a cut line instead of a score line and I ended up with separate fronts and backs, didn't use the back). I wanted to cut a window in the front and glue the logo to the inside, but Megan said no. Next time, I think I would do the printing on the sticker paper I have, or maybe onto photo paper for a glossy look (I have TONS of 4x6 photo paper; I just got printable vinyl sticker paper and I'm not going to use that for it!). Her classmates thought she bought it from the school office, so that's a compliment!

I made this gorgeous wreath, from Sweet Red Poppy
I did not have to buy anything except the wreath frame. 
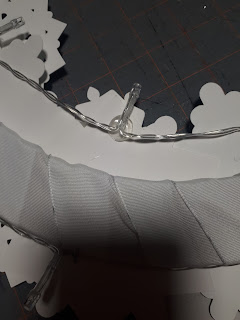
It lights up with little LED lights from Giant Tiger. They are battery operated and have a built in 6 hour timer. They were already in one of my house plants, so I didn't actually buy them for this project LOL. 
The wreath frame is a chipboard frame from the fake floral section of Dollarama. I had originally bought a gold tinsel wreath from there, but the family actually liked it and wouldn't let me dissect it!
The lights are pinned to the outer edge with T pins, and secured to the inner edge with ZOTS 3D Dots. 
I might have gotten carried away. The instructions tell you to duplicate the 4 snowflakes so you have 5", 4" and 3" snowflakes. The original wreath I was going to use was curved (domed?) so I worried that the snowflakes would be too big to follow the curve. I duplicated and shrunk them down to 2" snowflakes as well. I also was trying to use up paper, and conserve paper, and I moved things around a lot from mat to mat and in the end, there were so many snowflake parts that I had to figure out how they all went together. Luckily, each layer (of each design) is different, so it's not like the inner layer of the 5" snowflake is the same as the outer layer of the 4" snowflake. After matching everything up, I had a few extra layers of each size/design, so I cut some individual layers to make more complete snowflakes. In the end, I used 12 5", 8 4", 7 3" and 5 2". I had about 8-10 left. I cut lengths of yarn, glued it to a ribbon, and made a sort of garland to go across a window that has no curtain. I used the ZOTS to secure it, but alas, it kept falling down. I ended up laying the ribbon on my fireplace mantel, placing the mantel decorations over it to hold it down, and letting the snowflakes hang in front of the fireplace. It looks nice when the ceiling fan is on!

Then I had to make a card for my niece. I had been drawing these characters following Genevieve's Design Studio on YouTube. I made their accessories in Queen's University Tricolours (I found a website that gave the hexidecimal codes for the colours!). My niece goes to a private school. I looked up their colours and found out their mascot is a polar bear, so I used the polar bear I had already done. How awesome! Because you use layers for the different parts, I could easily change the sweater, hat and scarf!

I had only two pieces of white cardstock though. I went ahead and printed the card. 
It printed streaky! And the "white" cardstock didn't look all that white (card on the right). I checked the settings, I cleaned the nozzles, tried again...still streaky. I kept cleaning the nozzles and running the test print. It started to get worse! The cyan eventually completely disappeared! I did one more clean, it came back, I did a test print, it was almost perfect. Tried printing the card, not quite there. One more cleaning...but now I had to go to Wal-Mart, at like, 8:30pm in the drizzly rain, to get more white cardstock. Not a lot of options! Managed to find some though, and printed one more card. 

I managed to get a smudge on the front! I was NOT printing again though. I liked the card, but to me, it was lacking something. The dull cardstock soaks up the ink, and it loses some details. It's not smooth like a commercial card. I did find at Staples later they had "card" paper. I tried to stick my finger in the package, and it did feel smoother. However, it's 8.5"x11" paper, perforated to make two cards. This card I made, I used a free template from Genevieve's Design Studio (and her YouTube tutorial) to make a card closer in size to a "standard" commercial card. 

This also meant I had to make an envelope, and this size card needs a 12x12" piece of cardstock to make the envelope. I used my envelope making tool I bought from a friend that sells Stamping Up! stuff. I love it! I used it to create an envelope for the Gator card too. 

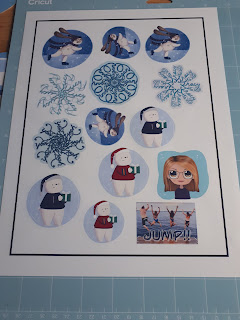
I also made some stickers, but still only had the printable sticker paper. They looked good though. I printed them, then put clear vinyl (Dollarama "book cover" vinyl) on, then cut.

 OMG. I hadn't created a white background behind the first few polar bears, and didn't realize how jagged the edges were. It took about an hour to cut the first one! I paused it a few times to clean the blade, then I just raised the blade up so it wasn't cutting. I wanted to just give up on the bears and have the other items, with white borders, cut out. I had flattened the whole page though. Eventually I did stop it, cancelled the cut, and went back to the canvas. It allowed me to "Unflatten" the page, and I was able to delete the two stickers it had mangled. But then, when I went to make it, set it all up, loaded the mat...it never moved on to the start option! I gave up and hand cut them. 

I used the polar bear to seal the envelope, and the Nya one for the front (I also glued on a gem). I included the other stickers in the card. 

My sticker vinyl came and I got to work. I had made a sticker sheet in Procreate using my artworks, back in the summer...but now that I had the proper stuff, those old artworks just weren't exciting me. I got to work making new stickers. 

It's Koala Printable Vinyl Sticker Paper, Glossy. It's about $20Cdn, for 20 sheets, with free Prime shipping. So about $1 a sheet, not including tax. Seems like a lot, but I got 14 stickers on one page, and if I had some smaller art ready to go, I could have filled in a few spots. 

I LOVE it. The colours are so rich and glossy! It cut so smooth! I didn't flatten this time, but did attach. Some had white borders and I carefully checked them when I imported. I used bleed on, and printed on "premium photo paper, glossy" setting. To cut, I used "Printable Vinyl" as the material, and the default pressure, and it made perfect "kiss cut" stickers!
When I did the alteration to the polar bear, I forgot to do the outline changes on a new layer. And then I forgot to re-adjust the outline back to the red. He's still cute!

I had a bit of space left, so I did this photo I had altered from a cottage vacation, and the cartoon of my SIL, I had made it following an Art with Flo tutorial (I'm pretty sure). I've got some more designs in the works. 

I hadn't really intended to write all this. I was just stopping by to write about the yarn donation I made to a local lady that makes "nests" for a wildlife refuge! 
A great way to get rid of some variegated leftovers, and other small balls that won't play nicely with other yarns when I make the blankets for seniors! I gave away 1053gr! So I have to add that to my totals. Also, in November, I was contacted by a woman who I had made Christmas stockings for. She had another baby and wanted a new stocking. She was really understanding when I said I couldn't do it for this Christmas, so I'll be making it for 2022. I rarely even go to my FB "Business" page, but FB sent me an email of the message, thankfully. I've got to buy yarn for that. Oh, hope I didn't give away any of the small amounts I used for the design! I had kept all that stuff separate, but I kind of forgot about it over the past two years and integrated the yarns back into the stash. New year, new challenges!

Yarn In:  3109gr
Yarn Out:  1053gr + 4586gr =  5369gr
Balance: 2530 gr more OUT than in
Cost:   $44.66, 365 days, $0.12/day

My last post said $0.05/day. Not sure how...that should have been $0.15/day!


Tuesday, December 15, 2020

You Can't Catch Me!

 It was feeling like every time I turned around, Gjoa at Special Heart Studio had another awesome design I wanted to do. Let alone trying to do ones from before I even got the Cricut, I couldn't keep up with her current designs! This one was no exception! I knew I needed it from the moment I saw it!

I made a special trip into Michaels' to get brown cardstock. Amazingly, they had a variety pack of brown! However, despite the two dark colours looking different in the package, they were really similar once cut out.

I thought about maybe doing the back in black instead, but someone mentioned burnt cookies... I really wanted to get some textured or glittery papers to make more (but sadly, have not).

As soon as I saw these guys on her website, I knew I wanted to see if I could alter it so it looked like a bite was taken out. My friend Cherie, owns a great boutique, Beadle, and years ago sold adorable felt gingerbread men with a nibble from their arm/feet. They were so cute, I wanted paper versions. 

It took some figuring out, but I managed to do it!! I couldn't just cut off chunks from the arm. There is a border on the pieces to give a smooth edge. 

I did a different combination of papers this time. He's more subtle. I like them all! The girl one came with the original file. It was a great reason to buy some more pens that would work in the Cricut. I bought Staedtler Triplus Fineliners at Wal-Mart. Of course, I'm seeing them cheaper and in bigger sets, everywhere now that it's closer to Christmas. I did have to wrap painter's tape around the pen to get it to stay in the clamp. And, apparently I missed the step about attaching the draw layer to the piece it draws on to. 

Look at the detail These guys have only two layers with the overall design, but it's enough to be really effective.

I still smile every time I see this! LOL! He's so cute!

Look at that nibble! Poor guy! LOL! Changing the smile to a frown would have been too much with this file, but I think he's fine with a smile. I'm so glad I got these done early. I wanted to do more, but I just haven't had time. There's always something new to make!!


Crafty Hallowe'en

 I don't normally do a lot for Hallowe'en. I do really enjoy it, but the weather starts to get crappy here around then and I've never done any crafting for it. We don't have a party or anything, so why bother? I have made pumpkin hats and costumes in the past though.

But now that I have the Cricut, I knew I had to do some creating! All of a sudden, I started seeing layered pumpkin projects, and other projects! My favourites again, were from Special Heart Studio!

This adorable "peach" was removed from the top layer!

I kind of felt this yellow layer was a little too bright. However, something weird happened with my Cricut, and when I cut the bottom green layer, it cut another top layer!

It was an interesting look. Not quite what I wanted, so I put my last sheet of green in and tried to cut another bottom layer.

Something messed up again! When I looked at the computer, it was showing both mats as being cut at the same time! Now I had TWO green top layers!

I snipped apart one of the green top layers and added a few green accents. Also cut the center piece in another shade of orange to reduce the amount of yellow showing. For the leaf, I used the contour function and made a solid leaf, cut in another shade of green.

I found some orange rick rack in my sewing desk, stuck a 3M Command hook on my front door, and Bam! Hallowe'en 2020 taken care of. 

But what to do with the green piece left over? It reminded me of an acorn squash--a favourite fall veggie growing up. I thought I had lots of green paper, but no. Needed another trip to Michaels. This time I cut the thin piece representing the crevices in orange. You know how squash get a bit of orange on them. It was too bright, so I found my only stamping inkpad left, which just happened to be green, and toned it down a bit. 

Rob and I made a surprise visit to my mom's on Thanksgiving (October here) and I gave it to her for her front door. A little unconventional, but I think it was adorable. 


Monday, December 14, 2020

Perfect New House Gift

 Right when I was working on the letters from the previous post,  Special Heart Studio came out with another awesome project I HAD to make. What perfect timing!

Whenever I take a paper project off the mat, I always admire the leftover bits. Sometimes there are shapes that are worth keeping but not really this time.


I messed up the colours of the layers again, but it's okay. This was the first time using the Cricut pen since the original test project. I was really impressed and this prompted me to do more "Draw" projects.

Simple and sweet, a perfect little housewarming gift. One group member showed that in the heart, she had done a sketch of a house (for other new homeowners). I was going to do that but didn't have a picture of their house. 

I can't recommend Special Heart Studio's projects enough. She has so many designs! And they're all free. I have been learning how to design this type of project now, rather than just the letters that I had done. It's not terribly hard, though of course, I can always make it harder than it needs to be LOL.


Layered Letters

 I had surgery last week, so I'm on couch-rest and getting caught up with blogging. Lots to show in the Cricut area of my life!

My brother and his partner finally bought their first house. Like many in their 30s, they struggled in the inflated housing market of southern Ontario. COVID was actually a blessing for them--with my SIL working from home, they were saving on commuting costs (and no more lunch time distractions in the big city LOL). On top of that, they were able to find a fixer-upper in the countryside that had the renos stopped because the owners were out of money due to COVID. It was exactly what they were looking for (although I'm sure my brother would have liked a bigger garage/workshop!). 

They were going to be renovating, so they didn't really have a colour scheme or styling in mind yet. I thought I would make these in shades of grey, since that's the hot colour in home decor, but I didn't like the pack of assorted grey paper. Megan felt these beachy colours were subtle and modern

I used the Zengo font again, and Inkscape. I am definitely getting better at this, though I was in a bit of a rush and I didn't smooth out some of the areas of the outline. 

I was having trouble keeping the layers flat. A letter like this is not an easy one to start with, and I have developed some tips to make it easier. Stay tuned for that post.

You can see how the inside curve of the C is not smooth. I also had trouble at the top of the C, getting the gold flat. The gold cardstock feels thicker, even though it was in the package with the rest (Recollections brand, one of their theme packs).


Another shot of those bumpy edges. 

I had trouble gluing the gold. Trying to re-align it caused creasing. I didn't use foam tabs for the gold layer, I used spray glue.


For the "&" I used a font I had already that had a bit of design to it instead of a solid character. Then I made a couple offset layers. I didn't add the gold layer (read on to find out why). I hadn't intended to have the pale blue as the top layer, but well, these things happen. I made the easels from the incredible website, Special Heart Studio. You'll be seeing more designs from Gjoa here! She really inspires me! The easel fit the M and the & well, but not the C. I made a few adjustments and it's better, but not as good as I'd like. I did the easels because I didn't want to invest in frames that they might not like. Cheryl says she'll probably frame them once they're done renovating. 

And now. It wouldn't be a TracyKM project, without an issue, the True Tracy Way. And boy, did I have an issue. I cut the layers of the C first, then went on to the M. I don't remember what order they were being cut in, but on the gold layer, the Maker SHUT DOWN MID-CUT. Yes. OMG. It powered off, blade down in the cardstock. It would not turn on again! The power cord had power. An error message appeared, it didn't help. I Googled, I YouTubed, I silently wept. Searched the Cricut FAQs and Troubleshooting. Finally another error message showed up and I followed the link. 

Apparently, using foil cardstock can cause static if the air is too dry, and the machine stops!!!!!!! 

The fix is to mist the air around the machine. Done. And... still no go. 

This was on a Friday night. I sent a message off to Cricut. And turned off the lights and left the room.

On Monday, I thought, let's just try again. I misted again, and pressed power. And it came to life! I had previously yanked the mat out so I worried about the rollers, but it seemed fine. I cut the gold layer again, said a silent blessing and got to assembling.

Last week in a Facebook Cricut group, a member posted that they were having trouble with their machine just shutting off mid cut and Cricut wasn't listening to them and helping.  I noticed it looked like foil cardstock. I shared my experience, and indeed, that was what was happening. She had even told the Cricut agent that it was foil cardstock! I wonder how many other times this happens!! 


Sunday, November 08, 2020

Layered Letters


As I mentioned in my post about my initial papercrafts with the Cricut Maker, I learned about 3D layered paper projects and was instantly hooked. When I first got the Maker, and started looking at designs available, I was not too inspired. Many designs seem to be really fussy to me. Multiple fonts used in one design, florals and flourishes, hearts galore. I don't do a lot of decorating (because Rob is so fussy on how things are hung on the walls), my budget is small, so I don't buy a lot of knick knack dollarstore items that I could customize, etc. 

Then I learned about 3D layered art! I watched many videos about mandalas and I loved them, but they were still a little too "decorative". Through YouTube's "Suggested Videos", I came across PattyAnn's Place's video on doing a single letter. Oh boy! I had learned enough that I thought I could do this in Inkscape. 


Of course, the first one I try is an M, for our last name! 

It's only 4 layers, but how much fun that can be? I just picked 3 colours from a pack of themed paper from Recollections. The 4th colour is the top black layer. Each layer is elevated  by foam double sided squares, except the top, which is glued to the layer beneath. It could probably have been raised too, if I had the tiniest foam dots. 
One thing I didn't like was the file had some edges that weren't very smooth. See towards the bottom of the picture? It's a free font though, so if I want it smooth, I can do that myself. I couldn't back in August, but I think I can now. 

While at the cottage this summer, I had wanted to watch lots of Inkscape tutorials. I couldn't though because the wifi wasn't very good. I could, however, use Inkscape without wifi. I started playing with L, for Lucy. I wanted to do it Tricolour (Queen's University).

This one, she deemed too red.


This one is too blue. We realized whatever colour is on top is going to dominate, and for Tricolour, none can dominate. So we went with black on top.

There are 5 layers. I needed someway to show case this in her "dorm room" (Hugh's bedroom that became a guestroom got a makeover and a new desk and she uses it for her online university classes). I found the free easel file at an incredible website, "Special Heart Studio".
That website is incredible. So many free layered designs!! There are a lot I want to make, and she keeps creating more!! If you're on Facebook, join her group. It's very helpful.

I decided to try one for Nya, in her school colours for her dorm room. The N looked good at first, but when I did the first offset (in the grey), some of the areas filled in totally. My personal assistant didn't know what might have happened. Sometimes Inkscape holds on to "artifacts"--nodes that didn't get removed before saving, but didn't show up (on a hidden layer, or just very tiny). I'm not sure I have the skills to fix this. The font (Zengo) is free, so I can't complain. I will try again using her last initial. Or find another free alphabet.

I had to pay the little girl that did Megan's papers while we were away. I made the envelope with her name cut out. What I didn't realize was that there were score lines in the file that needed to be changed from cut to score. So, it cut the front out of the envelope and each flap for the back was separate. I took that front piece, covered it with clear book protector film (from Dollarama--a cheap option to transfer tape) and essentially laminated it. I told her it was a magical bookmark to remind her that mistakes can become something wonderful. She was so excited by that! More than the money!

For her card, I shrank the L down, and did just three layers--the solid dark pink, the light pink with the scrolls cut out, and the gold. 


Stuck it to a card (cardstock folded) and there you go! Personalized card! I think I'll make one up for someone else in my family that needs a card right now. 

I have another layered letter project to share, but it deserves its own post.