Showing posts with label swimsuit. Show all posts

Sunday, October 31, 2021

A Little Bit of This, A Little Bit of That

 Work (supply [substitute] teaching) has been crazy busy. I don't get any time to sew, and only bits of time to knit. And not much left over to blog! So I'm combining a few things here today because who knows when I'll get to blog again.

These three bikini bottoms are all I have sewn (other than repairs) since....summer 2020? I don't even remember. 


Top was the first one. I couldn't decide on black or brown for my first pair. Opted for brown because I did have some RTW black bottoms, I just didn't like their fit. I wasn't sure on the waist band but compared to the other two, I think I prefer it. I used the Scrundlewear underwear pattern with my modifications. I didn't add leg bands, just folded back with elastic. They seem cheekier than my underwear! Much cheekier than my one piece suits! The bottom right are a reversible pair. There's no waist band, or any elastic. Theoretically these sew up very quickly, but realistically, nothing in my life is quick, except time. The left pair is hot pink and leopard neon print, reversible. I think I'm going to open them up and add some elastic to the front waist. They kind of puff out in the hot tub. 


More tiny hats for the hospital. I found a third. They are baby blue Bernat Lollipop Sparkle. I used a lot of that yarn (mostly in white) twenty years ago. Very nostalgic. The mitts are not that dark in real life. So, you see, I'm really not knitting a lot. I'm not watching TV much in the evenings anymore.


I did buy some dishcloth cotton when I was visiting my mom in her small town after Canadian Thanksgiving. We didn't go on a trip this summer, so I never made my vacation keepsake dishcloths. My older ones are starting to look pretty grungy. Staying at my mom's for 3 days was my holiday, and I figured it might be easier to get the yarn up there since all the stores down here have stock issues. Not a big colour selection. I'm almost 20 ridges (40 rows) into the first dishcloth. Slow going. 

What does keep me busy is making art on my iPad Mini, using the Procreate app. If you're interested in that, I'm on Instagram, tracykmvetzal and my account is public. 

Yarn In:  340gr + 2769gr = 3109gr
Yarn Out:  60gr + 4526gr = 4586gr
Balance: 1477 gr more OUT than in
Cost:  $14.66 + $30 = $44.66, 304 days, $0.05/day

Friday, September 06, 2019

Water Socks!

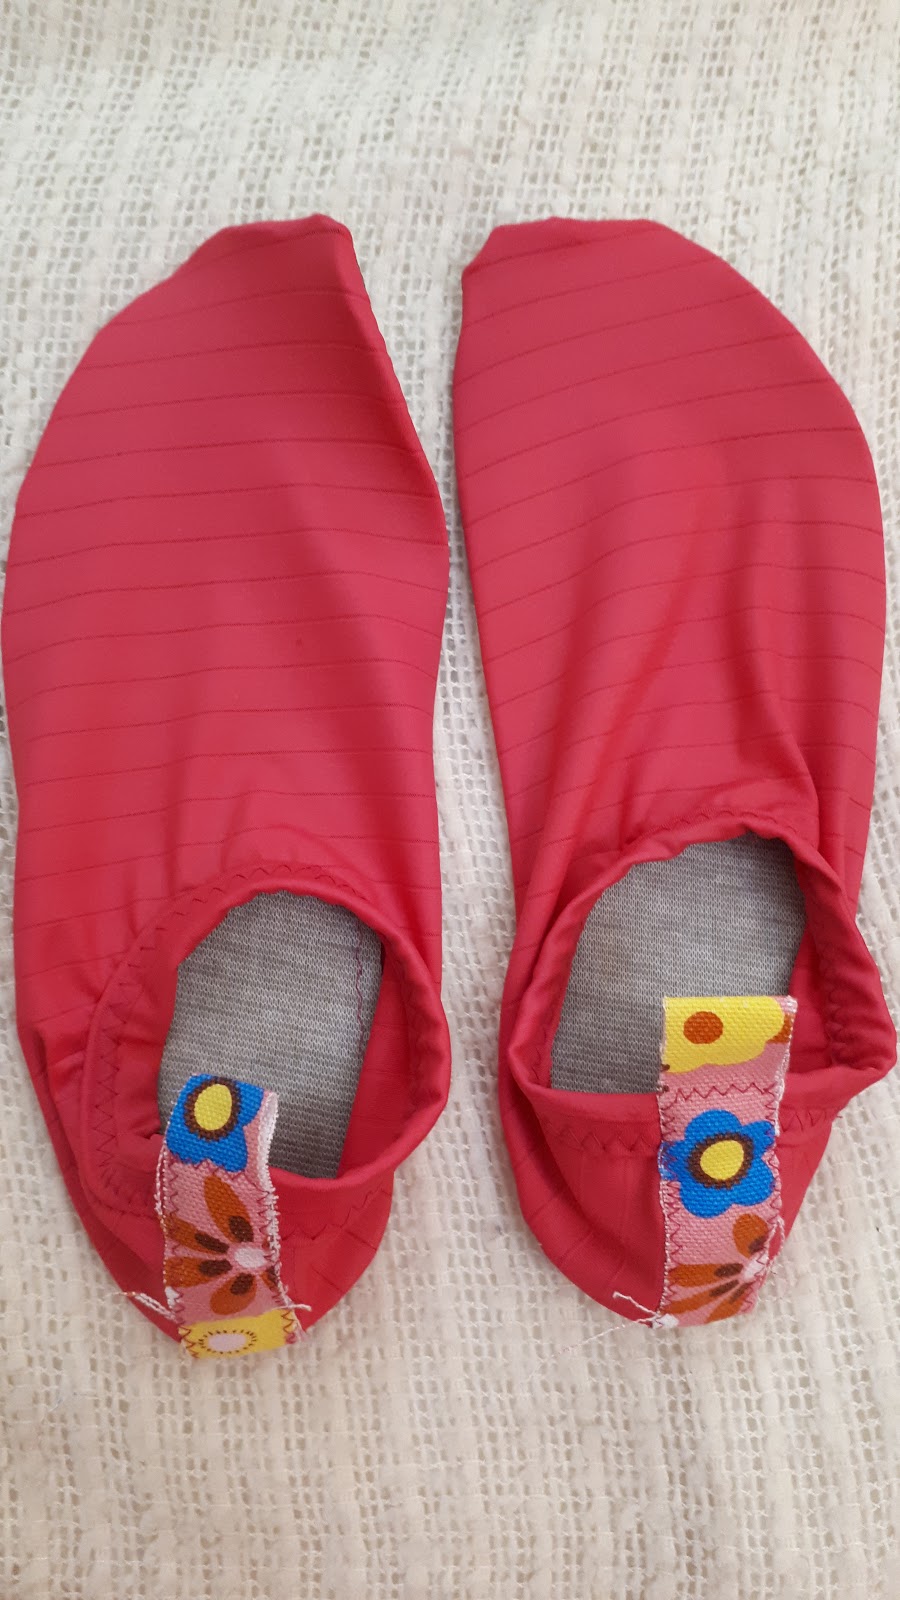
So, we're going on a cruise. Yup. Taking our two girls and my mom! Her first cruise!! Exciting! One item you often see recommended to take are water shoes. Many excursions involve water, and although the beaches are usually beautiful sand, you never know what lurks beneath. I also frequently hurt my feet and hate strange things touching my feet in the water LOL. One day on Facebook, there was an ad for these water slippers. They had thin soles, unlike most water shoes that have thick plastic soles. While those do have good traction and protection, they are heavy and we're trying to pack light.

So I looked at the slipper pattern I use and thought maybe I could just make them smaller with swim fabric. But I didn't think the style would be the most secure in the water. I searched and searched online to find something like what was in the ad.

I finally found these Skin Splashy Shoes. Seemed simple enough. I bought the pattern. I had already ordered the Tough Tek from The Fabric Snob (I'm on a new 2-in-1 tablet so linking is still a challenge). I cut out my size. For the bias banding I just cut a strip of the swim fabric to fold over the top.

 For the ankle band, you were to use woven fabric but  I couldn't figure what to use so  I used some interfacing. I didn't stick well and you can kind of see it.

It should have been difficult to put together, but of course I had some issues. And when I tried them on, they were too pointy at the toes and wide around the ankle. The opening wasn't snug either. So I resewed a few spots, took off some of the opening binding and stretched it tighter. I think I ended up making them a bit too small for me though. So I had my mom try them on and she was happy with them.
She does aqua-fit so these will also be good for that.

So I had to make another pair for myself. This time I didn't trim the toes as much. For the opening binding, I made wider trim and stitched down like bias binding, then folded it over and stitched from the right side. The inside wasn't folded in again, so I trimmed it close the stitching. Also on both pairs, I trimmed the front of the band back to the zig zags. I had to shorten the strip quite a bit more than what the pattern said it should be.  For the strap, I used some printed pink canvas. 
At the end of June I sprained my left ankle. You can see the swelling on the top of my foot. And this was seven weeks later.


I didn't make the foam insoles for either pair. I tested them in the hot tub, putting my feet right up to the jets, to see if they would slip off. They stayed on. Yes, it might be odd to be on a beach with my mommy and have matching water slippers, but I don't care. My comfort and safety is more important!   Oh, and Lucy has a bikini in this fabric LOL. Bring on the rocky shores of the Caribbean!

Tuesday, May 21, 2019

Swim Suit

Last year when I bought the coverall pattern for my husband, I decided to pick up a swim suit pattern or two (I'm sure I bought three patterns...what was the third one? The only other Kwik sew pattern I seem to have is for a bra. I thought I bought that a long time ago. Maybe I only bought two patterns). One of the first three bathing suits I made for myself is nearly dead (it's just for our hot tub now), and although I made some bikinis and a one piece for our last cruise (Oct 2017), I decided it was time for a new suit. I've seen some awesome fabric online that I wanted to get so I need to muslin a new pattern. Looking at that link, I'd say both these suits are dead. I've been wearing the floral one lately; I think the other one died a while ago. I'm not sure it was actually swim suit material.

This pattern is Kwik Sew 4182. Since buying this pattern, I have really dived (LOL) into independent designers but I went with this one because I had it and our printer is dead. Today, on my Facebook "Memories", I complained 7 years ago that there weren't very many swim suit patterns on etsy for young girls. Well, this has all changed with the explosion of independent designers! As long as you have a printer, you never need to buy a "Big 4" pattern again.

I opted for the tankini, View A, with regular straps. Maybe if I get the fit right, I could wear a halter neck, but it always pulls on my neck. Swim suit fabric is stretchy, so the weight of my bosom pulls the strap down. I felt the legs on View A were lower cut than on View B, but they use the same pieces. I'm pretty sure they are lower than my original suits. I do prefer a higher cut.

I couldn't figure out why the bottoms looked so huge. I know I've put on weight in my bust and belly, but not my butt! Then I realized I cut them on a fold, instead of just doubled. So they are essentially 5/8"+5/8" too big. Phew. 
I shortened the bodice a smidge, but I didn't take too much off because I wanted to make sure it was long enough to cover my belly. I didn't do a proper FBA, but graded out at the top edge to an XL and I think I made a new size, XXL, for the bust. I had originally thought about turning the lining into a shelf bra, with some elastic, but I realized that I had no idea where to do that on the lining piece!! In the end, I think it's fine without it. 


I had such a hard time getting the front piece sewn to the lining at the bust, where the elastic shirring is. I could manage to get it lined up, but the very top end wasn't getting gathered and it was a hot mess. Ripping it out a few times made a little hole in the lining. 


Argh. I sewed this so many times. Finally just left it.

I know that without the top elastic and straps, it's near impossible to get an accurate fit. I could see that the top edge was too long. Elastic will bring it in, but you don't want it gathered. 

It also felt a bit snug across my middle. 

 Adding the elastic and the straps did help a lot. However, I think because the rouching didn't go high enough, the top edge is a bit high and has funny wrinkles instead of gathers. I could probably gather it better with some hand stitching. I did open up the elastic and made it quite a bit tighter across the front top which helped with that floppy dip at the center. I don't think I have a finished picture.

When I tried the bottoms on without the top elastic, I could tell they were too short for me. I like bottoms that go up to my natural waist, which is quite high, at my belly button. Otherwise, they just fall off, no matter what I try. So I cut a wide piece for a band. I wanted elastic in it. But how to add the elastic at the top fold and keep it straight while sewing it all together...I didn't think I could stitch it down straight, didn't know if I wanted the stitching to show, thought I could stitch it on the wrong side.  Lined it up several times, yet somehow when I sewed the band to the bottoms the stitching ended up on the right side...I just picked it out. The elastic doesn't stay quite at the top of the fold. I think next time, if I had to do this, I'd cut an outside and an inside to the band and put the elastic in the seam allowance at the top. But that would mean a bit more bulk. It probably doesn't need the elastic, but it makes me feel better.

I don't have a finished picture. The bottoms are a bit loose, even though I already unpicked the bum elastic once and re-sewed it. I made a XL front and a L back for the bottoms. I first used a piece of elastic halfway between the lengths given for L and XL. I have a tiny tush. The rouching on the top tends to sag.

In the end, I don't think this will work for the fabric I want to buy. The gathers mean much of the pattern is smooshed up. I think for the new fabric I will need a smooth front suit. Yikes. I do have one but I don't wear it much. Patterns For Pirates just came out with Minute Maillot and I love the high legs on that one, so perhaps if I lower the back, raise the leg holes, add the contrast bust band, and with the optical illusion of the print, it should look better than that blue blob :)


Thursday, March 29, 2018

Swimsuits!

I needed new swimsuits for the cruise. And I decided, since the average age on this cruise would be about 65, that I would give a bikini a shot again. First I made a one piece using my standard pattern. The colour is rather bland, though quite shiny. I used turquoise thread for the top stitching.
 I sent this to my husband and asked if he still thought the brown was boring. LOL. I don't seem to have a whole body picture. But it's Kwik Sew 3779, the same as these ones. I think I still need to add to the lower width and figure out a straighter curve for the centre edges. And why does it pull funny along the elastic?
 I made some adjustments to the cup portion of the pattern for the bikinis.
 When your beer matches your fabric...
 I learned how to make the fabric covered elastic straps from Ohhh Lulu! The part on the straps is partway through this video though I used info from the other parts too.
 Does this pillow make me look frumpy?


 And yes, I had a bit of an incident with slippage. Luckily it wasn't at the main pool!

 Next, I wanted to replicate a reversible bikini top I saw online, but I had a few other tweaks.
 I couldn't get the lower band to sew on straight so I eventually hand basted it.
 I loved how it was looking, but it just didn't work out. The straight tops across the cups wouldn't lay flat on me (the model had been much smaller and therefor the binding/straps were closer together). I don't have enough height in my bodice to make all the angles work properly.
 I did some fudging, adding the little pink ruffle and an upper portion, gave up on the reversible idea.

Still cute, right? I know I wore it on the cruise, but I don't see a picture.

I thought I had made another top, but maybe not. Even though it was a 10 day cruise, we didn't swim much. The pools were really cold when we got onboard, and the adult only Solarium pool never warmed up.

Wednesday, November 08, 2017

Lovesick Bra

When I first heard of this pattern, I knew I had to make it. I wish I could even remember where I heard of it! You know how it goes on the internet....one interesting site leads to another.... I wasn't totally happy with the free lace one at So Sew Easy and didn't want to fuss with it to get it my size. The lace one I made Lucy--oh wait, I haven't blogged it yet! You can see it on instagram. I know it's going to take a couple tries to get the right size. And I really wanted something simple and cool for the cruise. I thought this bra would make a good bikini pattern, so that was my "muslin".

 I used this fabric which was sold as swimsuit fabric but feels like cotton lycra. I loved the bikini I made for Lucy with it. I made the DD/E cup and the L(12) band. I scooped the back lower, but I didn't think about the fact I should make the straps longer. Usually straps are too long on me, but this time they were too short. It's not bad though--it just makes the back pull up where they attach, rather than a nice smooth line. I used the video tutorial from Ohhh LuLu! for the straps. I used swimsuit lining for the inside.
 The front centre seam does not lay flat and a small discussion on the George & Ginger FB group didn't really help to clear up whether it should or not. I kept oscillating between needing a larger cup, or needing it smaller at that seam. I didn't think either was right. I felt I clearly needed all the volume the cup gave, and maybe even more to wrap around the inside of the breast to meet at my breastbone. But I didn't know if that would fix it, or if it would still sit away from my chest.
I finally decided to curve that centre seam inwards towards the top of the cups, adding 1/4" to the bottom of the cups and almost 1/2" to the top edge between the centre and the strap part. I found on the first one, the angled part where you sew the strap too didn't really show well so I made this one straighter. But I realize now that the flat edge should be angled in the pattern so when you sew the dart, it angles it upwards. Hard to explain. I also went with a L(10) for the back piece and L(12) for the band. I reasoned that if the tops of the centre cups were higher, then my cleavage wouldn't show so much and it wouldn't matter that each breast isn't fully cupped and meeting at the centre.
 I was feeling particularly bloated this day! I also couldn't get the dart points to be flat! I was using wicking jersey from the diaper making days and bathing suit mesh/power mesh (or net?) inside. I saw that the fabric wrinkled on the sides,  so I reattached the band at the sides and took that bit off.
 I used wide stretch lace for the straps. I cut it narrow and folded over the inside edge with elastic. I only had swimsuit elastic which has a beige tint to it, so it kind of looks dirty. But overall I like it! It's super comfortable.
 Hubby had a lot of issues with being my photographer. He gets distracted easily.

He can't believe I was going to put this on my blog. Well, I told him I wouldn't put that picture on, but the others? Sure. Why not! Flat Lay pictures are nice for details and shape, but there's nothing like seeing a pattern on a REAL person. Keeping it real here folks.

 Trying out flat lay photos. I liked this shot but it's not getting many likes on Instagram.
 I wore the bikini top as a bra too. Fun! Though I suppose it just looked like a bikini top under my tank top, since we were on a cruise ship.
For some reason my husband likes to take angled pictures of me. Maybe it makes me look taller?

 You can see here how the back pulls up at the straps. I had drafted the back so it sloped down from the side seam to about 1/3 across and then straight to the centre (and mirrored). It seems okay though.  I wore it under my clothes when we did an off road four wheeling adventure.  We were told we were going to a beach without any amenities. We finally got there and it was several different resorts along this beach, with bathrooms and outdoor showers. It was an interesting excursion that went two hours longer than we were told!
I wore it on the trip home from the cruise. This happened during lunch at the Miami airport! It went through the shirt and onto the bra. Luckily I had another top in my carryon. Oh well. It was shockingly, the only time I did that on the entire trip! It was so comfy for travel! I want to make more! Maybe even in lace?

Wednesday, June 27, 2012

New Swimsuit

I'm not sure how I feel about sewing swimsuits.  The suit I used to have (store bought) lasted a long time.  Last spring (2011) I bought a new one since the old one was worn out and I was cutting it up to make a pattern and I wasn't sure how that would work.  That store bought suit lasted only about six months!  The one I made at that time, with fabric from FabricLand, is still going strong, although I didn't wear it a whole lot.  Then I sewed two suits in October.  One has worn out!  It was fabric I bought at Value Village, so I guess I can't complain too much.  And it's too big now. 

Meg needed a new suit, since she's in the hot tub a lot and her old suits were hand me downs that were really worn out.  She wanted a tankini, and I used the same Kwik Sew pattern that I used for Lucy's suit (I don't think I've used it as intended yet).  Her measurements are all over the chart though.  I had to lengthen, widen some, narrow the shoulders....when it came time for adding elastic to the arm and necklines...I had no idea what to do.  I compared the original amount to the original pattern, and it used about 1 1/2" less elastic then the measurement.  That did not work.  I took elastic out.  I added elastic. I ripped and re-sewed.  Finally, it seemed okay.  I hope no one ever unpicks it and sees how I added in and cut out bits of the elastic!  LOL.


Another big issue I had...when I cut the front, I added two inches to the length...but I didn't mark it on the pattern.  When I cut the back...I forgot to add that extra....yeah.  I've done that before, and still haven't learned.  So, I ended up cutting a strip to make a ruffle.  The length wasn't bad before, but she did want it to cover her belly completely.

The fabric was from Spandex World, last summer.  I ordered two yards, and was very disappointed when it came and there was a white line between each yard.   But it was cheap, compared to what I can buy here (and they don't have the swim suit material "mill ends" bin anymore!).

Monday, January 16, 2012

Swimming, swimming...

...in my swimming pool; when days are hot, when days are not, in my swimming pool....

I may not be a "swimmer" anymore, but I do spend lots of time in pools/hot tubs (and the beach on the cruise) so I do need good swimsuits and have, like most women, some challenges with fitting.

After making my first suit, and Meg's first suit, I went ahead and bought a couple Kwik Sew patterns, and made the animal print bikini for Lucy. 

I decided to try the first one I link to above; KW 3779.  Because it's somewhat of a tank, I thought I could use my original suit as a bit of a pattern guide.  It did all go together pretty well, although I had to take in the crotch/bum seam, the center bum, and the side seams.  I did a FBA, however, it doesn't "cup" me quite like it does on the envelope.  I think I need to make my right side bigger.  It's also a little more revealing on me than the pattern...particularly on the right side.  I think because my breasts are closer together (although maybe not evenly spaced on center), and because my shoulders are narrower, the V neck spreads too much.  I have to figure out how to adjust that width and have it line up with the back.  Lucy says it's too low cut, but I think I can fix that on the next one by stitching the cups together at the lower center front for an inch or so.  Or, finding a clasp/decoration that could join the two cups together.
 I did have a little trouble lining up the two cups with the center front seam, and the right side is a little off.

Overall, I was impressed with my first suit for me, from a pattern.  The fabric was a find from Value  Village!
I decided I wanted to make another version, using some fabric from Spandex World.  I figured I should start with the next smaller size since I had to take in the first one so much.  I wanted the back straight across, and the cups wrapping around (for extra coverage) towards the back.  This presented a lot of construction challenges which I worked through in my brain for awhile before starting.  I also needed to line the back pieces as the fabric was a lot thinner.
In the end, I don't think it was worth all the extra hassle.  The back ended up higher than I thought, so it's not really sexier.  I could probably have not bothered with the angled sides on the cups, especially if they fit better, but I didn't want to risk a blow out.  The thinner material has meant that this suit really stretched when it got wet.  I think I need to find a buckle, bauble, or clasp for between the cups to prevent them from sliding over.  What do you call those ornamental bits...they're not functioning buckles or clasps...I do have one from the suit I took apart, but I think it might be too wide.
 Knowing where to position the straps on the back piece was a two person job, thereby voiding the idea of this suit being a surprise for our cruise.
One of these days I'm going to tighten up the elastic around the cups, maybe  shorten the straps.  It's fine in our private hot tub, but a little scary on the public beach.

I can't wait though to make another suit, probably the tankini.  If I can find some brown or black that matches these fabrics, then I can use the scraps as contrast. I highly recommend making your first suit from a real pattern!