Sunday, March 21, 2021

Outside My Box

 I wanted some new mittens for my winter/spring coats. One is plum-ish, the other is bright pink. I found some superwash wool in my stash and at first, I was going to play it safe. Stripes, maybe black. As I looked at the balls of yarn though, I started to think---why not get a little crazy? I have the pair of fingerless gloves that I wear all the time, and people often comment on how cheery they are. Why not do something like that? I thought Fair Isle would be good because the floats on the inside add to the warmth. 

I dug out my stitch pattern books and got looking. At first, I liked some large scale designs but I worried about having enough yarn, and wanted to incorporate several colours. And I didn't know how many rows I'll end up with, and didn't want to have them look like they ended abruptly.  I settled on this simple 4st, 3 row repeat. 

I started the cuff, and I wasn't sure what my direction was going to be. I thought let's go random stripes. It's usually hidden inside my coat anyway. I do kind of wish I had gone more basic though. 


Then I started the pattern after the ribbing. I really got into the stitch pattern and kept forgetting to start the thumb gusset!! So the mittens end up being rather long inside my coat--have to put them on before my coat LOL. 

For the increasing section of the thumb gusset, I kept the stitch pattern to every other stitch, rather than try to incorporate the hand pattern. 


It got up to my knuckles and I really was afraid of running out of the pink. It was kind of an awkward length. So I made the end cuff long. They're almost mittens. I thought I might make them as convertible mittens, but there's not enough yarn to keep with the pattern. 


These will keep me toasty through much of the winter. I can tuck my fingers inside for those "didn't know I'd need mittens" times. 


Yarn In:  0gr
Yarn Out:  83gr + 1196gr = 1279gr
Balance:  1279gr more OUT than in
Cost:  $0, $0/day

Thursday, March 11, 2021

Simple but Effective

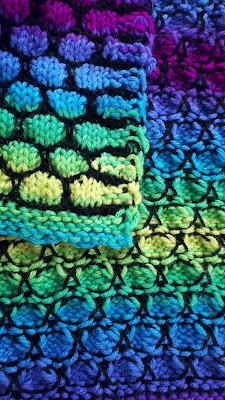
 I finished the latest blanket for Crocheted Blankets for Seniors (they accept knitted ones too!). This was so easy. Four rows main colour, in stockinette. One row in contrast, in the pattern stitch, then one row in contrast in knit stitch (even though you are on the back side; this creates a nice textured ridge to the front).  Every 4th stitch on the contrast row 1 is done like this:

Locate the stitch on the contrast band below--follow the column down to the contrast row

Insert the right tip into that stitch of the contrast row. You're going into the top stitch (there are two rows in the contrast "band").

Knit the stitch, pulling the strand through. The four main coloured rows are still on the left needle.

Drop the stitch off the left needle, and give a little tug to unravel the four rows. They will be caught behind the contrast stitch! 
On the next contrast row, you'll center that tuck stitch you did. So, the first time, it's MMMCMMMC and the second time it's MCMMMCMM.  Of course, you don't have to do 3 main colour stitches, you could do any odd number. Just centre the tuck stitch.
Depending on how much you steam it, and shape it, it will create nice little bubbles. My black yarn was rather delicate--a thin chenille--so I didn't make those stitches too tight. You could though, and it would emphasize the bubble effect.


The back side is nice and tidy and looks good too, even though it's not technically reversible. 

This blanket ended up a smidge narrow (by about 2-3") and only 440gr. I had a pound of this yarn (454gr), so I have some left. I will probably take all the bright yarns I've used recently and create another blanket. 

Yarn In:  0gr
Yarn Out:  440gr + 756gr = 1196gr
Balance:  1196gr more OUT than in
Cost:  $0, $0/day


Thursday, March 04, 2021

Quick and Easy Project

 Way back last summer, a weekly email from Cricut included a link to a tutorial on making a subway tile backsplash. I sent it to my Mom. She's been trying to re-do her backsplash, but wanted something non-permanent, cheap, and easy. This seemed to fit the bill and she was excited to give it a go.  I found some non-permanent vinyl at Happy Crafters in a soft orange. Yes, she wanted orange.  My brother was painting the laundry room so he painted the backsplash to represent the mortar.


I took measurements while we were there dropping off the dog before our cottage trip. I took some time during the vacation to figure out what size a tile should be. The general idea for a subway tile is that it is twice as long as it is high. However, I wanted to minimize cutting and fitting on the wall, and get the most effective use of the 12"x12" sheets. I finally created a size, I'm not sure what it is now but I was able to fit 8 on a sheet with hardly any waste. In the tutorial, she mentions 4 or 5. I bought 30 sheets because I calculated 28.75 sq ft. I was worried if that would be enough. I knew I'd have to trim some, and would those trimmings be usable in other spots? What if I mess some up? I cut them out and didn't get to weeding them right away (which isn't really necessary).


After it had sat for awhile, the vinyl sort of shrunk from the cut lines. When it was fresh, it was hard to see the cut lines, but in the picture above, you can clearly see each tile.

Easy weeding, but it added up to a lot of waste. I do hate that about vinyl crafting.

All done! We were planning a surprise visit during Thanksgiving weekend and I thought maybe I could get it done.

It took a bit to figure out the best way to do it, keep them straight, create the grout spacing. I started over on this end because it's a short wall, with something in front usually LOL
I noticed right away, that the non-permanent vinyl is not opaque. It's a bit translucent and feels thinner. This meant that the defects in the wall she was hoping to cover, showed up. You can see this in the tile above the outlet.

And...this section was all I got done. And then life, surgery, recovery, more COVID restrictions...finally I decided I just needed to go for a day. Which turned into two nights. I had other things (food, vitamins, electrical panel) to deliver that she needed, so I wasn't totally breaking the rules!  


I had started with 1/4" grout line above the wood strip. However, as I went over, I couldn't keep that, and keep the tiles straight. It was frustrating. I didn't want to trim tiles for the bottom row, so I had to fudge and play.


I couldn't get right into the corner behind the TV. The angle that I needed to twist/stand/lay down at was too uncomfortable for my left ankle. 

We were left with a lot of tiles left. Maybe 10 sheets? Not sure. 

So this quick and easy project, took six months to (almost) finish. LOL. She's happy and still determined that she wants an orange backsplash.