I see I haven't posted in a long time. What have I been doing? Working. Nearly full time this year as there is a shortage of supply (substitute) teachers. I do very little knitting. In the last post I mentioned the Handicrafter Cotton yarn I bought; I'm still knitting dishcloths with it. Thought I might finish it off before the end of the year, but no. If I sit and watch TV and knit for the evening, my hands are too sore the next day. I also still have the tiny newborn hats I'm working on. I haven't done any sewing, but I am getting things out today because 1) my mom mentioned she's been using the Boxerwears I had made for Dad as pajamas, so I want to make her some of the woman's version 2) I want to make some for myself 3) I saw some snowflake fabric in my stash 4) I'd love some more Sunset Loungers as one pair seems to be missing (did I leave them when I visited my mom?), and one pair has faded and one pair was not a great fabric choice and 4) Megan asked for another Lovesick Bra. Of course, that's what I'm going to work on first LOL.
It's Print Then Cut, layered onto a few layers; the Thank You is cut from the black, the green is the full card and the black is glued on the front (there was a cut line instead of a score line and I ended up with separate fronts and backs, didn't use the back). I wanted to cut a window in the front and glue the logo to the inside, but Megan said no. Next time, I think I would do the printing on the sticker paper I have, or maybe onto photo paper for a glossy look (I have TONS of 4x6 photo paper; I just got printable vinyl sticker paper and I'm not going to use that for it!). Her classmates thought she bought it from the school office, so that's a compliment!
I made this gorgeous wreath, from
Sweet Red Poppy:
I did not have to buy anything except the wreath frame.
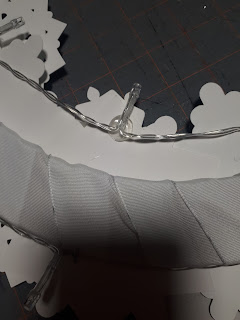
It lights up with little LED lights from Giant Tiger. They are battery operated and have a built in 6 hour timer. They were already in one of my house plants, so I didn't actually buy them for this project LOL.
The wreath frame is a chipboard frame from the fake floral section of Dollarama. I had originally bought a gold tinsel wreath from there, but the family actually liked it and wouldn't let me dissect it!
The lights are pinned to the outer edge with T pins, and secured to the inner edge with ZOTS 3D Dots.

I might have gotten carried away. The instructions tell you to duplicate the 4 snowflakes so you have 5", 4" and 3" snowflakes. The original wreath I was going to use was curved (domed?) so I worried that the snowflakes would be too big to follow the curve. I duplicated and shrunk them down to 2" snowflakes as well. I also was trying to use up paper, and conserve paper, and I moved things around a lot from mat to mat and in the end, there were so many snowflake parts that I had to figure out how they all went together. Luckily, each layer (of each design) is different, so it's not like the inner layer of the 5" snowflake is the same as the outer layer of the 4" snowflake. After matching everything up, I had a few extra layers of each size/design, so I cut some individual layers to make more complete snowflakes. In the end, I used 12 5", 8 4", 7 3" and 5 2". I had about 8-10 left. I cut lengths of yarn, glued it to a ribbon, and made a sort of garland to go across a window that has no curtain. I used the ZOTS to secure it, but alas, it kept falling down. I ended up laying the ribbon on my fireplace mantel, placing the mantel decorations over it to hold it down, and letting the snowflakes hang in front of the fireplace. It looks nice when the ceiling fan is on!
Then I had to make a card for my niece. I had been drawing these characters following Genevieve's Design Studio on YouTube. I made their accessories in Queen's University Tricolours (I found a website that gave the hexidecimal codes for the colours!). My niece goes to a private school. I looked up their colours and found out their mascot is a polar bear, so I used the polar bear I had already done. How awesome! Because you use layers for the different parts, I could easily change the sweater, hat and scarf!
I had only two pieces of white cardstock though. I went ahead and printed the card.
It printed streaky! And the "white" cardstock didn't look all that white (card on the right). I checked the settings, I cleaned the nozzles, tried again...still streaky. I kept cleaning the nozzles and running the test print. It started to get worse! The cyan eventually completely disappeared! I did one more clean, it came back, I did a test print, it was almost perfect. Tried printing the card, not quite there. One more cleaning...but now I had to go to Wal-Mart, at like, 8:30pm in the drizzly rain, to get more white cardstock. Not a lot of options! Managed to find some though, and printed one more card.

I managed to get a smudge on the front! I was NOT printing again though. I liked the card, but to me, it was lacking something. The dull cardstock soaks up the ink, and it loses some details. It's not smooth like a commercial card. I did find at Staples later they had "card" paper. I tried to stick my finger in the package, and it did feel smoother. However, it's 8.5"x11" paper, perforated to make two cards. This card I made, I used a free template from Genevieve's Design Studio (and her YouTube tutorial) to make a card closer in size to a "standard" commercial card.
This also meant I had to make an envelope, and this size card needs a 12x12" piece of cardstock to make the envelope. I used my envelope making tool I bought from a friend that sells Stamping Up! stuff. I love it! I used it to create an envelope for the Gator card too.
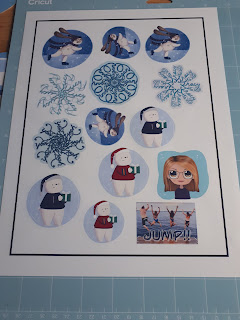
I also made some stickers, but still only had the printable sticker paper. They looked good though. I printed them, then put clear vinyl (Dollarama "book cover" vinyl) on, then cut.
OMG. I hadn't created a white background behind the first few polar bears, and didn't realize how jagged the edges were. It took about an hour to cut the first one! I paused it a few times to clean the blade, then I just raised the blade up so it wasn't cutting. I wanted to just give up on the bears and have the other items, with white borders, cut out. I had flattened the whole page though. Eventually I did stop it, cancelled the cut, and went back to the canvas. It allowed me to "Unflatten" the page, and I was able to delete the two stickers it had mangled. But then, when I went to make it, set it all up, loaded the mat...it never moved on to the start option! I gave up and hand cut them.
I used the polar bear to seal the envelope, and the Nya one for the front (I also glued on a gem). I included the other stickers in the card.
My sticker vinyl came and I got to work. I had made a sticker sheet in Procreate using my artworks, back in the summer...but now that I had the proper stuff, those old artworks just weren't exciting me. I got to work making new stickers.
It's Koala Printable Vinyl Sticker Paper, Glossy. It's about $20Cdn, for 20 sheets, with free Prime shipping. So about $1 a sheet, not including tax. Seems like a lot, but I got 14 stickers on one page, and if I had some smaller art ready to go, I could have filled in a few spots.
I LOVE it. The colours are so rich and glossy! It cut so smooth! I didn't flatten this time, but did attach. Some had white borders and I carefully checked them when I imported. I used bleed on, and printed on "premium photo paper, glossy" setting. To cut, I used "Printable Vinyl" as the material, and the default pressure, and it made perfect "kiss cut" stickers!
When I did the alteration to the polar bear, I forgot to do the outline changes on a new layer. And then I forgot to re-adjust the outline back to the red. He's still cute!
I had a bit of space left, so I did this photo I had altered from a cottage vacation, and the cartoon of my SIL, I had made it following an Art with Flo tutorial (I'm pretty sure). I've got some more designs in the works.
I hadn't really intended to write all this. I was just stopping by to write about the yarn donation I made to a local lady that makes "nests" for a wildlife refuge!
A great way to get rid of some variegated leftovers, and other small balls that won't play nicely with other yarns when I make the blankets for seniors! I gave away 1053gr! So I have to add that to my totals. Also, in November, I was contacted by a woman who I had made Christmas stockings for. She had another baby and wanted a new stocking. She was really understanding when I said I couldn't do it for this Christmas, so I'll be making it for 2022. I rarely even go to my FB "Business" page, but FB sent me an email of the message, thankfully. I've got to buy yarn for that. Oh, hope I didn't give away any of the small amounts I used for the design! I had kept all that stuff separate, but I kind of forgot about it over the past two years and integrated the yarns back into the stash. New year, new challenges!
Yarn In: 3109gr
Yarn Out: 1053gr + 4586gr = 5369gr
Balance: 2530 gr more OUT than in
Cost: $44.66, 365 days, $0.12/day
My last post said $0.05/day. Not sure how...that should have been $0.15/day!