Showing posts with label Full Bust Adjustment. Show all posts

Monday, August 01, 2022

Is it Summer Yet?

 At the start of summer break, I planned to having a relaxing summer. I wanted to draw, practice flute, clean out my email inbox, walk daily, practice yoga daily, sew....So how's that going? I've gotten some art ready for stickers, but haven't actually drawn any new art. I practiced flute for about 15 minutes. I started the summer with shoulder pain so the flute, and yoga, had to be put on hold. I have been walking a lot--30 minutes daily, M-F and some on the weekend, as well as an almost daily 25 min walk with the dog after dinner (not fitness walking at all LOL). I have done a bit of sewing, which I'll go over. Also finished up a charity crocheted blanket and started a Christmas stocking. I have also had doctor's appointments, x-rays, ultrasound, physio, dentist, eye doctor...middle kid got her wisdom teeth out, both girls have jobs and need rides, youngest has the rink twice a week...it's been a lovely summer though not the relaxing, do nothing summer I thought it would be

One day, I got a phone call from an elderly man who's quite popular in our community FB group. I had previously repaired an old wool Mary Maxim jacket for him, and now he had a wool blanket he kept in the car that had a few holes. I said I'd take a look. 
Turns out, it's woven, not knitted, but this gave me a great opportunity to learn how to do mending using the weaving method! One of those things I thought I'd learn at some point. 
It wasn't too hard! He was very pleased with it. I also made sure to give it a good bath in wool wash. 

As well as making stickers on my Cricut, I made IG address decals for our trucks, and new dishwasher magnets. I was planning to make the silver one, white, but it was too transparent. The Tricolour one will be sent to my eldest. He expressed interest in having one, but didn't like our original one since when the Clean was upright, it was on the bottom. So I fixed that. 

I despartely needed new slippers. I loved the gold ones I had, with suede soles. I'm out of suede, so I got out the ToughTech I bought for swim shoes in the summer of 2019, as part of the cruise prep. 
I also wanted a new sleep mask. Currently, I use a dark coloured buff. It works fine but thought maybe something new would be nice. I wanted something with some shape, as commercial sleep masks gape along my nose. I had seen some really cool shaped ones on Amazon and thought maybe I could make something. I had a hard time finding a pattern, eventually landing on this one by a Korean YouTuber, for a contoured eye mask. She created it so it wouldn't rub on her eyelashes. It's supposed to bubble outwards, reminds me of fly eyes, LOL. However, my interfacing was too weak (she didn't specify in the video), and my fabric too wimpy, so I don't quite get that same effeect. Plus, I had trouble sewing the slippery fabric, then I trimmed the seams, turned right side out, and discovered I had sewn the elastic into the seam. Picked it out, re-stitched, turned right side out, and discovered that I must have snipped the elastic when I was snipping the seam allowance on the curves. So I had to rejoin the ends. Overlapping the ends has made the elastic just a smidge too small now, and I wake up with a blue line across my forehead. There is still some gaping around my nose, but it's not too bad. I think next time, I'll just make a flat one LOL.

One of the lettering tutorials I followed early in the summer. Going to make it into stickers.

There is a long story with this. The short version is I combined some different pieces I did into one, and made a background for my new laptop. The two mushrooms with faces, I drew them just by looking at reference photos! I'm so proud of them!
Megan bought a dirtbike, but has been cursed. Another attempt to go out and this happened. Sigh. Poor girl.

Finished this corner to corner crocheted blanket for the seniors. 

As I was getting near the end, I realized I wouldn't have enough of the green blend. So I created a plan to increase the pink (previously it had been one row) and decreased the green (it had been two rows). It's not quite the transition I was envisioning, but it's done. It weighed 600grams.

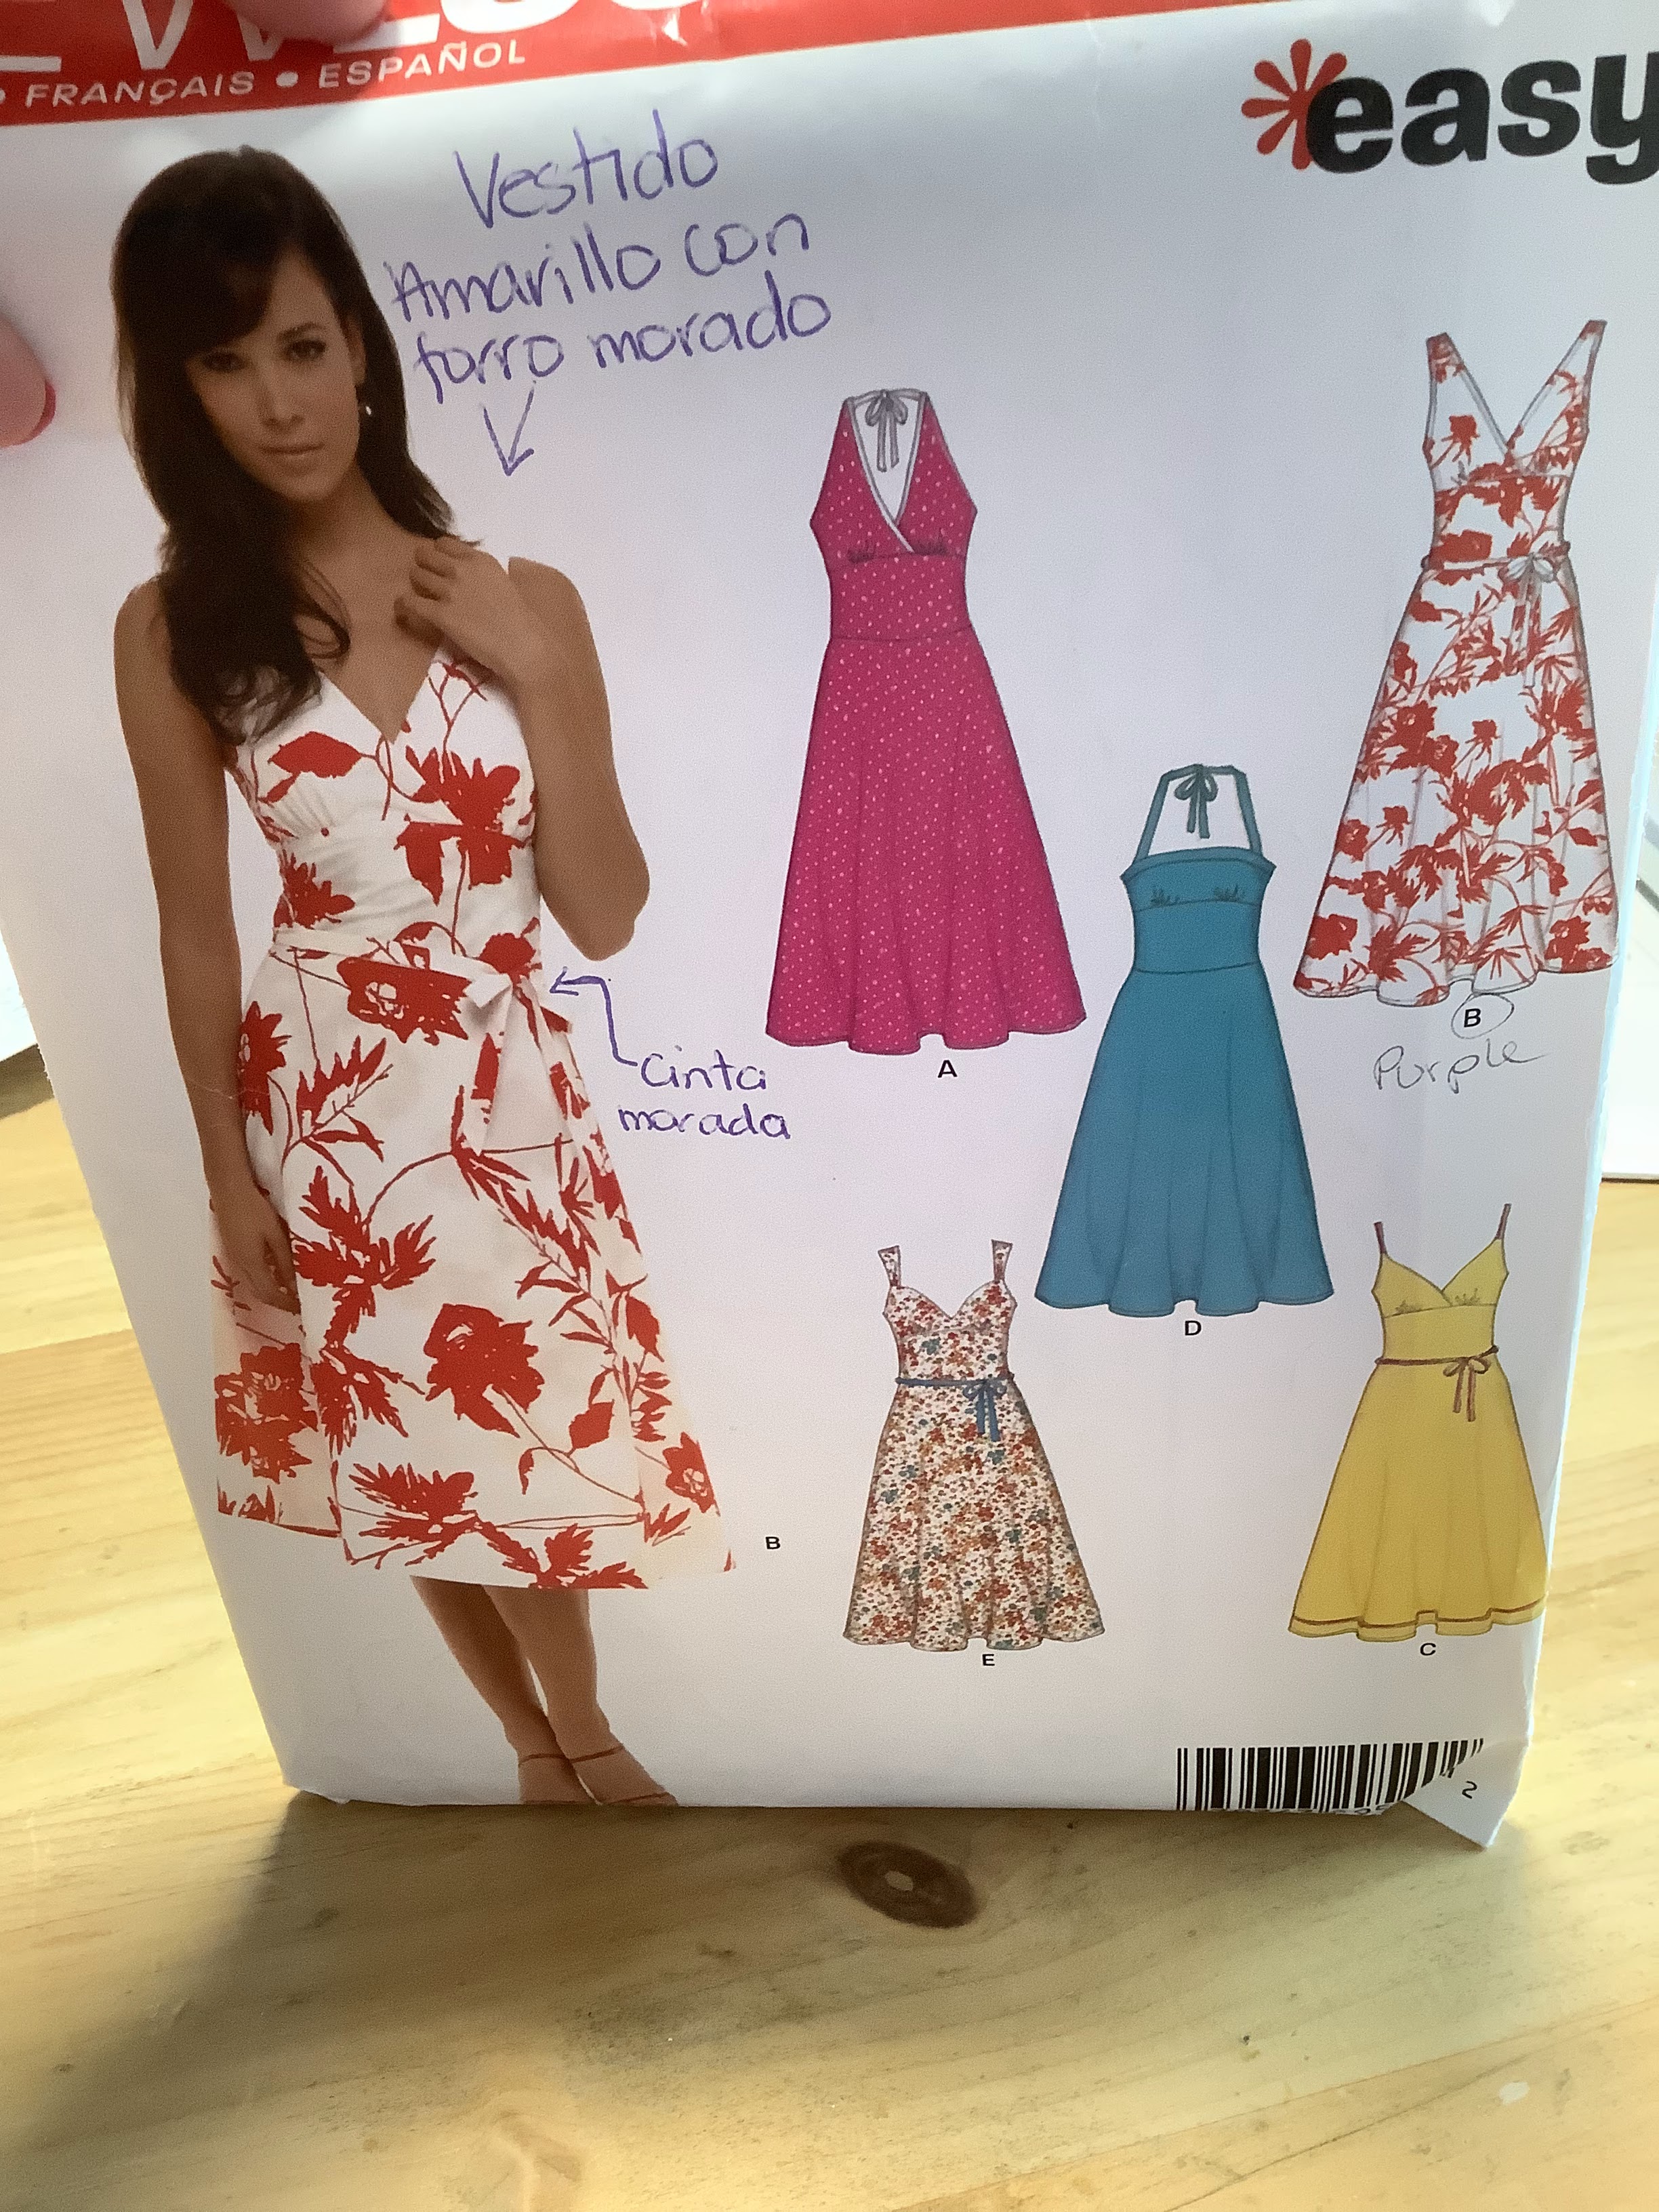
I made two versions of this dress very early in my sewing hobby--2007. I learned the hard way about full bust adjustments. Actually, I didn't learn it then, but this pattern showed why I needed a FBA. Check out New Look 6557 in the Labels section.
I found this pattern at a thrift shop and it seemed complete. It's similar to the above pattern, and Simplicity is the parent company. This one doesn't have the midriff band, and uses pleats in the bust instead of gathers. I thought I'd give it a try finally, but found it was missing all the bodice pieces except the front upper bodice. So I'm merging the two patterns.

I tried on the second version of the New Look dress that I made in 2007. I could zip it up this time, but after much searching, I found the original picture (which I didn't seem to blog!).
My bust is definitely bigger now! This was 6 months after the reduction, and a month after recovering from giardia.
This is the first test of the new mash up. It's just the top portion. It felt a little bare and revealing in the V neck. So I altered the pattern pieces a bit more.
On the last few inches of sewing the lining to the bodice and I run out of bobbin thread. I start winding a new one, get halfway full, and suddenly the machine starts slipping. My other machine is getting looked at because it started making a noise! Ack. For the last year, every time I ran out of a bobbin, I tended to just grab whatever was somewhat close and already filled Now I'm down to a few bobbins, and they're those colours. Argh.

And that's pretty much it for now!

Yarn In: 150gr

Yarn Out:  600gr + 20gr = 620gr

Difference:  470gr more OUT than in

Costs: $15.22/213 days = $0.07

Friday, May 03, 2019

Slow Sewing

I am sort of, on house arrest. My truck needed repairs and once I was done the supply teaching jobs I had committed to, Rob said I couldn't drive it anymore. Then it was almost fixed, and a brake line blew. So it's totally not driveable, even in an emergency. This is the end of week two. At the start of this school year, it was hard to break the old schedule--I left for my lunchtime job at about 10:50, got home at 12:15.  I've broken that routine now and these two weeks of knowing I can't even run to the store has meant my days are totally unbroken! Last week, I spent most mornings after the girls left, having a nap. By Friday though, I must have been caught up on my sleep because I couldn't nap.

I decided to do some sewing, since I could devote my "whole day". Of course, that never happens! I decided to go with the flow, and not rush these projects. First up was a muslin for New Look 6457. Measurements. I know I slacked off all winter. It was a busy, stressful winter. I decided to bite the bullet and do some measurements. Yikes. Some of it had to be monthly bloat! This pattern only goes up to size 16 and that wasn't enough. It used to be, along with a FBA.


I traced out View E bodice. Reviewed how to do a princess seam FBA. Got cutting and spreading. And it was really messing up the armhole. I really questioned it. So I slashed the pieces vertically and added a little bit to each piece (back too). Then I did the FBA. That went much better. I cut out the pieces, and added about 6" to the bottom, thinking I could turn this into a shirt if it works. I questioned though if I needed to widen at the bottom. I mean, I knew I needed more width for the hips....but it just wasn't computing. I quickly basted together the bodice pieces and tried it on.

I don't seem to have a picture. The shoulders were angled out way too much. That usually means you need a smaller size, with a FBA. Or you just have narrow sloping shoulders. Since I already did the FBA, and I knew I needed some extra width, I decided I needed to change the angle of the shoulder "strap"


I pinned out the extra in the neckline so the straps angled where they needed to be. How to get that onto the paper pattern without adding width somewhere (think of those angle drawings in geometry. When you open the triangle on one side, the lines get closer together past the point where they meet). 


You can see on the piece on the right, the slashes I made to the neckline. I did it over two or three slashes so by the time the dart reached the princess seam, it was just a wrinkle. I also needed to take a bit in under the bust. I also had to unpick the seams at the bottom...about six inches. It wouldn't lay flat LOL.


I think I still need to add a smidge to the inside of the strap--once the lining is sewn in, it'll be 5/8" narrower and I think my bra will show. I also feel I need a smidge more under the arm.


 Man, feeling so bloated and huge!
 I think this was the first round, before I opened the lower seams. I left the upper back open because it calls for a zipper. It was really hard to get it over my bust the first time! My bust was about 42" and the waist of this is probably about 37". Not much stretch in a woven! It's been awhile since I've done a top in a woven!

 I realized after doing the paper alterations, I realized I only needed to re-cut the front centre piece. I cut it to the length it was supposed to be. Easier to get on!

I've set it aside to work on other things. I wanted to make a dress for an event on May 10, and then wear it again late in June for Megan's grade 8 grad. I really want to trim myself down again though! And since this is a fitted, lined bodice, it won't be quick to alter if I do slim down.  As well, the dress requires piping and I need to find some co-ordinating fabric to make the piping and who knows when I can get out to the fabric store without a chauffeur! I'll find something else for the May 10 event, and then get back to this one in June.


Friday, January 18, 2019

Astoria

One indie designer I follow (okay, George + Ginger) was having a sale and I was seriously considering a dress that seemed to be the current vogue...a swooping colour blocked gathered side panel. However, I wasn't sure how I would alter it for a FBA. Then, before I could decide, Peek-a-Boo Patterns released the Astoria.  With a sale. How could I not? This is also the name of an album by Canadian band, Marianas Trench. My middle girl, Lucy, became a Trencher and since I had to take her to concerts, I became one too. Perhaps not my favourite band  (some screeching, swearing, etc) but I do think they have a really unique talent for song writing.

I had just gotten some brown (or I bought it after the pattern release? Does it matter?). I wanted to make another top to go with this skirt . What? There's no skirt in that post? Um yeah. I still don't have a picture, because I haven't worn it since the summer. But I've worn this new top a few times. However, with brown pants, it feels like there's too much brown (especially since it's not an exact match LOL).

I was all eager to do the FBA. A princess seam! I had just done that on the Riki dress! No problem! Uh. The front piece for this top is cut flat, not on the fold. No problem! Just flip it over and do the FBA on the opposite half. Uh. There's a seam there, right through the bust. And the centre front piece is extra long because it's gathered.

Basically, I ended up joining the centre piece and the side piece together with tape and doing the FBA on it that way, and then separating the pieces. It made sense in my head, but I wasn't sure if it was going to all work, given the swoop shape and the gathers.


So much surgery on the pattern. And I thought when I had my surgery, I wouldn't need to do this sort of thing. Actually, when I had my surgery, I wasn't sewing for myself. So I had no clue. 


Gratuitous shot of hubby and me, at Queen's Homecoming


Hanger shot, cause I don't seem to have an actual on-the-body shot. It's a little washed out in this photo.

 This picture was actually about my curly hair. Which by the end of the day was flat and fluffy. I'm experimenting with "The Curly Girl Method" but I don't know that I like how it looks with a "cast" (when the hair is crispy with product, but the curls are defined).

I bought the brown from Midnight Mountains Fabrics. I'm sure you can google that. I really like the quality but got frustrated because they sent only half a meter instead of a full meter. I did make underwear with the 1/2 meter, so that was okay. I've ordered three times from them and twice they've messed it up. I've gotten to keep the mistake fabric both times though. This is nice stuff, but I'm not really used to such a elastic cotton and although it probably looks fine on, I kind of feel it should be slightly larger. I keep saying this every time I make something with these better cotton-lycra fabrics!  The other thing...the selvage of the fabric was odd. Never seen that before.

Overall, I'm quite happy with the shirt. I can't wait to wear it with the skirt. I thought it would be good with my brown pants too, but it's just too much brown. So I wear it with beige pants. I'm fine with that. I do plan to make more of these tops, but it does take a fair bit more fabric than just the plain short sleeve t-shirts I make. The front piece is quite a bit longer, so a meter isn't enough. And the long sleeves adds to the requirements. I don't like really long sleeves though, so I made them shorter. But if I remember, I was really squishing this in on the fabric.  I had hoped to make it with a cowl in the print fabric, but I didn't have enough. Since my printer is broken and I can't make any of the newer patterns I've bought, maybe I should make another of these....

Thursday, October 11, 2018

A Dress! With Sleeves and Pockets!

Awhile ago I had seen a photo in the FB "George + Ginger" group of the "Riki Dress". Everyone was gushing over it, but it was "retired". I don't really get the idea of retiring patterns. They're online. What's there to retire? I know sometimes they retire early patterns as they become better designers, use different software, or tweak their size blocks. But why retire a pattern that everyone loves? They then brought it back a little bit later--so I wonder if it was a marketing ploy (like, Stitch Upon A Time's "Spoxxy" tank getting a one day re-release, and then coming back a month later as a totally new updated pattern). I jumped on the chance to buy this dress during the short sale.

I had a few options for fabric. I really wanted to do colour blocking, but felt I should do a "wearable muslin" first since other than the Lovesick Bra, I hadn't made any of their patterns. I don't really fit their sizes though, so a muslin was important. Plus...a FBA on princess seams...Had I done that before? I know I tried to make a princess seamed dress in the summer of 2010, but there were no blog posts. I finally found it blogged in 2011.  I really wish that dress had worked. It was a great pattern, nice fabric, I love the look, etc, but too many issues from trying to fix it. I worked on another version of this dress, but the blog post indicated I still had a lot of trouble and the FBA was difficult. I also really liked that dress. I got rid of both of these when I lost some weight and started sewing better fitting items. Sometimes you can't just keep taking in seams!

Oh yes, back to the fabric. I was sure I had seen a picture where someone did a striped fabric, but had the stripes one way for the centre, and the other way for the sides. Couldn't find that photo again, and my fabric didn't have the greatest vertical stretch, so I worried that might be an issue. A lot of the dresses shown used black for the side panels, but my black is a cotton-lycra and this fabric was likely a poly-blend (shiny). So, I just went for all one fabric.

I followed a tutorial for the FBA. I think it was a mash up of https://sewoverit.co.uk/elsie-sewalong-full-bust-adjustment-princess-seams/ and http://curvysewingcollective.com/princess-seams-an-fba-for-large-busts/  There are LOTS of tutorials for how to do this now. Not so much in 2010!!
I think I also took out a smidge in the upper bodice and sleeves.
 It all went together super fast! The only issue were the large pockets. I saw pictures of others complaining that the pocket sagged. The suggestion was to make the pocket pieces narrower. I tried that on one side, but it still sagged and now pulled in the seams a little. So I experimented with a safety pin, to mimic a snap. I polled my girls, and they said the side with the snap looked better. I couldn't do anything about the side I had already taken in, so I just put a snap on it, and didn't bother to adjust the other pocket.
 The sleeves are long. I think I did the 3/4 sleeves and they were full length on me. So I took some elastic pieces (I keep all my elastic scraps, just for these sorts of things), and ruched both sides of each sleeve. It was tricky, since the sleeves were already seamed, and I thought about taking out the seam, but just persevered.
 Since I wanted this for teaching, I kept the longer length. Some of G+G's designs seem really short!
This is the angle most of the world sees. Okay, the world over 6'2". But most of the world is still taller than me. I would prefer a slighter more open neckline. Got to be careful though, don't want students taller than me looking down, or have it gape when I lean over a desk!!
My husband won a very significant award from Ontario Power Generation (OPG; the provincial corporation that creates electrical power in Ontario) and this dress was perfect for the "business casual" dress of the award ceremony. The day started with a tour of a hydro electric generating station, and we had to wear flat shoes. I wore my Sketchers that are a little more dressy than a sneaker.


Instead of plain black snaps, I used Snoopy. I've always loved Snoopy cartoons and I love adding whimsical touches to my teaching outfits! I wore this dress to a high school recently, but never got to show anyone the snaps LOL.

I do find that even my phone is too heavy for the pocket. Tissues, room key, cough drops are fine.

I want to make more of these...but G+G are having a sale right now and I see a couple contenders. I like the  Daydream Dress and then I saw the Sassy Side Top!  How the heck to do a FBA on that? And my waist is way bigger than the size I would pick going by the upper bust. It wasn't an issue with the Riki because the FBA added enough and there was also pattern ease at the waist. The Sassy Side Top is really slim fitting. I've had a hard time finding tops to wear with my leggings, and this might work. I was going to order the SoTa last weekend during their debut sale, but it was Thanksgiving here and I missed the deadline.

And then in my email this morning, was this new pattern!   I thought Peek-a-Boo used a curvier block, but the sizing seems to be the same as G+G. However, the ruching is lower and the side piece goes straight down, so a FBA might be easier on this one. I don't need ruching over the bust, as evident in the Plitvice  (which I still love, and wear, but would modify next time). I think I will get the  Astoria because it includes the hood and cowl. And, I can probably modify the side panel to make it swoop like the Sassy Side Top. Now, I've got to find the time to sew!! And, I need some thick tights and/or some tall boots. That's been a challenge. My legs are too skinny and short!

Thursday, August 02, 2018

Hampton Hoodies

Lightweight hoodies (especially with bottom bands) seem to be very popular. So I had to jump on the bandwagon. I went with the Hampton Hoodie by Peekaboo Patterns. Having had great success with my t-shirts and doing an FBA, I got to work. By the end, my pattern piece looked like it had had a run in with a paper shredder. Wait...this is my t-shirt pattern. Why am I showing it? To show what a t-shirt FBA looks like?


 Not sure what I'm trying to show here. I think the fabric is a rayon blend. It faded a bit after washing.
 I had a horrible time with the placket. The instructions seemed fine, but I just couldn't get a good result. It also seems that when I printed it, my printer cut off a bit from each page, and my pieces for the bands might have been off, and where the placket opening is on the centre front.
 Having adjusted the pattern considerably, I needed to adjust the bottom band. I did the math. I quartered and pinned. And this is not what I was going for. Having been washed a few times, it looks better, but I keep thinking I should re-do it. I didn't want it snug on my hips because then it looks like a maternity top due to my belly.
This picture was actually to show the saggy butt of the pants I made. But it shows the back of the top too. I could have done the hood in black, but I didn't have enough width to do the plackets in the print, and then they wouldn't have stood out on the front. So, you see the inside of the fabric in the hood. Suck it up.


Again, a front shot. Because these pants are pouffier, the hanging band issue isn't as bad. 


And while I was at it, underwear to match.


I decided to give the top another go with some fabric I got that I just loved. Sand and sea. My favourite combo!

Again, I had terrible placket issues. I picked out the stitches several times, and ended up with a little hole I handstitched and Fray Checked. 

 Another placket photo. I just couldn't figure out where exactly to line up the edge/point. And I don't seem to have a finished picture. Stay tuned and check back later.


Wednesday, November 01, 2017

Hello November

I just scrolled back to see what I needed to get caught up on....and wow. I didn't post at all in October!! First, I was super busy finishing up things for our big anniversary cruise (I posted lots on Instagram), and then we were gone for 12 days, and then it was full on Hallowe'en costume creation. But let's get this blog back up to date!! Lots of sewing posts ahead, one crochet post, maybe two knitting posts....

First up. Two sleeveless blouses. I found this flowy blue-ish fabric remnant and figured it was rayon. It was only 0.9m and marked to $12.83 though because of my Fabricland Premier card, I got 50% off, so with tax, it came to $7.25. I was looking for a fabric that would go with blue shorts, white shorts, blue pants and blue capris. An abstract/floral print was perfect. I washed it up and decided to test out  Simplicity 3506. It'd been in my collection for awhile. It's hard to see in the pictures, but there is a bit of yoke detail on the shirt. I traced out size 16 and decided to do a FBA for real, instead of my cheating of doing a larger size from the armhole down. It took awhile to figure it out, and I did way too much work in the end (I made a dart, rotated the dart and then took out the dart). In the tracing process, and transferring to the slippery rayon, the subtle shaping on the yoke pieces pretty much disappeared.

 Not sure what this was showing but I think it had to do with the yoke. Oh, actually, I think I sewed the yoke to the back with wrong sides together. Further adding to the issue with it losing it's shaping.

 I'm not going to the trouble of editing all these photos. It might be hard to see it, but I felt the neckline didn't come out too exact, being slippery rayon, so I opted to make a band and tie. I made the band pretty tiny though, by the time it got all folded and pressed. It does hide the bottom of the V though.
 I liked it, though I wasn't happy with how the gathers on the yoke drooped over towards the armhole. It created a fold of fabric over the outer bust. I figured it was my sloppy cutting and marking of the notches, so I tried to be super careful on the next one.
 I wore it on a sunset catamaran cruise in Aruba. OMG, that was the greatest excursion. Made so much fun by meeting the girl behind The Mutt Hutt. And her fiance. And the open bar. The shirt was nice and cool though in the extreme heat times it did stick to me a little. It didn't get worn as much as I thought it would because I just had too many clothes with me of course.
 I decided I needed a white shirt that wasn't a t-shirt and that this pattern would be fine. It's an eyelet cotton my MIL gave me when a friend of her's cleaned out her house. I tried to be super careful with the yokes, and moved the gathers right up to the neckline, but it still droops over the outer bust. I think if the V neck was taken in a bit, it would really help. If you draw a line straight down from the yoke, it just ends up on the outer portion of the bust. I'll keep looking to see if I have a full picture. Also, I did have some issue with my front and back pattern lengths not quite the same after the FBA. Must correct that before the next one.
This time I did the facings. It wasn't too bad. I need to tack them down at the shoulder seams though.

I eliminated the zipper in both tops.

I may or may not make this pattern again. Hard to say. I really need tops with sleeves now, so it won't be anytime soon. I also like the dress version.