Showing posts with label lace. Show all posts

Wednesday, August 06, 2025

New Life

 Many years ago I made a beautiful brown lace tank top. It was such an indulgence for me, but it just didn't work out for me. At some point I gave it to Lucy, because she had a pair of brown pants. Recently, she actually wore it to work! I was so happy!

She didn't really want to pose and be on the blog, but how could I not?


I now the pictures are a little fuzzy, but she wasn't as excited as she was when she was 8. The most interesting thing I noticed though, is that she had it on inside out! I looked for the shoulder seams, and there were none. I'm not surprised I grafted the shoulders, but it still looked good around the armholes and neckline. She really thought this was the right side.

It looks so good on her! I'm so thrilled she's wearing it, even if it's inside out!


Monday, September 16, 2024

Red, Pink, Purple

 It's been an interesting summer. I'm back to daily supply (substitute teaching) list. Let's leave it at that. 

Another red scarf in the bag. This one is crochet, a worsted weight, 4 rows of Double Crochet, and 2 rows of Double Crochet in the summer fine yarn I've used before (I have a giant cone). As I worked it, the fine yarn sections would contract inwards, and the scarf had this interesting bubble effect. It made it rather narrow though but I didn't know if blocking hard would straighten it out. I stretched and steamed and it seems to be behaving now.  99grams.

I finished the really large shawl I've been working on since mid-March (I think). I don't remember exactly where I found the pattern but it's a drop stitch lace, similar to the shrug I made last summer). You increase on one edge until you get to the width you want, then knit a wide section, then decrease. I wanted a large stole to wrap around me and almost be blanket like. It was really hard to stretch it out on the needles to check the width though. It's two strands of fine coned yarn (Spinrite tent sale?), and the black cone has a sticker indicating it's likely 50% wool, 50% acrylic and made in Spain. For those that understand the numbers, it's a 2/16. The other strand is a white and black plied together, totally unknown fiber. Originally I was going to use just it, but recognized that would take me a long time LOL.

I could have made it a little bit wider, but that straight section felt like it was taking forever! The decrease section got faster and faster, but I decided I didn't want to wind more balls of the yarn together so that I didn't end up winding too much and have a ball left over that I would never use, so I was carrying around two large cones of yarn. In the end, while the shawl is quite long, it's almost too long in the inc/dec sections. So, after washing and blocking I decided to cut off part of the narrowing end. 


Yup. Snip snip along the top of one pattern repeat. Gently pick out the stitches until back at one complete row and then I went back a few more rows to get to the start of the repeat. I casted off in pattern. This makes one long increasing section, a wide section, and a decreasing section that comes to a blunt end. 

It was at 299gr before I chopped the end off, that took off 12 gr. I'm going to keep it as 300gr because it's not like I can re-use that 12gr.

I'm also working on tiny bears for a local charity. I did two in a marled purple. I thought I grabbed the next size needles for the second purple bear but it seems I might have actually grabbed the next size smaller. They're the Bill and Ben Twin Bears from www.craftbit.com. That pattern sucks though, so I re-wrote it. If you'd like a copy, click HERE. There still might be some errors, so just let me know!


Disco Bear on the right. Sometimes they get their own personality. I see I forgot the mouth on the one on the left!

I got a large donation of yarn and the pink chenille and the purple were in it. The charity requests no animal fibers. I could not find a mid brown in my stash that wasn't at least some bit wool, but it was washable....I didn't want to risk it anyway. I don't like this brown but oh well.

Cut little bunny tail and freestyled floppy ears

Disco bear LOL. I don't know what happened when I sewed him together. The lower half looks like the toddler potty dance, the upper half is waving to the teacher to get their attention. 100gr for all the bears.

I bought 6 balls of red worsted yarn from Facebook Marketplace for more red scarves.


That's 1186gr of new yarn that I don't think I'm going to get knit this fall, but I'll be ready to go for next year. I was rooting through my bins and found a few balls of red Astra I had bought when I was making custom Christmas stockings. It's been awhile. Do I dare use it for scarves?

I've also been sewing but I'll save that for another day.  I've been trying to blog this post for a month but Blogger, on this account, has not been working for inserting pictures on my laptop. I can use a different account, and post pictures in the blog I have on that account (Ontteachertracy if you're into music teaching). I was down in the basement doing my morning yoga and thought I'd give the desktop a try. So at least I can post this way. It feels so retro LOL. Stuck in the cold (Air conditioning) basement!

Oh, and I'm test crocheting something and needed to buy yarn for that but I'll save that for another post.

Yarn In:  1182gr
Yarn Out: 1005gr + 500gr = 1505gr
Balance: 323gr more OUT than in
Costs: $20

This is such a falsified total LOL. All those bears were from donated yarn which I didn't count in my Yarn In total LOL.


Sunday, January 13, 2019

Delayed Reyna

When I was looking at my 2018 yarn totals and looked back at my 2017 totals, I saw  that I included the Reyna shawl in the totals. Mmmmm.  I don't recall actually blogging about it...did I even photograph it?!

We were going on a big family trip to a luxury cottage in the Muskokas, July 2017. I wanted a simple shawl pattern that would look nice with a handpainted yarn. I'm not sure where I asked for recommendations--I think on my Facebook page. "Reyna Shawl" was mentioned a couple times. It seemed simple enough.

I did no prep before we went. I didn't even wind the yarn (Araucania "Ranco Sock").

What better way to ball up a skein than with a view like this? Muskoka chairs are perfect for this.

 Less than a month later, the shawl was being blocked.


Dappled shade on a warm August day was perfect for blocking.

But I'm not thrilled. The colours are kind of muddy. If mud was purple, magenta and turquoise. Part of the issue is garter stitch when it's very short colour sections. I've worn it as a scarf with my winter coat, but that's about it. 

Tuesday, September 11, 2018

The Trouble With a Stash....

I don't do a lot of fabric mixing in individual items, but when knitting, I will often be mixing yarns for certain effects. Often though, I just don't have the right yarn to go with what I already have...so the stash grows. That's not usually too much of an issue for me with fabric. I buy a piece of fabric, I use it,  I keep big scraps for Boxerwear flies, or crotch linings in underwear, or sometimes bands. So as long as I'm sewing as fast as I'm buying (ha!) the stash won't significantly grow.

But sometimes a piece comes in and sits there. Could be I loved it, but it wasn't as big as I thought. Or the material is not right for anything I'm working on. Sometimes I have bought fabric and then changed my mind about the project. That's what happened with this salmonish stretch lace yardage. I picked it out to make a "belly band"--a loop of stretchy material or lace worn over your pants waistband to smooth it out and /or fill the gap if they're a bit low or your shirt is short. Megan liked the colour and also wanted a bathing suit cover up because it matched.

Neither of those things happened. Megan's bathing suit faded so quickly (do I even have a blog post about it?). So the lace sat there. I thought I might use it when I made the rayon "pillowcase" dress. I thought I could colour block the sleeves but the family thought it looked odd. So the fabric sat. I kept seeing lace everywhere though and thought it was time to do something, especially after making the tank tops with the lace down the center back. I wanted to expand out a bit. At first, I thought I'd do the sleeves in lace. Too predictable. Then I saw some shirts with the back yoke in lace. Nice, but not quite right (looking at my photos, apparently I did make a tank top with a lace yoke). Then I saw my mother-in-law in a split back t-shirt  and thought, if she's wearing one, I need one. But of course, none of my fabric was suitable.

Off I trudged to FabricLand with my fabric. I'm so picky about matching colours. I was not optimistic. I walked around, everything was too expensive. I headed to the clearance/remnant bin, and found two good sized pieces of fabric. One was a woven that I thought my girls' might like as shorts but still matched the lace (they turned it down), and one was this knit. It's a little thicker, with a plush feel. Could be a ponte?

I got out my t-shirt pattern, all set to hack. First up, I had to create the back yoke. No problem. The petal pieces weren't hard too, though I had just done a swayback adjustment on something and loved how it looked so I was disappointed to not be able to really do that. I thought about it a long time though. Then I got really creative, and decided I wanted to split the yoke and do the stripes on the bias. Pointing up.

I needed some strong coffee for this. And in the end, though my stripes matched awesome, they were pointing down! LOL. I didn't have a lot of fabric, so I just went with it.

 Everything else on this top was a pure fluke. I decided to cut the neckband going the opposite way than normal (it was still stretchy), so it would have little vertical stripes. I had absolutely no intention of it matching at the back. Never even thought of the possibility while planning.
 And I sure as heck did not think about having the yoke stripes match the sleeve stripes!  Holy cow, I could not believe my luck. Perhaps it makes me look a little wider, but that is a lucky sewing-win if I've ever had one. And even more incredible was that both sleeves turned out like this, not just one. If it was only one, that would have been really odd looking.
The two layers of lace still seemed a little see-through, and with the way they curve and there's only one layer at the sides, I worried about my bra showing and if it would be school friendly. I didn't get to wear it to school, but I  think it's fine. Next time, I could make the yoke longer, or more likely, make the back pieces angle more sharply and meet at the sides lower. However, I doubt I'll do this again in the lace. If I made the angle different, due to my short height, those pieces are going to lose the nice curve and I might as well just totally overlap two normal pieces, sewing them together most of the way down. I guess that is an option, but I wanted a bit of looseness.  My mom's not a fan of the shirt, but this time, it's just she doesn't like this style. It wasn't about how it looked on me. I hope I get to wear it more. I don't know if I wore it again this summer. I've gotten to the point where I have more favourites than I really need. Do I get rid of the old frumpy t-shirts?

Wednesday, February 14, 2018

Estuary

While reviewing my blog for the year end totals, and trying to figure out when/if I blogged my coral socks, I realized that I had never blogged about my finished Estuary shawl. I had posted it on Instagram, but not here! I've been finding that happens a lot. I went back and edited my 2016 totals (yes, I made this shawl in 2016!), though the 67gr doesn't change things a lot, it did take it from a "more yarn in than out" year, to a "more yarn out than in" year. Barely. LOL. The cool thing is I could actually go back on my blog and find when I got this yarn! Apparently, it was March 2007! I tried working with it in November 2007, but wasn't happy with that project. Curlerchik and I have kept in contact, through blogging and then Instagram!

 These pictures were August 2015, at our favourite chip truck, which sadly disappeared. So I don't know exactly when I started the shawl, but it looks like I had a good chunk done here.


Apparently,  April 7 2016, I noticed a mistake, I had made a row with eyelets when there shouldn't have been. It's dead centre above, and off to the left below.


 Do you see them? I could not leave it. Rip Rip Rip.  I even blogged about the mistakes!
 I must have been really motivated to finished because by June 19 I had it finished and blocked.
 It's not a terribly wide "shawl", more scarf than shawl.


The colour reads more purple in sunlight. The pattern calls for fingering weight, and I think my yarn might have been more laceweight. I think I might have added a pattern repeat, but I'm not about to check it out now. It's a light, lovely little thing to wrap around the neck, or daintily over the shoulders with a sundress. Though I don't really do dainty.

I still have some of this yarn left over. I'm not sure how much but I don't think it's very much. Sometimes, you don't need to use up all the yarn. Sometimes it's nice to have a bit left, just as a keepsake.

Thursday, September 28, 2017

Poncho

This is along the same theme as the last post. No, not red t-shirts on teen boys. Last Christmas I asked what my niece might like that's handcrafted. Her mom suggested a poncho, perhaps in black. Not too fancy, but not too casual.

Christmas  came, and I was so busy with custom orders and life I didn't get to it. I thought I would do it for her birthday in late May. Again, I was quite busy. I did some swatching though, but her birthday passed. We were all going to a cottage at the end of July, so I thought maybe it could be a little thank you gift for inviting us.

I got to swatching. I knew she wanted it lightweight, but warm. I had only my SK155 out. I could have turned the table around and got the Memomatic 327 out, but that seemed like too much work. I pulled some black Elann.com "Peruvian Baby Lace Merino" (from back in the day they had a website and yarns to rival KnitPicks). One and two strands felt too fine. Three strands felt too thick. I explored punch lace, but only one card of the basic SK155 set works for punch thread (aka thread lace). Then I was at Michaels' for something else and found this black velvety chenille called Loops & Thread "Shellie". This would be perfect together. The chenille for the bulk and texture, and the Baby Lace for the warmth. I swatched some more.

Suddenly, my machine wasn't working right. WTF. Everything was set right.  I checked every last detail of the settings. It all looked right underneath the carriage too. It worked from left to right, but not right to left. Then the stitch selector jammed again and I knew I had to take it apart.

I couldn't see anything immediately, but then felt a thunk and it released, and I knew what had finally happened.

 The left lower J pusher has snapped off. It's what gave me so much trouble before. It controls the tuck setting, going right to left. It had gotten bent and I straightened it, but I knew metal fatigue would happen at some point.
Can you see it better when I hold the upper lever out of the way? I did find the tiny piece, but I doubt it could be welded back on. Oh well, I can still tuck left to right!

I decided on one strand Baby Lace and one strand Shellie. And, the one card that would work on the SK155. By now, I was really wishing I had just got the 327 out.

The actual knitting is pretty easy, though of course, I had those days where yarn got tangled, caught in brushes, broke unexpectedly, etc. But it got done, and I sewed it together. I made it as a long rectangle, then pulled one end around to the side perpendicular to the other end, and sewed it together. This creates a loop with a pointed section. So it can be worn many ways. I left the working in the ends and the crochet borders until we were at the cottage. I had to block it still. There was an iron at the cottage, and an ironing board. I didn't want to lug that down to my room, so I steamed it on my floor! It worked. I didn't get any good photos, but Megan is interested in photos, so I sent her and Nya off to get photos and I told her to get  some detailed shots too.


 She's wearing a shirt with planets on underneath. Creates an interesting effect.

I did a simple scallop around the edge, after two rows of HDC (I think), in just the Shellie.

Maybe it's something about the Mainwaring family that makes them make these faces when I take photos of them in my handmades?

Yarn In: 2242gr
Yarn Out:  125gr + 2916gr=3041gr
Balance: 799gr more USED than bought
Costs:   $57.30/271 days = $0.21 per day 

Wednesday, April 20, 2016

Mistakes are Not Always Design Features

Often in knitting, you'll hear "Oh, it's not a mistake, it's a design element".  Once is a mistake, twice is a feature, thrice is purposeful.  Well, I made a mistake on this shawl, and didn't notice it till 27 rows later.  It is clearly a mistake, even if most people I showed it to could not find it right away.

 It was hard getting a good picture.  Running vertically, just to the left of the right pins, there are extra eyelets in the tips of the motifs.
 Close up, they do sort of blend in with all the other million eyelets, but they break up the tips of the motifs.
This picture shows it pretty well.

Of course, this is not a simple repeating pattern with clearly defined stitch repeats (chevrons or feather and fan type patterns).  Dropping down the offending stitch and reknitting it 27 rows....in this pattern, I wouldn't even do it if it was just ONE extra eyelet, and I think I did it 8 times.  What I don't understand, is how it didn't affect the next right side row!

The only way to fix this was to rip out the rows.  I thought maybe I could take a thin needle through a row just above it and then tink the last few rows, but the pattern undulates too much.  I kept it pinned down, and ripped the rows back, counting each row as I went.  I ripped 27 rows.  Then, I had to figure where this put me on the charts, since there are two charts, and one is 40 rows, and one (the section with the errors) is only 20 rows.  There is 4 rows in the 40 row chart that serve well as "landmarks" because two of them have a M1 at one end of the section, and two rows have it at the other end of the section.  In a sea of YOs, K2tog, SSK, SSP2O and K3tog, a M1 stands out.

I got it back on track, and I'm keeping care track of which row I'm on this time (you repeat the shorter chart something like 5 times, and the longer chart, it doesn't say how many times!).  It seems I've barely used any of the yarn (KnitPicks "Shadow", I think), but now I'm in the "even width" section so I'll just keep going on these charts for quite a while.  I wish I had made it one chart repeat wider, and actually, after ripping out the 27 rows, I would have had to rip out only about 20 more rows to get back to those charts...oh well!

Sunday, September 09, 2012

Short Row Shawls

The term "short row shawl" can be interpreted in several ways.  One, is making four wedges that all together form a triangle (I think it's four...).  Short rows can also be used to create a circle, or half circle shawl.  In this case, however, short rows are a bit different.  They really ARE short!

One technique is to use groups of needles, usually 3 or 4, separated by one or two needles out of work.  Start at the right edge of the bed, and put all but the two groups closest to the carriage into hold.  Go back and forth over these two groups for 6 rows.  Put the next group to the left into work, and knit to the left.  Pull the group over on the right into hold, so now you have two groups again.  Knit 5 rows, ending with the carriage on the right.  Continue across the needlebed, pushing the left group into work, knit across, pull the right group into hold, and knit 5 rows.

When you get to the last two groups on the left, you have two choices.  One is to knit on the two groups, and then start returning back to the right.  You'll have to do one extra row to get the carriage over to the left before putting the right group back into work.  The other option is to put the last group on the left into work, knit to the left, and put the right group into hold, so you're working on just the left most group of stitches, for how many rows you want.  This will create a scallop along the edge.

For the turquoise shawl, you start with 2 needles in work, two out, 2 needles in work.  I think.  If you look here you can see some pictures.  As you work across, and get to one side, you also put two more groups of needles into work, and you have to e wrap over them.  This creates the increasing triangle shape.  When you get to the width you want, work without increasing; and then you decrease to get the other angle.  That's where I had trouble, remembering how to do those decreases. 

There's also no law that says you have to do the same number of rows over each group as you go across.  Check out this shawl.  I started at one edge with only 3 rows between groups for about 5 groups, then 5 rows for 5 groups, then 7 rows for 5 groups, etc, and the scallop was made by doing several more rows than the group before. 

Other scarves include a red one and black one based on a Diana Sullivan pattern and the original white one posted higher in this post.  I hope to add some photos in the future, to show more detail about the edges.

This is a great technique that has endless variations.  Leaving two needles out of work between groups produces longer floats between the groups.  Doing more rows on each group makes the holes between groups bigger.  This is one time though that you don't want to knit too loose, or the yarn will loose it's shape and visually will not look as good.  I hope to get back to that brown and blue one, but I've decided that it won't be a shawl again....I'm going to do the same technique with some other yarn as I don't see myself using a blue and beige shawl, despite loving the colours together--it won't go with anything else in my closet!

Thursday, June 07, 2012

Beaded Bleeding Heart Scarf

This is actually the tuck lace scarf from Machine Knitting Fun, the small version using 16-0-15 stitches, T8, and the same yarn as the purple scarf.  I meant to weigh it as the ball felt a little light, but forgot.  It's plenty long though.
Each of the foam squares is about 2 ft long.
I knit the 6 rows in hold, then one row, then put the beads on the 3 tucked stitches, then knit the second plain row.  This centered the bead over the tucks.  At first, I knit the two plain rows and put the bed on, which made it sit on the really long stitch that forms the open back-to-back triangles.  That was nice too, but it was more obvious.  Either way is fine.  I didn't know how many beads I had, or how many rows this would take, so I just did the first 6 or so repeats, then knitted until I seemed to be low on yarn.
Then I started the beading again.  As it was, I probably had enough beads to do the whole thing!  Next time, I might divide the beads equally before starting.  I also didn't want to have happen what happened with the purple one--started beading the second end and realized I still had lots of yarn left.  I didn't want to run out of yarn before doing the same number of beaded rows either.  This time though, the beads are really subtle, so I said "oh well, one end has more beads than the other" rather than rip it back and re-knit some without the beads.  It's such a fast knit though that I really should have knit the whole yarn (doing the second end beadless), then rip back to match the number of beaded rows I had at the start, and re-knit them with the beads.

I opted to block it so the sides formed scallops.  The blocking wires really helped with this!  In fact, I don't think it would have looked right if it had been blocked with straight sides, unless you did more plain stitches on the edges.

I really like this yarn.  It's light and airy and the colours were very saturated, with just a little bit of difference in shade between the fibers of the two plies.


I've tried many times to upload the picture of the scarf in my bleeding heart plant, but it won't load.  My SIL says bleeding hearts are one of her favourite  flowers and they grow wild and crazy in Alberta where she used to live.  The yarn is the exact colour.  I had a hard time giving this one away, but not as hard of time as what she's going through :)

Yarn In:  12 574gr
Yarn Out:  10 664+ 50gr = 10 714gr
Balance:  1860 gr more In than Out
Costs:  $287.71/164 days = $1.75/day

Saturday, May 26, 2012

Scrambled Eggs

It is often said that lace knitting in it's unblocked state, looks like nothing more than overcooked pasta.  Mine looks more like scrambled eggs.  It's actually "Omelet" from knitty.com.  It's been over a year, and it's been cast off, washed, and shook out.  I will get around to steaming the points (I don't want the whole shawl to grow) on a day when it's not already steaming here.
Bizarre, how Blogger thinks I want pictures one way, when I had loaded it a different way.  Not that it matters all that much this time, LOL.  All I can is, if you're going to make "Omelet", don't use superfine yarn; use something with a bit of heft, so you're not doing a bizillion repeats of the main chart.

Thursday, May 24, 2012

Secret Scarves

My sister in law started dialysis right after Easter.  She originally had a fistula put in her arm, but it failed, so she had to have  a port put into her neck vein/artery.  As can be imagined, she was upset about this.  I had been asking for ways I could help out, and she wasn't coming up with anything, so I took it upon myself to apply the knitter's belief that we have a gift that should be shared.  Most knitters have knitted items for charity, or as thank you gifts.  It's what we do.  We enjoy the process of knitting, perhaps using new techniques or yarns we wouldn't use for ourselves.  A bunch of scarves would also fit in with my goal of reducing my stash, right?

I've already shown the first three scarves--purple/green, black Magicolor, and grey tuck (just scroll down a ways to see them).  I ended up with a total of nine!

This is the entire stack.  From the top:  purple/green Patons Lace; steel gray tuck stitch; white penguin; Magicolour; blue with beads; black; mint green; white; white with rose; and yellow.

Blocking the scarves was a learning process.  I got better at it as I went along.
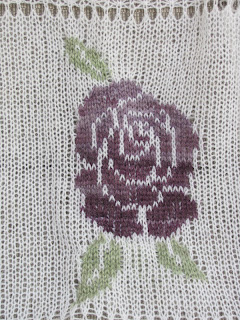
The rose is made with the left over Patons Lace from the purple/green scarf.  It adds a tiny bit of fuzzyness, and I love the shading effect.  For this, I learned how to use the Magic Cams and do a single motif from a punch card, rather than having the motif repeat along the row, or having to make the scarf narrow so there'd be only one repeat.  Purple is her favourite colour, and I like the song "Every Rose has it's Thorn"....thorny things can be beautiful too.


Another version, this time with a little penguin.  She had made a comment about her bus coming early and having to do the "penguin hussle" to get to it.  He's so cute!
Most of the tuck stitches look pretty similar!
Here's a close up of the little fella after her was blocked.

This black scarf...I don't like the yarn.  It almost holds it's shape on it's own.  But every gal needs a black scarf!
 This is a butter yellow scarf.  The yarn is the same one I used when I made the large piece of Imagination Fabric for my niece.  It has a shiny effect with one of its two strands.
 Blocking two scarves at once.  It takes longer than I expected to put in the wires and pins!
 At the seminar I went to, we learned how easy it is to bead on the machine.  Really, it is.  The hard part is picking the beads and pattern.  Most of the tuck stitch patterns I was using were very vertical, so I did simple rows; three at each end.  I definitely want to do more beading, and I've been looking at my old Knitwords to find some patterns!
 This is a mint green scarf (seen in the picture above of the two scarves blocking, this is the other side).  Not my colour, and I'm not sure it's her's, but I don't really have much in the lightweight, summery colour type yarns. 
 I really liked the fabric of the blue scarf; it's an icy blue, the same yarn as that yellow.  I think the one below is the green one...the colours are really washed out on my computer.
Another view of the black one, I think.  The front--knit side--is a vertical rib, and the back is like a honeycomb.  All these (except the Magicolour one) were done on the single bed, Singer 327 standard gauge machine.

I have a few other scarf ideas, but I'm not sure when I'll get to them.  And I just don't seem to have many summery yarns, for some reason.  I had hoped to use up quite a bit of yarn, but a 40gr scarf doesn't use much yarn, LOL.  I have several cones of 30gr or less that I just don't think will be enough for a scarf, and I think they could be used for 2 colour tuck, but that doesn't seem very summery to me.  Any ideas?  Some of these scarves were from never-ending cones, I'd have to knit hundreds of scarves to use those up (the grey, the yellow and blue, even the mint green still has a lot to go).

Total weight of all 9 scarves:  487gr.  Total weight of ones not already shown:  270gr

Yarn In:  12 574gr
Yarn Out:  10 344gr + 270gr = 10 614gr
Balance:  1960gr more In than Out
Costs:  $287.71/148 days = $1.94 per day.