Monday, April 30, 2012

Slow Knitting

Have you heard about "slow sewing" and "slow cooking"....taking your time to enjoy the entire process, not rushing through just to get the end result.  I think knitting lends itself to this idea because it is difficult to take short cuts, when each stitch forms a crucial part of the fabric.  Yes, there are some shortcuts--in the round, vs. seamed, 3 needle bind off vs grafting, etc.  But you generally don't knit for instant gratification.
Even when your intent is to knit some mindless socks, there's still quite a bit of process to go through.
Add in my inability to do mindless because I find it boring...LOL.
I really wanted to use Noro Sock yarn, back when it first came out and it was the greatest thing since sliced bread (I'm reading "Wheat Belly" right now...OMG...never eating wheat again!). 

When I went to the Kitchener-Waterloo Knitter's Fair in September 2008, one of my goals was to get some.  The cheapest place I found it had poor colour selection.  Oh well, I opted for the bright "Clown Vomit" colourway.  It sat in my stash for three years.  I thought maybe I'd knit up simple socks on the machine, since the yarn didn't feel very soft to touch, and obviously, any pattern details would be lost.  Then, the two colour Noro scarves were so popular, and one of my friends was knitting sock versions, using a solid colour and a Noro.  I thought I might do that--almost mindless, but not quite.  However, Noro has a unique texture and I didn't like pairing it with plain sock yarn.  I thought about something using short rows.  I saw some patterns for socks where they are knit in a sort of spiral, joining as you go.  Cool, but I wondered how that would feel on the foot, and then you have the small ridges going around your foot where you join as you go around.  I found an interesting pattern and adapted it as I already had the toes started, before deciding on a pattern.

I started with using just one end of the yarn, but found  the colour changes were too long so the diamond pattern wasn't showing.  Switched to using both ends of the yarn, and that created some issues (maybe not if I was actually following the real pattern).  In short, I wasn't very careful with being accurate between changing each diamond, until I got around the heel.  Also, there comes a point when you don't like the two colours you've been given, or one colour seems to be taking forever to change to another colour.  And then, since you can't knit both at the same time on one circular, to start the second one meant breaking the yarn and the colour progression.  Next time, weigh out and wind two balls, and use two circulars.
See how you can't see the diamond on the top foot, near the toe?

I dont' like short row heels, but that would obviously be the best design for this sock.  To get more length in the back of the heel, I add some extra short rows.  The first sock turned out fine, but I had a nagging feeling something was off with the second one.  By the time I got around to trying it on (I was working on it at swimming lessons, didn't want to scare anyone), I was long past the heel, which was not in the right place, and had a weird double chin effect.
 Progress on these socks was slow.  I started in early October, not sure when, but I do know I was working on them on October 11 when Hugh was hit by a car.  They went on the cruise.  They got tossed aside so I could finish Sheldon, and Duck Feet, and the shawl, etc.  Finally, I just got to it and got them done.


 I thought I'd finish up all the yarn, but they were getting high and I was down to small butterflies of yarn from where I had given up on certain colour combinations (hate the orange and turquoise, so when it came up again at the end of the second sock I just chopped it out).

 Yeah, I know.  Using the self timer helped the self-sock portraits only slightly.

Even though I had figured out the pattern by the time I did the heels, I made a mistake on nearly every diamond of the legs.  You have to carry one of the yarns up while working on the other diamond, but you don't have to carry that yarn up for the other diamonds.  You do have to work around to the other side of the sock before starting the next diamond.  I would either forget to carry the yarn up, meaning I'd have to cut and weave ends in, or, almost every time, forget to work around to the other side and started the next diamond where I'd finished the last.  I blame this on the dim lighting in places! 

They were very lumpy, scratchy, quite ugly before they were washed.  Sock blockers would have helped even more, but just a wash and a pat made a big difference.  One of the toes is too square, but I'm okay with it.  They are a great addition to my "happy day" sock pile, and great in my skates.  I doubt I'll use this yarn again, unless I find a colour I really like.  I do like the pattern though.  I would recommend it for a yarn with short colour changes, and not the fake fair isle yarn either.  If the changes are short enough,  you could just use one end.  If you're dyeing yarn, I'd knit up a swatch, figure out the length of each diamond, and dye it accordingly.  Fun!

Friday, April 27, 2012

A Little Something

I wrote briefly about my recent project committing knitting suicide.  I got it back on track and finished it.  Well, there are still many ends to weave in...
Last January while visiting my parents, I visited their local discount store which sells a good selection of Spinrite yarns.  They also often have the "1lb Unknown Fibre" bags.  I often can tell what the fibre is and they had two bags that were clearly Patons Lace.  One was filled with the blues colourway, the other bag had mostly blues but two balls of the green/natural/plum colourway.  I wasn't too sure about it, but I love the blues, and since it was $6.99 for each 454 gr bag (instead of $6.99 for one 85gr ball!), I just couldn't pass it up.

I thought I might "whip up" a tuck lace sweater based on a pattern in Knitwords #42.  However, my swatch did NOT match the picture in the magazine!
 I liked my swatch better, actually.  I liked how the single stitch, and the middle stitch of the 3 stitch column, snaked back and forth.  I realized my swatch looked like a scarf, and I wasn't 100% thrilled with the colour for a sweater....so I went ahead and re-worked it for a scarf.
Trouble from the get-go.  Every thing was trouble.  The cast on.  Setting up the pattern between the two beds.  Keeping the edge stitches on the MB knitting instead of doing the tuck pattern.  Big loops at the sides.  Yarn breaking sometimes because of those loops.  And then it went and did this:


So, I decided enough was enough, even though I was near the end, and re-cast on without the ribbing stitches on the edge.  I studied my swatch and saw that if I did the edges with the two out of the three stitch column, then the inner stitch would get the tuck pattern and it makes the middle stitch (now the edge stitch) zig zag back and forth like little scallops!  I had a hard time steaming the black scarf straight--I tried using the blocking wires, but it made awful edges and I had to re-steam it without the wires; hard since I was trying to stretch it at the same time!

This time, it was so much easier.  I still had troubles with some looping on the sides, and decided to try without the tuck brushes.  As I went to take them off, they pretty much just fell off.  A ton of fuzz in the bristles, but no actual yarn.  It didn't totally solve the problem. One issue was that the yarn is very slippery, AND fuzzy.  It wouldn't feed through the tension dial freely, but then if I paused at the edge, it would suddenly loosen up and the wire would start moving back and losing tension.  So I just kept the yarn in my hand at the edges to make sure it took up the slack.

This is a picture of the wrong side, before blocking.  Lucy thought it looked like a winter scarf.  It was a neat texture before blocking, but that's when the magic happens! 
This is the right side.  You can see a bit of the texture, but not much.  Really, Blogger?  You think that picture, above, is in the "center"?!

And here's the money shot.  It's a lovely texture, nice zigzag columns on the knit side, tucks on the back side.  The scarf weighs nothing--65gr, so it easily could have been made longer, or wider, if you bought a regular 85gr ball.  I have 35gr more which I'm working into the next project.


Yarn In:  10 905gr
Yarn Out:  10 009gr + 65gr = 10 074gr
Balance:  831 gr more In than Out
Costs:  $192.71/121 days = $1.59/day


Thursday, April 26, 2012

Nerves of Steel

I mentioned earlier about being in an email conversation with a designer.  She was giving me advice about making scarves and suggested I try her pattern.  I was actually looking for a double bed pattern, more scarf like, and I had no idea if I had one ply yarn, but why not?  LOL.

This is a large cone I have, bought at Spinrite.  The label says "Spinrite, 2/24, Mic Acr Wl, Khaki/black, Wrk 06707 July 99"  and I'm interpreting it as microfiber acrylic and wool. Not so sure about the "Khaki" as it seems grey to me. The 2/24 is the size of the yarn.  I used Singer card 11, and T2 instead of T3.  It just seemed too loose at T3 and the tuck pattern didn't seem to stand out.  Now that it's done, I probably could have stuck with T3, which most likely would have gotten me the same size as the pattern---mine is 16 1/2" x 59".  I did 1000 rows, which is almost 100 rows more than the pattern, but it's 3 inches shorter.  I would have preferred it to be at least those 3" longer, too!   It's going to end up being a shoulder wrap, not a "toss around and over" stole.  It can also double as a lap blanket.
 I tried ironing my swatch, which wasn't a swatch with this pattern, but the swatch I did when I was playing with the short row lace using various number of passes between each group, before I made the blue/beige shawl which I still need to re-work and is for me, not for this secret project.  Phew.  Run on sentence, anyone?  So, I tried ironing, and I was a little fearful of melting the yarn or flattening the tuck pattern.  I think it's probably okay to flatten the tuck somewhat--you still see it and it's not very textured to begin with--but I absolutely did not want to melt the yarn!  The very edge still has a bit of curl, so I might try again.
I won't lie.  Although it was an easy knit, it was mind-numbing.  B-o-r-yawn-i-n-g.  The most exciting thing?  It's suggested to bring the end needle opposite the carriage to HP before working the row.  So, stopping on each row?  Blah.  I discovered you could stop in the middle of the row, then pull both edge needles to HP, then knit two rows, ending in the middle again.

I really didn't think the tuck was going to show up.  On the knit side, you really don't see much.  Now that it's rested, washed, steamed, pressed, etc, I'm quite pleased at how it shows up.  Subtle.  This yarn, and pattern (but much narrower) would actually make a nice man's dress scarf.  I worried that it would be too manly--this combination of grey and non-lace--but have you ever seen a man wear a stole?  It's a huge cone though, and I think the next one will indeed be a lacey option.  I think grey is a great neutral colour that can be both casual and dressy.

Yarn In:  10 905gr
Yarn Out:  9902gr + 107gr = 10 009gr
Balance:  896gr more In than Out
Costs:  $192.71/120 days = $1.61/day

Wednesday, April 25, 2012

Little Black Scarf

I am working on a mega project.  I won't tell you much, except that it will involve lots of scarves, stoles, wraps, etc.  It will partially be a way to broaden my horizons with my Singer 327, using new techniques, and using up yarn.  Lots of yarn, I hope!  The first example wasn't too difficult, except that with scarves, swatches often become a scarf and scarves often end up just being a swatch.  This is a 3x3 rib, with the center needle of each three taken out of work.  I didn't want it heavy like a winter scarf.  The first swatch was very narrow, but I didn't realize at the time how much I could stretch it.  So, I cast on twice as many stitches.  Now, it was a great width (even a little wide), but too short.  By about half.  Went in the middle for the next attempt, LOL.

 The yarn is 43gr of Denys Brunton "Magicolour"   shade 4BB.  It blends from blue to turquoise to green along with a strand of black.
 Before steaming and stretching, this was very squishy, and the colour shading was very prominent.  And gorgeous!
 After steaming and stretching open, it's really hard to see the colour changes unless there's something dark behind it.  But the scarf is wispy light, with a slight wavy texture of the ribs.
 43gr is not very much yarn.  It works for this scarf though.  Doesn't take very much off my yarn stash totals either.  I've also been using up some almost empty cones (25gr or less) for waste yarn.  I'm not counting that in my totals, some of the waste yarn does get re-used, thrown into a zip loc baggy, but at least the cone is off the shelf.  I think I've emptied 3 cones using it as waste yarn, the cone of the bright blue, this cone of Magicolour, and one of black from the 3 black spiral scarf.  Not a lot of actual weight, but a great improvement in visual clutter.
Yarn In:  10 905gr
Yarn Out: 9859gr + 43gr = 9902gr
Balance:  1 003gr more In than Out
Cost:  $192.71/119 days = $1.62/day

I didn't include the pink-turned-white shawl as it's not "finished" or the shawl I just posted as I started it before this whole yarn confession thing.  I did buy two Machine Knitters Monthly magazines...should I count them?  And, I've got an order in for about $120 worth of yarn, partially for a business adventure!!

Awww Man!!!

Last week I swatched for a sweater.  The swatch did not look like the pattern at all, and since I was already in an email discussion (about something else) with the designer, I asked her about it.  Apparently that issue of Knitwords is just full of errors!  I liked my swatch and realized it'd make the perfect scarf for a project I"m doing.  I decided to try it and use both beds for the edges.  I don't know if there's anyway, on a Singer, to get the MB sts to not knit in pattern at the edges, except for pulling them to HP.  When I do that, they tend to get bumped by the side levers and then the stitches get dropped off.  I tried moving the edge stitches around so they'd fall on non-patterning needles, but perhaps I should have experimented during the swatch stage with that.
I was getting pretty frustrated.  There were MANY loops on either side (especially the left side though).  The yarn seemed to either get stuck in the tension mast due to the mohair, or else it started to slide too freely due to the slipperiness of the mohair.  It kept getting wound around the tuck brushes.  If I noticed soon enough, I could unloop it, but that resulted in loops at the edges to work in later.  I was getting so frustrated, and not enjoying the process which was going WAY too slow for a scarf.

And then....

Apparently the scarf was getting frustrated with me because it just jumped right off the needles.  Committed knitted suicide before I even had a chance for an intervention.  Not that I would have...I laid it to rest overnight and got started fresh in the morning, this time not using both beds.  It's gone much better, though I was still getting looping.  I finally took the tuck brushes off (actually, they nearly fell off when I went to take them off), and finished fairly quickly.  It soaked yesterday, today I'll steam it and show pictures later!

Tuesday, April 24, 2012

Sweet Lily Number Two

Oh boy, Blogger changed again.  Hopefully this goes well!  I'm not thrilled with the colour scheme of the dashboard pages, but at least you don't see that :)

As we were preparing to leave for our cruise in October (for a day by day recount, visit my other blog, over in the right sidebar!), I decided I wanted to take a shawl to work on.  Nothing too hard, but there would be plenty of time when I could focus on charts, if needed.  I have many shawl patterns "favourited" on Ravelry....perhaps too many as it makes it hard to choose!  In the end, I opted for another Sweet Lily Shawl.  I really enjoyed this pattern the first time though I wanted a bigger shawl.  I grabbed this skein of Wellington Fibres (Scroll down a little in this post to see the skein; the photos in that post are much closer to the real thing than the pictures in today's post!).  I got the yarn wound into a ball before we left, but when we got to the airport I realized that while I had remembered a crochet hook this time, I had forgotten waste yarn.  I had a pair of socks that I was also working on, so I used some of that, which sucked as it meant breaking the yarn and more ends....
Once we were at the hotel for the night, I worked on re-writing the edge chart.  I hadn't liked it the first time, and changed it, but never wrote it down.  It's the very outer chart, doesn't include the Sweet Lily part, which is fine.  I hadn't liked the way the YO, k2tog ladder shifted at the start of every row repeat (12 rows or so).  Despite writing it down this time, I did find that the very last section did end up with an error!  Oops!

A close up of the ladder and points.  I'm not a fan of the points; I tried to open them up when blocking, but that's a lot of pins!  You must be sure to cast off each point VERY, VERY loosely.  As in, hold the yarn loose, with your fingers, after casting off the stitch so when you work the next one, it doesn't get pulled tight.
Why, when I set the mouse where I want to type, it just keeps jumping down to some other position?
Close up of the Sweet Lily portion.   It's a little busy in this yarn, but not terrible.

The lace part.  The easy part!  This yarn is so soft, but also VERY slippery!  I had to be really careful anytime I set it down and picked it up.  I was really pleased when the lady in airport security was looking in my purse/knitting bag, and asked if the projects could be picked up/taken out, rather than just yanking everything out of the bag.  It would have been a nightmare if she had just grabbed this!

A shot, with a neat effect showing the pattern.  I actually finished the shawl in mid-March, and took it to my parents in March Break to photograph.  It was too sunny though and that's why everything looks washed out.  Check out the other link to see the real beauty of this yarn.

I said this last time I made the shawl, and I'll say it again...I want to make one using just the lace wedges, and then pick up and knit a deep border, either downwards, or side to side (depending on yarn amounts).  Maybe two borders, why not?  I could also knit a sideways shawl on the knitting machine and hand knit a lacy border....


Tuesday, April 17, 2012

A Closer Look

When I posted about sending all the items to my friend "way up north" I decided to not include info/pictures about the actual items since the post was getting too long.  So I'm going to do that now.  Much of what I'm going to show has to deal with how to stretch out your yarn when you're dealing with finite amounts, for whatever reason.
 I don't knit a lot of scarves.  They are too boring to handknit, and on my bigger gauge machines I don't have ribbers, so there is the issue of the knitting curling.  Recently I've been reading about "killing" acrylics by steaming them heavily.  A little scary--purposely applying steam to change the nature of acrylics (they want to keep their shape so regular wet blocking doesn't work at all).  I tried it with a scarf I made for the first donation, to the school.  I made a 1x1 tuck scarf, steamed it flat, then washed it to see what would happen.  It stayed flat!  I had used Patons Astra, and Bernat Camouflage, and both worked.  The 1x1 tuck almost lays flat to start with though.
For this purple and grey scarf, I had a lot of grey, and the the purples/white/black added up to 1/2 of what the grey was.  So I knew I could do 2 rows of grey, 2 rows of another colour (and be left with lots of grey).  I did the "other colour" sort of random.  It was a 4 row tuck stitch pattern, and then 2 rows of knitting all stitches.  There were a couple purples that I had very little of, so I used them when it was a non-grey 2 rows all stitches spot, so they would show up more.  I carried the grey and one purple up one side, and the white and black up the other side.  For the other purples I did cut the ends.  I also put needles out of work to allow for a looser feel and slightly wider scarf.
 Since it was still pretty narrow, I made it as long as I could.  I find that wide scarves need to be short to wrap once around the neck, but skinny scarves should be long to wrap a couple times.  The Astra really reacts nicely to the steam.  It lengthened out and got drapey.  I will admit that I did not have all this planned when I started out, all I knew was that there'd be two rows grey, two rows another colour!
 I also had some bright Astra in yellow and bright peach.  I bought a ball of variegated in similar colours and did a 1x1 tuck (2 row pattern) with two rows variegated, two rows yellow, two rows variegated, two rows peach--since again, I had twice as much variegated as the solid colours.  This really blends the solid yarns into the variegated yarn, and you don't really see stripes when the colours are that close.
 This cocoon was a "D'oh" moment.  It's started at the top of the front, worked downwards, shortrowed for the bottom, then worked upwards.  The pattern on the front was to be tuck stitch butterflies.  Part way up the back, I realized the butterflies were now upside down.  The look like little angels!

 Above is a blue and white cocoon, I'm not fond of the striping, it was hard to match the sides even though (or because?) i was doing sew as you go.
 This one is tuck stitch with Bernat Co-ordinates.  In the short row section, you can see the short floats as I carried the yarns up the short rows.  Not too bad, but not great.

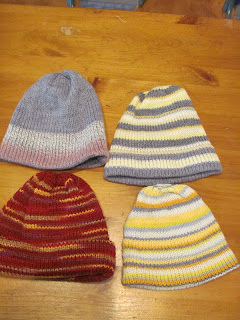
These hats are variations on the double layer charity hats.  The grey one at top left was a little short for a brim, but for a toddler it can be folded back.  The yellow and grey ones have a doubled brim that's stitched down inside. Depending on the look, the can fold the brim up for a toque or leave it long for a slouch hat.
 For this hat, I had a pink yarn with a very short repeat, and a Red Heart grey print, and a charcoal solid yarn.  I did 4 rows charcoal, 2 rows pink, 2 rows grey print.  I ran out of the grey print right at the top, but it's not noticeable.  I really liked this one.  The grey print is used in these hats below.
 The top one is the double layer reversible charity hat, the bottom one is my side to side double hat.
 I wanted to experiment with short rowing the top in 4 sections (I've seen two sections used so that the top of the hat looks like the top of a mitt).  I couldn't get it to work out, so I did it one section at a time, meaning that I had to stitch the seams between sections, and work in more ends.  Not worth it.  I'd rather do the decreases and move stitches over.
 Somehow the back got pulled down more than the front, but in real life it is even all around.
 This hat uses the same two yarns as in the top left hat in the picture above of the 4 hats.  It's simply two rows of grey, two rows of the pinkish.  The reason it seems so blended is that the pinkish yarn is two ply.  One has a slow colour change of pink/cream/light grey, the other ply is grey. 
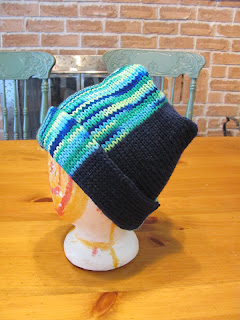
 These two hats are also my sideways hat pattern, but instead of putting all the stitches back to work at once and starting a new section, I put them back one at a time.  It comes out with 4 sections and is almost square on top!


 The two pictures above just show more hats that I sent.   I did find that the sideways hat used less yarn as there is more shaping at either end.
I can't remember if I included this picture before. It's a pair of double thick mittens, done in 100% worsted weight, superwash wool.  These babies are thick and warm.  A great way to use up mismatched colours is to use them for the inside.  Of course, the mittens can be turned inside out, but someone might like the random look too.  Or, you can use a thinner, or thicker yarn for the inside.  Whatever you have! 

The main idea I want to present is to weigh your yarn before starting.  If you have equal amounts, then you can do equal size stripes (they can be unequal in the sense of 2-A, 4-B, 4-A, 2-B).  If you have double of one colour compared to another, plan accordingly.  Use the smaller amount for a band, or thin stripes.  If you want to keep a variegated yarn looking saturated, stripe it with a contrast yarn, or with one that matches identically.  If you want to soften a variegated yarn, blend it with frequent rows of a matching colour.  One row of each will blend very nicely.

Monday, April 16, 2012

White is the New Pink

I decided to try the "Kill Me" shawl again, working word for word with the pattern.  It was still difficult, and I really think there's an error in the pattern.  I think I will try writing it out more clearly, for others.  I have to find out first if I did the decreases right.
First decision though, was what yarn to use.  The original was from a huge cone I have, but the shawl used only 88gr.  So I picked a 100gr hank of yarn that is extremely similar, but from Grand River Yarns.  I can't find the same yarn there (or on Ravelry) but I did find one that seemed very similar called "Iris", while mine is called "Isis".  If you take a look at this post and scroll down, you can see a picture with the yarn.  It's the pinkish one on the left, with bits of black-blue.  Or, look at this post, and scroll down.  Sometimes when you dye with black, it will "break" and you'll see the individual colours that make it.  That's what it seems like with this yarn.

I knit the shawl, weighing the yarn when I got to a "critical point" in the pattern, and found that I wasn't going to have enough to make it the full size!  Altered the pattern and finished off.  Took it upstairs for a bath, since this yarn has been floating around since fall 2007.  Cool water and some Soak, and look what I found!
 Buh Bye pink dye!  So glad I wasn't washing any other items at the same time!
 Right out of the bath, it still had lots of pale blue/turquoise splotches, and a pink tint over all.
 As it dried, it seemed to get lighter, though it is definately not white.  The splotches also seemed to disappear!
There are a few splotches left, but they sort of look odd now.  I'll admit, I wasn't overly thrilled with the yarn to begin with.  It was a free skein from a "buy 4 get one free" and she didn't have any more of the 4 that I chose, that I really liked (except for the one that my friend picked, but since she drove, I let her have it, LOL).  I had never thought about over dying it, but I think I might do that now!  The yarn is rayon, which means I have to dig out my Procion MX dyes.  I don't have much of them, so my colour choices are probably going to limited to blues/turquoises which I had bought to dye a cone of rayon from Camilla Valley Farms.  We'll see.  Not sure when I'll get to it, as I also have to get out the instructions, etc...and there are other, more pressing projects.  But, this means I can't add the 100gr to my yarn used yet!

Friday, April 13, 2012

Cozy

To distract from the fact I haven't finished any projects since last week, I'll show a slightly old project instead!

Knitters can often be heard saying that a yarn spoke to them.  Let them know what it should--or shouldn't--be.  Some people might find this odd, but is it any different from a sculptor that looks at a hunk of marble and sees an armless goddess?

I bought this lovely yarn many years ago.  I suspect I bought it in 2000, or maybe even before.  It was after November 1998 (when we bought my little car, which I'm pretty sure we were driving), but before Feb 2001 when I rolled it.  Of course, I could be totally wrong and we were in the next vehicle, but it was still definitely before 2002.  Funny what we use to date events!  We were driving to Bancroft, from Orangeville, and stopped in a large yarn (and back then it had quilting stuff) store, on Anne St (or, you get off on Anne Street).  They had a great back room with their discount items.  I bought 19 balls (I might have bought 20, but what I have here adds up to 18.36 balls).  I don't remember the price, but I can't see myself paying more than $2.50 per ball--that would have been nearly $50 plus tax, and I'm sure Rob was with me so it would have been a hard sell!  For some reason, $2/ball seems "right" in my mind.

The yarn is Naturally "Cafe".  It's "10 ply", or, a 20st/4" worsted weight.  I hate the "ply" system.  The yarn itself has only 4 plies.  It's 42% NZ wool, 28% alpaca fleece, 26% mohair, and 4% nylon.  At the time, alpaca was not common in yarn, so I was thrilled to try it.  There's 3 green strands, and then one black boucle strand. The yarn feels really soft and almost silky "in the ball".   However, once you knit it, it has almost a prickly feel!  I had originally planned to make a plain sweater.  I did try once  I got the LK150, to make a sweater, but wasn't happy.  When I got my yarn cubbies in May 2010 I put this yarn prominently at the front (bottom left cubby in the last picture).  I knew I had to keep it visible.

With this being the year to use up stash, I knew I had to get this yarn made into something.  I did some swatching and really realized that it was not going to become a sweater.  Maybe a cardigan, but I still wasn't convinced.  All of a sudden I decided it was going to become an afghan--we hadn't had a new one for the couch in quite a long time and the ones we had had been stolen to someone's bedroom.


 I choose Heidi's round table cloth pattern--the same one I used for Meg's baby blankets. It looks much different in a "mature" yarn! This time I did it on the Singer SK155. Maybe T9?
There are ripples in this one.  I didn't block it really, just washed it and stretched it out over a chair to dry.  I've had the ripples in other versions, but not the two I made for Meg.  I think the looser the gauge, the less likely the ripples.  They don't bother me for an afghan, but I wouldn't want that as a tablecloth.

It has been well received on the couch, though Hugh asked if it could be "his".  Ummm.   No.  Rob thought it should be a little bit bigger, LOL.  My big question now, is what to do with 244gr of the leftover yarn?!

Yarn In:  10 905gr
Yarn Out:  674gr + 9185gr = 9859gr
Balance:  1046gr more In than Out
Cost:  $192.71/107 days = $1.80 per day