Just when I thought I was doing great at not buying yarn...I needed more. I have an order for 5 Teddy hooded cowls, and although I asked if the 5th one (an addition to the original order) could be a different colour/shade, it just felt wrong when the time came to work on it. And, I had used some of the black I bought for more Toothless stuffies, for the black kitty cowl, and I was pretty sure I didn't have enough anyway, so that was on the list.
I got to Michaels and headed to the Cozy Wool section. Yup, the rack of "Mushroom" that I had emptied out last month was still empty. So I wondered around looking for another yarn. I was coming to the back corner, and wow--there was two balls of Cozy Wool in Mushroom, just sitting in another rack! Upon closer inspection, it was a whole other section of Cozy Wool, with another rack of Mushroom! While the dye lot doesn't match, it does appear very close. Two balls of that, and I will use leftovers of the very first dyelot to make the ears for them all. I did just barely squeak cowl #4 out of the last of the last dyelot, though that one has a few extra ends to weave in (127gr x 2 = 254gr)
Loops & Thread "Impeccable" was on sale, and that's what I bought before for the new Toothless orders. However, they had no balls of black. I started looking at the giant balls of acrylic, and noticed it was also Impeccable, and there was a black. I got out my calculator--it was a better deal than the same amount at regular price, though the sale priced balls were cheaper than the big one...but there were no black small balls. However, I realized that I could use my 40% off one regular priced item coupon on the big ball! Awesome!! Then I got home and looked up the original Toothless and see I used Bernat Waverly, LOL! (396gr). Total cost at Michaels, $20.31)
And, I had a give away on my Facebook page. I offered a pocket bunny, or a cupholder mitt. The winner ended up being the sister of the photographer that I made the other pocket bunnies for--and she had ordered them for her sister. I said I was flexible, and she thought a pocket unicorn would be nice because her daughter wants a baby unicorn for her big unicorn. I searched for some gold metallic thread/yarn, couldn't find anything at Michaels, but did find some at Wal-Mart. 35gr, $4.26
Yarn In: 289gr + 9074gr = 9363gr
Yarn Out: 5669gr
Balance: 3694gr MORE brought IN then out
Costs: $24.57 + 457.63= $482.20/322 days = $1.50/day
Monday, November 24, 2014
Tuesday, November 18, 2014
Winter!
Last week, November 11, Remembrance Day in Canada, was so warm, even for November--it was more like late September. What a nice treat--usually it's cold and rainy. But then, it turned cold and rainy and yesterday, winter appeared in much of southern Ontario. On Sunday, I managed to get some photos done before we got too much snow!
Back in late summer I had quite a few inquiries about the animal hooded cowls. I finally got one woman's order done (no rush, these are Christmas presents....if she can wait that long LOL). She asked for one kitty and one bear for 6 and 8 year olds and a kitty for a 16 month old, colours up to me.
 First up, the bear. Cozy Wool in chocolate brown (267gr). This bear told me she wanted a pink bow tie, no boring button!
 Next up, a charcoal kitty. This was three strands of yarn from the stash--Impeccable in black (that I had bought for making more Toothless dragons), vintage Mary Maxim Royale (30% mohair) in black, and Esslinger Wolle "Charme" (20% wool) in charcoal/grey. A nice subtle effect! Then, I edged the front and the ears in black curly fun fur (no label).
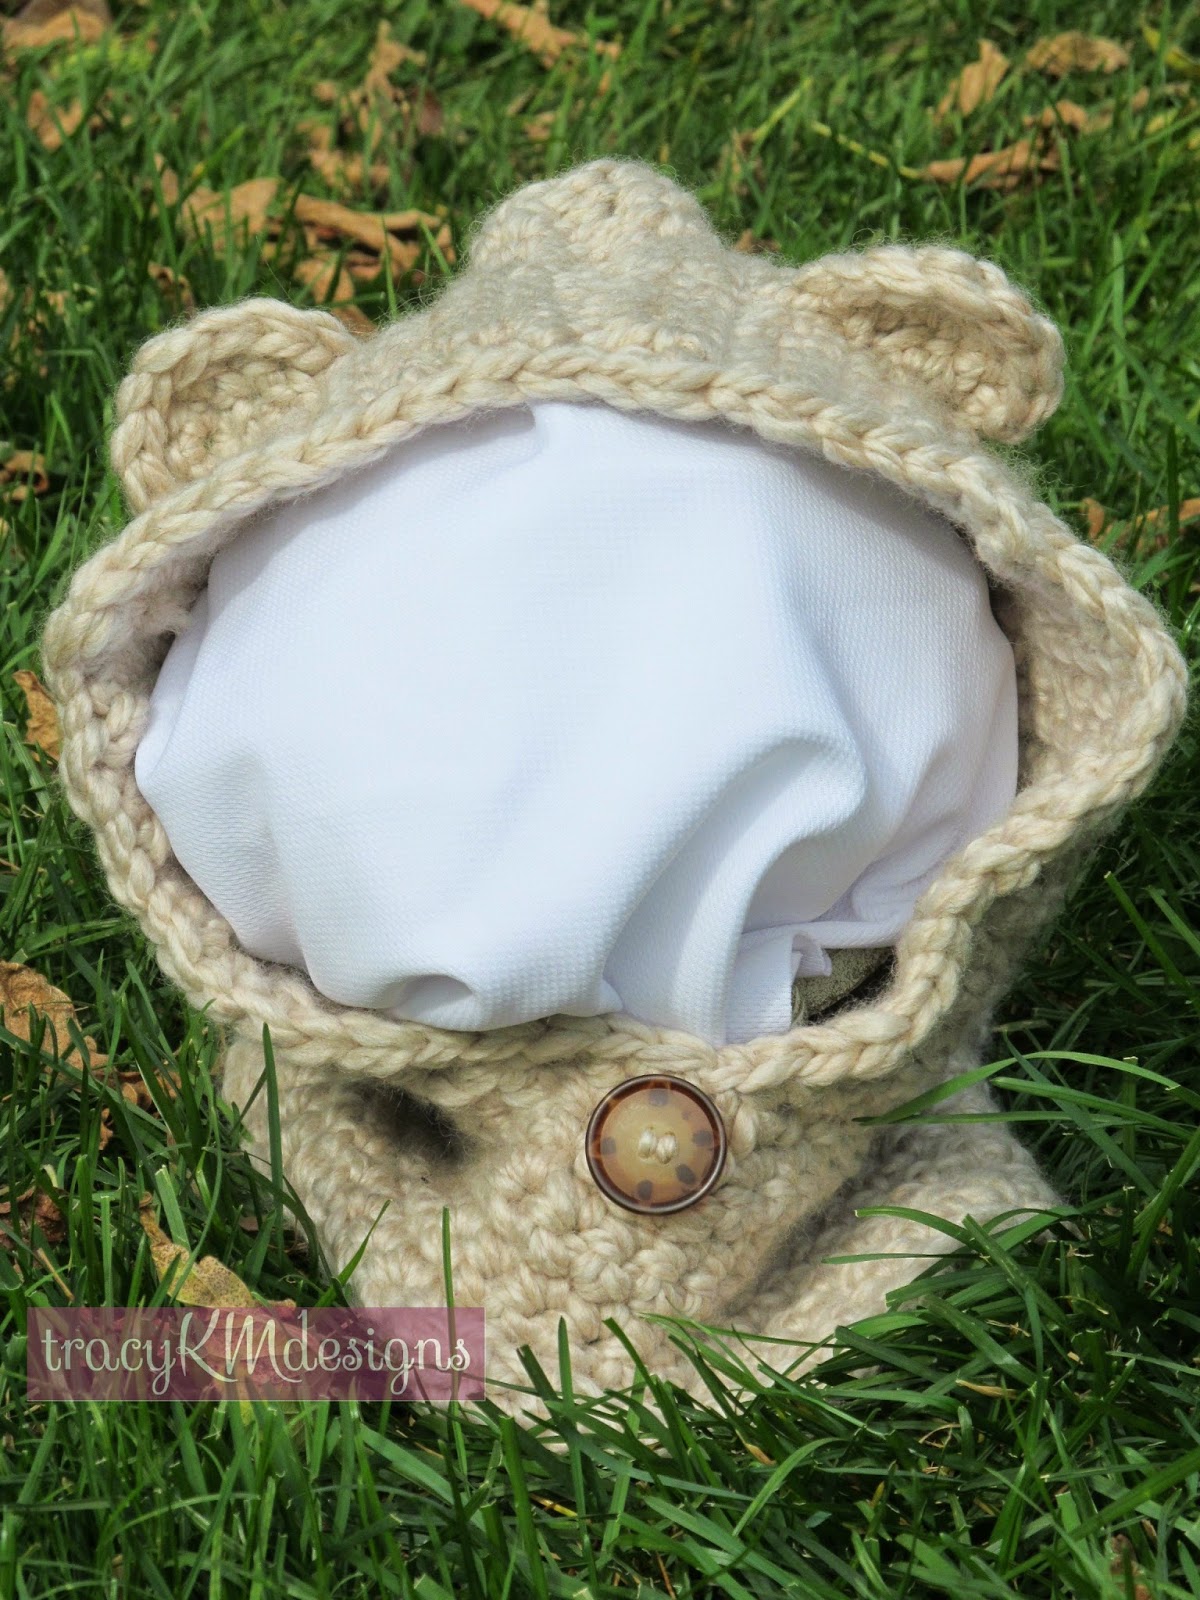
 I finished the main part of the black kitty first, then did the white one--including the bow, then came back to the black one to finish it off (at the time I made it, I didn't know what I wanted at the neck). This bow is made from Red Heart "Reflective" in the purple colour (234gr). A fun way to be cute AND safe! And every kitty need a bell.
 The white kitty is a strand of white, I think Impeccable, and a strand of Patons Sequined Lace, and then every third row I added a fun fur. On the right side rows, I crocheted it in, and on the wrong side rows, I carried along the front (right) side of the work. I was running low, and I thought this would be a good way to stretch it out and add some variation, since these rows weren't as dense as the rows it was crocheted in with the other two yarns.
 Then I spent a LOT of time with an almost blunt needle, picking out the fun fur so it was mostly on the right side. Less tickly on the inside, and more fun on the outside. I didn't have much left, so I wove the fun fur along the outside of the ears--it wasn't enough to crochet it around the edges of the ears, like I did with the black. Then I trimmed it along the ears, as it seemed too scraggly. I didn't do a round of single crochet around the face on this one. Not enough of the white fun fur, and it wouldn't have looked good without it. (186gr)
The bow--I took quite a bit of time finding the "right" bow pattern. Not a bow tie, a real looking tied bow. I was going to just crochet a chain, single crochet back, and tie it into a bow. But I wanted the tapered tails. I found this pattern through Ravelry. Perfect!
Got them delivered, and they were well received! I still think I might make one for myself if I ever get the chance before spring!
Yarn In: 9074gr
Yarn Out: 687gr + 4982gr = 5669gr
Balance: 3405gr MORE brought IN then out
Costs: 457.63 /316 days = $1.45/day
Back in late summer I had quite a few inquiries about the animal hooded cowls. I finally got one woman's order done (no rush, these are Christmas presents....if she can wait that long LOL). She asked for one kitty and one bear for 6 and 8 year olds and a kitty for a 16 month old, colours up to me.
The bow--I took quite a bit of time finding the "right" bow pattern. Not a bow tie, a real looking tied bow. I was going to just crochet a chain, single crochet back, and tie it into a bow. But I wanted the tapered tails. I found this pattern through Ravelry. Perfect!
Got them delivered, and they were well received! I still think I might make one for myself if I ever get the chance before spring!
Yarn In: 9074gr
Yarn Out: 687gr + 4982gr = 5669gr
Balance: 3405gr MORE brought IN then out
Costs: 457.63 /316 days = $1.45/day
Friday, November 14, 2014
Clean Up, Clean Up!
A photographer posted in a frugal group (like Freecycle) that she was looking for crochet hooks and yarn to learn to crochet. There are often posts like this, and I always mean to respond....but this time I actually did, and cleaned out my duplicate hooks and dug deep in the worsted weight bin to find some yarn I could part with. Not a lot, but one of the balls is a full ball of Impeccable in a bright Christmas green :)
Yarn In: 9074gr
Yarn Out: 435gr+ 4547gr = 4982gr
Balance: 4092gr MORE brought IN then out
Costs: 457.63 /312 days = $1.47/day
Yarn In: 9074gr
Yarn Out: 435gr+ 4547gr = 4982gr
Balance: 4092gr MORE brought IN then out
Costs: 457.63 /312 days = $1.47/day
Wednesday, November 12, 2014
Lions and Tigers and Bear!
Okay, I've done a wolf and a dino, but no lions and tigers :)
I was asked to make an adult bear hooded cowl, for the same lady who wanted the dino one. Sandra, from Apple Melon Designs is a hoot. And thankfully, patient :) I've had her bear hoodie done for a while, though it just needed a button or something at the neck. I don't do the little button placket that's in the pattern, it might be okay on an adult size, but it just seemed bulky and unnecessary on the tiny ones. She wanted something more subtle then the dino one, so this one is plain black, LionBrand Thick n Quick. But what to do for the decoration? I had some black glittery buttons, but they were a bit small.

So, I crocheted a circle with the teal reflective yarn, and sewed the button on top! Now, there's just a hint of a reflective patch when it's dark out, and a nice teal colour when it's not dark. I chose a circle instead of a flower so that the men in the house could also grab it and wear it for those quick late night dog walks.
 It's hard to get a good picture. I tried outside, but the flash wasn't going off...even though it seemed dark out. Oh well, it shows it enough to know the reflective yarn works!
Yarn In: 9074gr
Yarn Out: 314gr+ 4547gr
Balance: 4527gr MORE brought IN then out
Costs: 457.63 /310 days = $1.48/day
I was asked to make an adult bear hooded cowl, for the same lady who wanted the dino one. Sandra, from Apple Melon Designs is a hoot. And thankfully, patient :) I've had her bear hoodie done for a while, though it just needed a button or something at the neck. I don't do the little button placket that's in the pattern, it might be okay on an adult size, but it just seemed bulky and unnecessary on the tiny ones. She wanted something more subtle then the dino one, so this one is plain black, LionBrand Thick n Quick. But what to do for the decoration? I had some black glittery buttons, but they were a bit small.

So, I crocheted a circle with the teal reflective yarn, and sewed the button on top! Now, there's just a hint of a reflective patch when it's dark out, and a nice teal colour when it's not dark. I chose a circle instead of a flower so that the men in the house could also grab it and wear it for those quick late night dog walks.

Yarn In: 9074gr
Yarn Out: 314gr+ 4547gr
Balance: 4527gr MORE brought IN then out
Costs: 457.63 /310 days = $1.48/day
Monday, November 10, 2014
The Next Generation
It seems that the busier I get, the more the family demands of me too. Anyone else notice that? But sometimes you have to put family first, and this weekend was like that.
Diane Sullivan re-posted her video for how to make a hair scrunchie on the machine. It was one of those videos I always thought I'd get back to watch later as I don't see myself as a scrunchie type of gal anymore. But hey! I have a daughter with incredibly thick, long hair who always wears it pulled back, and likes to dress it up! Even better, she's on a figure skating synchro team and has to wear it up, with a team practice dress. She could make a scrunchie to match her practice dress, and use up some of my yarn! LOL. She's done a bit on the machines before and sometimes asks, but it's hard finding projects young kids can do themselves.
 She used a thicker, silicone elastic. It was a bit trickier, but she needs heavy duty bands in her hair.
 She started Friday night, and we were done on Saturday. She did a total of 1000 rows, but was annoyed that the row counter only went to 999!
 Can you believe she's about to turn 9?! When I started this blog, she was 9 MONTHS old!
This is not a big stash buster (8grams, including the band), but would be a great use of those small odd amounts you just can't throw out. I think this was an old Kroy sock yarn.
She decided she also wants to make a scarf for her new jacket. We looked at the designs in the manual and she liked ones with flowers, so she's doing card 20 (I think) in blue and white (again, Kroy sock yarns). I got it set up while she was at practice. Good thing, cause it took me two tries :)
 Concentration!


 I thought it was neat how when it rolled in, it completed the half patterns on each edge.
 The machine does such an awesome job on fair isle. I would never, ever attempt this by hand!
 Meg asked an interesting question. What if I had casted on ALL the needles. Mmmm. That would turn the work 90degrees, meaning instead of knitting it as long as needed to loop twice around the neck, the needlebed would determine the length...I don't know if it would be a good length or not. However, you'd only need to knit one pattern repeat to get the width, and when worn, the flowers will be "right side up". Interesting...
I did wonder, after casting on, if it should have been made double wide and folded over, and then I thought, no way do I want to seam it LOL. I think it'll be fine with the backside showing. I'm seeing "inside out" fair isle sweaters in the stores now, so we're right on trend! Dad suggested doing a yellow stripe at the end, because it's part of the team colours. She liked that idea, and I think what I will do is graft the beginning and end together with yellow. This way, if we ever want to take it apart, I'll know where the graft is :)

Earlier this fall, the night before picture day, my older daughter decided her outfit needed something. At 9pm, she started "arm knitting" a scarf in black chunky. She got it finished, but decided it blocked the view of her hair, LOL. So I started wearing it. We weren't too happy with it. She had used two strands of Shetland Chunky, and it was too sparse. After a couple weeks, I ripped it out and crocheted it in treble crochet. I started with 10 tc, but after a couple rows, determined it was too wide. Decreased on each side, and kept going. When I got to almost the end of my yarn, I increased again at the edges, so the beginning and end would match to sew together. When I wear it, I either put the wider part behind my neck for warmth, or at the front to cover up a deep V t-shirt. I also discovered that I can take one twist and pull it up around my head like a headband. LOL. Multi purpose!! It used 50gr. Quite an economical gift idea. Though I think it needed beads :)
 A black scarf is perfect for me because I wear a lot of colour, and a lot of my hats and mitts don't have matching mates.
Yarn In: 9074gr
Yarn Out: 58gr + 4175gr = 4233gr
Balance: 4841gr MORE brought IN then out
Costs: 457.63 /308 days = $1.49/day
Diane Sullivan re-posted her video for how to make a hair scrunchie on the machine. It was one of those videos I always thought I'd get back to watch later as I don't see myself as a scrunchie type of gal anymore. But hey! I have a daughter with incredibly thick, long hair who always wears it pulled back, and likes to dress it up! Even better, she's on a figure skating synchro team and has to wear it up, with a team practice dress. She could make a scrunchie to match her practice dress, and use up some of my yarn! LOL. She's done a bit on the machines before and sometimes asks, but it's hard finding projects young kids can do themselves.
This is not a big stash buster (8grams, including the band), but would be a great use of those small odd amounts you just can't throw out. I think this was an old Kroy sock yarn.
She decided she also wants to make a scarf for her new jacket. We looked at the designs in the manual and she liked ones with flowers, so she's doing card 20 (I think) in blue and white (again, Kroy sock yarns). I got it set up while she was at practice. Good thing, cause it took me two tries :)
I did wonder, after casting on, if it should have been made double wide and folded over, and then I thought, no way do I want to seam it LOL. I think it'll be fine with the backside showing. I'm seeing "inside out" fair isle sweaters in the stores now, so we're right on trend! Dad suggested doing a yellow stripe at the end, because it's part of the team colours. She liked that idea, and I think what I will do is graft the beginning and end together with yellow. This way, if we ever want to take it apart, I'll know where the graft is :)
Earlier this fall, the night before picture day, my older daughter decided her outfit needed something. At 9pm, she started "arm knitting" a scarf in black chunky. She got it finished, but decided it blocked the view of her hair, LOL. So I started wearing it. We weren't too happy with it. She had used two strands of Shetland Chunky, and it was too sparse. After a couple weeks, I ripped it out and crocheted it in treble crochet. I started with 10 tc, but after a couple rows, determined it was too wide. Decreased on each side, and kept going. When I got to almost the end of my yarn, I increased again at the edges, so the beginning and end would match to sew together. When I wear it, I either put the wider part behind my neck for warmth, or at the front to cover up a deep V t-shirt. I also discovered that I can take one twist and pull it up around my head like a headband. LOL. Multi purpose!! It used 50gr. Quite an economical gift idea. Though I think it needed beads :)
Yarn In: 9074gr
Yarn Out: 58gr + 4175gr = 4233gr
Balance: 4841gr MORE brought IN then out
Costs: 457.63 /308 days = $1.49/day
Thursday, November 06, 2014
How Did I Forget?!
I can't believe I never posted this set! And that it's a year old! What happened?! Such a gorgeous picture too!


I made this last fall for Jenna, along with a bunch of hats. I thought it looked sweet just laying in my garden, LOL, but the real test is on a baby.
Isn't this so sweet?!
Baby feet!
I wish I had a continuous supply of newborns to model my stuff, LOL. I'm going to count this set in this year's totals. I totally could have made it this year. Oh, it's coming back to me now. I dyed the yarn. Actually, I think I started with other grey, thicker mohair, and got half done the pants and realized that I had two different dyelots. Wonder where the hat went. Oh, there it is! Gee whiz. I must be totally losing my marbles. There was issues with dying the yarn too...don't remember. Either it wasn't a big problem, or it was so big I blacked it out LOL. I'm somewhat guessing on the weights, based on other similar items.
Yarn In: 9074gr
Yarn Out: 50gr + 4125gr = 4175gr
Balance: 4899gr MORE brought IN then out
Costs: 457.63 /304 days = $1.51/day
Yarn Out: 50gr + 4125gr = 4175gr
Balance: 4899gr MORE brought IN then out
Costs: 457.63 /304 days = $1.51/day
Tuesday, November 04, 2014
Soft and Sweet
Soft, delicate mohair hats and wraps are very popular with newborn photographers. Little toes peeking through, a bit of a vintage feel. I hadn't knit an actual mohair wrap yet, though it's been on my "want to do when I have no orders" list. I want to offer newborn prop sets--wrap, pod, couple hats, and pants, in co-ordinating colours (girls/boys/neutral). Well, this hasn't happened yet, LOL.
I did get an order for a hat and wrap. The photographer sent me a picture of a baby wrapped up and wondered how it was done--we thought maybe there was a slit to pull one end through. I asked around, and googled, and found the actual original wrap vendor, and there was no slit, it was just a rectangle. However, she wanted to go ahead with the slit idea and it opens up new wrapping possibilities.
 I started with the hat, using a pattern I've used before. Okay. How is it possible I never blogged about that grey set?! That means it didn't get included in last year's totals? Oh, it's about 100gr at the most, probably, LOL. Anyway, after knitting a bit, I thought it looked a little too textured/chunky. I had wanted a bit of texture to contrast with the smoothness of the wrap. I messaged the client and asked if she had an opinion, and indeed, she wanted a smooth look to the hat as well. No problem!

Got the hat done, and did the wrap. I had thought I might use the LK150, but it's kind of buried in my studio. Took a few attempts with swatching--use 6mm needles (feel more comfortable) and do double wraps and drop the extra wrap off on the next row, or use 12 mm needles (broomsticks!) and do single wraps. Even though this was less than a month ago...I can't remember for certain, but I think I did the 12mm needles. I think this because I was at my brother's house for his birthday and working on it, while sitting next to his MIL, who was also crocheting. Her husband laughed at us, and said he's going to bring me broomsticks next time, to knit with. I said I felt like I was already using broomsticks! I had tried to knit in the restaurant while waiting for our (slow) dinner, but it was too awkward.
Once done, I felt it needed a little something. So, I made my traditional three layer flower. It was huge! So I made another smaller one.

Because it was vintage yarn and kicking around in my tote bag for a while, I washed it. Unfortunately, it felted a little!! The hat wasn't too bad, but the wrap? I soaked it in water with a good squirt of "smoothing" conditioner, then hung it for a bit to stretch under it's own weight, then pinned it out, stretched, and steamed. It did get back some of it's stretch, though the stitches are still very open even when relaxed--but I think they would have been anyway because of using the 12mm needle. I must remember next time to actually go a bit smaller since the photographer wraps the baby pretty tightly, which stretches the wrap out.
 The wrap used 83gr, and the hat and two flowers used 50gr (there's always a few grams more though, due to trimming tails. I really should count that since it all adds up!).
Yarn In: 9074gr
Yarn Out: 133gr + 4002gr = 4125gr
Balance: 4949gr MORE brought IN then out
Costs: 457.63 /302 days = $1.52/day
I did get an order for a hat and wrap. The photographer sent me a picture of a baby wrapped up and wondered how it was done--we thought maybe there was a slit to pull one end through. I asked around, and googled, and found the actual original wrap vendor, and there was no slit, it was just a rectangle. However, she wanted to go ahead with the slit idea and it opens up new wrapping possibilities.
Got the hat done, and did the wrap. I had thought I might use the LK150, but it's kind of buried in my studio. Took a few attempts with swatching--use 6mm needles (feel more comfortable) and do double wraps and drop the extra wrap off on the next row, or use 12 mm needles (broomsticks!) and do single wraps. Even though this was less than a month ago...I can't remember for certain, but I think I did the 12mm needles. I think this because I was at my brother's house for his birthday and working on it, while sitting next to his MIL, who was also crocheting. Her husband laughed at us, and said he's going to bring me broomsticks next time, to knit with. I said I felt like I was already using broomsticks! I had tried to knit in the restaurant while waiting for our (slow) dinner, but it was too awkward.
Once done, I felt it needed a little something. So, I made my traditional three layer flower. It was huge! So I made another smaller one.
Because it was vintage yarn and kicking around in my tote bag for a while, I washed it. Unfortunately, it felted a little!! The hat wasn't too bad, but the wrap? I soaked it in water with a good squirt of "smoothing" conditioner, then hung it for a bit to stretch under it's own weight, then pinned it out, stretched, and steamed. It did get back some of it's stretch, though the stitches are still very open even when relaxed--but I think they would have been anyway because of using the 12mm needle. I must remember next time to actually go a bit smaller since the photographer wraps the baby pretty tightly, which stretches the wrap out.
Yarn In: 9074gr
Yarn Out: 133gr + 4002gr = 4125gr
Balance: 4949gr MORE brought IN then out
Costs: 457.63 /302 days = $1.52/day
Friday, October 31, 2014
Nothing to See...
I'm busy crocheting bear hoodies, and kitty hoodies, and stuffed bears....while I do have some finished projects to show you, right now I need to get caught up on the "Yarn In" totals. Ugh. I hate this type of post. However, ALL the yarn I've bought is for orders, not for the stash. Unfortunately, there usually ends up being some left overs that do go in the stash. Sometimes it gets balanced by yarn coming out of the stash, but lately...not so much!
3 balls of Loops & Threads "Impeccable" in black, for more Toothless orders. 128gr x 3 = 384gr; $12.40
6 balls of Loops & Threads "Cozy Wool" in Mushroom, 127gr x 6 = 762gr; $33.83
2 balls Loops & Threads "Cozy Wool" in Brown and Mushroom, 127gr x 3 = 381gr; $16.92
Totals: 1527gr, $63.15.
Wowza.
Yarn In: 1527 + 7547yd = 9074gr
Yarn Out: 4002gr
Balance: 5072gr MORE brought IN then out
Costs: $63.15 + $394.48 =457.63 /298 days = $1.54/day
A year ago, this was my post:
Yarn In: 12 957gr
Yarn Out: 10 431gr
Balance: 2 526gr more brought IN than out
Costs: $9 + $249.29 = $258.29/305 days = $0.85/day
My out totals were a little inflated, because I had given away quite a bit of yarn, after getting a large donation. I think my balance would be about the same once I complete my current set of orders using all this yarn I bought. If I use most of it--say, 1350gr, that will improve my balance to 3722gr, plus the projects I haven't shown yet. My costs were much less last year because I was doing more knitting from my stash and from thrifted yarns. This year, many of my orders need yarn purchased. I might go back and create subtotals, for yarn given to me, and given away/sold, vs the amount actually used.
Two years ago, this was my post:
Yarn In: 18 141gr
Yarn Out: 14 640gr
Balance: 3501gr more brought IN than used up
Costs: $16.88 + $420.20= $437.08/311 days = $1.41
Wow, look at that yarn in/out! I must have gotten a big donation!! The rest is pretty comparable. How interesting!
Sunday, October 26, 2014
A Tale of Two Teddy Hoodies
I've written already about creating a Teddy hoodie and not having enough yarn. Getting more yarn and getting it done, and the client saying she wants a different colour. And crochet instead of knit. Got going again, had the "not enough yarn" issue again. So, what should have been a quick project ended up with, I think, FOUR trips to Michaels'. And two hoodies. In the end, she did love the one she got, so that's what matters!
First, the first knit version, with two toned ears, like she asked for:
 This took 132gr of LionBrand Thick n Quick in Fisherman (and a bit of random dark brown). The pattern had sizes 6-9 months, and 12-18 months, but the client wanted 10-15 months. A little fudging of the numbers and voila! This one is available to purchase, $25Cdn, + shipping.
Then I made her the crochet version, in a different yarn, with solid coloured ears. Sigh.
 It's hard to get a nice picture of a slouchy hood!
 Neither of these really show the colour. It's "Cozy Wool" in Mushroom.
 This is a better shot, though I used a filter to soften it a bit. Oh, and what's that? Yes, one of my new tags from Apple Melon Designs! This crochet version of the hoodie took 176gr. That's 124.7yds, compared to the knitted one at 82.3yds.
I got another order for this colour, went and got the yarn (and yarn for more Toothless stuffies), and then the next day got orders for FIVE more little hoodies in Mushroom. I went back to Michaels, and luckily it's on sale now, and cleaned out the shelf of Mushroom. BTW, did you know I don't like mushrooms? LOL!
Yarn In: 7547yd
Yarn Out: 132gr + 176gr + 3694gr = 4002gr
Balance: 3545gr MORE brought IN then out
Costs: $394.48/293 days = $1.35/day
First, the first knit version, with two toned ears, like she asked for:
Then I made her the crochet version, in a different yarn, with solid coloured ears. Sigh.
I got another order for this colour, went and got the yarn (and yarn for more Toothless stuffies), and then the next day got orders for FIVE more little hoodies in Mushroom. I went back to Michaels, and luckily it's on sale now, and cleaned out the shelf of Mushroom. BTW, did you know I don't like mushrooms? LOL!
Yarn In: 7547yd
Yarn Out: 132gr + 176gr + 3694gr = 4002gr
Balance: 3545gr MORE brought IN then out
Costs: $394.48/293 days = $1.35/day
Thursday, October 23, 2014
Kelly Sweater Techniques Tutorial
So, just HOW did I do the beige sections on the Kelly sweater?
When I first started, I was using worsted weight yarn on the SK155. Or maybe I was using the LK150. I have no problem with worsted yarn on that, though many people say not to use it. I only had a single bed, so there was lots of reforming stitches. The swatch I got was slightly different than what I ended up with on the Singer 327, but still close. But, I still had to re-swatch on the 327.
I started with examining the picture of the inside of the sweater.

 Just another shot of the whole sweater.
 Once the fabric is stretched out a little, you can see the undulating columns inside. I think I matched it pretty well!
.JPG)
.JPG) This is the "public" side of the above swatch. Still pretty messy!! I still wasn't 100% sure how I was going to form the stitches over the eyelets when I casted on for the back. But I wanted to move ahead.
This is the "public" side of the above swatch. Still pretty messy!! I still wasn't 100% sure how I was going to form the stitches over the eyelets when I casted on for the back. But I wanted to move ahead.


 First step of the pattern is to move all the ribber stitches. Of each pair, the left ones got moved one stitch to the left, the right ones, moved to the right. At first, I was doing this with the single prong tool, because I was looking just at each group of two stitches. Then I realized I could use my adjustable 7 prong tool, and move two stitches over at a time. Sometimes, if I lost focus, I got confused, but in general, this really sped things up (I think I knit almost the entire back the first time using the single tool!).
 These two pictures are just to show the steps needed. Pull needles all the way up, place transfer tool in hooks, push needles back down so stitches go onto tool, lift off tool, pull up needles being transferred to, put tool on needles, and push back down so the stitches go into the hooks and in working position.
 Once the stitches are all moved, they now line up directly with the mainbed stitches. Of course, this is a no-no with double bed knitting!
 Then, I pushed all the mainbed stitches forward to hold position.
 Using two two prong tools, I transferred all the mainbed stitches to the ribber bed stitches that were now directly below the mainbed stitches.
 I think there's three steps to transferring. Slid the MB stitches onto transfer tool, slide another tool into those stitches from the top,
 use the top tool to hook them onto the ribber stitches
 I wondered if the little P carriage could have transferred these stitches, but I didn't want to try mid-sweater!
 Mmmm, not sure why it's sideways. After all the MB stitches were moved down, the empty needles went back to A position, and the alternate needles (that fit into the spaces on the ribber bed), came into work position.
 Take one pass of the carriage over. Now, here's where the big issue lays. You can't have essentially what is a double yarn over. In hand knitting, you would knit and purl into a double yarn over to form two stitches. On the machine, I tried doing a single YO then knitting a row and then trying to make the YO bigger. I tried bringing up the heel of the stitch from the ribber. I could maybe have done one of the needles on the ribber and one on the MB and then moved the RB stitch back up? What I ended up doing what taking my single prong tool and inserting it from the top into the loop,

 Twisting it 180 degrees to the left (because that way just felt easier)
 And placing it back on the needle. At the bottom of the back piece, I had all 200 needles in work, so this was done to all 100 mainbed stitches. Every six rows in the cream section.


 Finally, I had all the pieces. And a lot of ends, loops at edges, and other tidbits to clean up. The sewing didn't go too badly, everything fit pretty well together! After sewing the shoulder seams, I made the collar. I used the cast on edge as the outer edge, knit half the collar, until I had used up half the yarn I had left. Took it off on waste yarn. Hung the body edge, right side facing me, onto the needles, spacing evenly (I found the middle first). Then hung the collar, right side facing the body. Knit a row, then casted off. Repeated for the other half of the collar. I was glad I had shortened the sweater, otherwise I would have had to do three sections, and would not have had enough yarn at all.
The biggest problem with sewing and blocking was the dog kept laying down on the pieces I had spread out on the floor.


When I first started, I was using worsted weight yarn on the SK155. Or maybe I was using the LK150. I have no problem with worsted yarn on that, though many people say not to use it. I only had a single bed, so there was lots of reforming stitches. The swatch I got was slightly different than what I ended up with on the Singer 327, but still close. But, I still had to re-swatch on the 327.
I started with examining the picture of the inside of the sweater.
I know that's not a great picture--it looked better on my iPad. I examined how the lines of knit stitches moved, and where the eyelets were. Although it was the inside, I figured if I could get the inside to match then the outside would. Also, the inside is what was facing me on the machine--or what I thought would be the easiest side to have facing me.
This is one of the swatches, trying different ways to get the eyelets. I actually liked this side better, LOL, but Kelly did not. You can see places where the stitches did not form above the eyelets. Then it becomes drop lace, and Diana Sullivan did a video on this while I was actually working on this sweater. WAY easier than what I was doing, but it looked too different, especially on the public side. It would have been an alternative if I wasn't trying to copy the sweater so precisely. Anyway, more about those dropped stitches later.
Not sure why I took this picture.
This was my first run at doing the back. I wasn't happy with the proportions of the light and dark. It also seemed a bit long, and once stretched, a bit wide. I recalculated my gauge after letting this sit for a month and indeed, I needed to re-work the math. I later found out that the KnitLeader was malfunctioning partway up the pattern. And it was kind of sloppy knitting. I hadn't "warmed up" enough.
I started out with 2x2 ribbing, using the cast on in the book for "heavier" yarns. I started with a tight tension and after the circular cast on, gradually increased. This kept the bottom from flaring out and helps eliminate stretching.
Then I would knit the row.
Here came the biggest game changer I figured out part way through. When I would knit the first row after twisting the eyelets, not all the eyelets would knit. I was finding myself having to re-work many of them. Some groups would have just the twisted stitch that didn't knit, some had both stitches that didn't knit, and the twisted stitch would have come untwisted, so I essentially had to re-do that row. I realized it was because there was no weight on the mainbed, after moving all the stitches to the ribber bed. So I tried hanging the ribber comb back on, and that helped, but not 100% and was awkward. I was in the last beige stripe on the second run of the back, when I had the idea to use ravel cord (or, thin waste yarn). I figured this was sort of like casting on--forming new stitches where there were none.
It worked! Almost every stitch knit! This idea, shown in that last picture above, truly saved my sanity, and combine with switching to the 7 prong tool for the ribber stitches, really shaved time off.
I still ended up with mistakes. Some of the mainbed stitches were fond of tucking instead of knitting, and even though I tried to check them every row, some still slipped by, so I'd have to decide if I wanted to unravel that stitch and re-work it, or let it go. Then, once while checking for tucked stitches, I noticed that I had a row of eyelets where quite a few hadn't formed right and the stitches above laddered. So I took it off the machine and when I laid it out to rip back, found that I had forgot two rows in between the first and second rows of eyelets (in the top beige section above, see how the lower two rows of eyelets are closer together?). Ugh. What a pain in the butt to get back on the machine.
After knitting the back and most of a front, I decided to do a run through of the other pieces, without patterning but with changing colours, to see how the yarn was going to last. It appeared I would just squeak by, so when I re-did the front, I went a bit smaller.
The biggest problem with sewing and blocking was the dog kept laying down on the pieces I had spread out on the floor.
I washed it up and laid it out to steam it so it would open up. When I looked at it, and then at the picture of the original, I was mighty pleased!
I didn't have it stretched out for the length enough for this picture, it was just a quickie.
So hard to get a good picture! I really needed a model, but there's no one here this size except me LOL. I was quite pleased in the end. It's really cozy, she can wear it as a shawl collar, or let it just fall open. The sleeves aren't too long for a normal sized lady, LOL. The only thing I wish was different was a bit more width on the collar (that half ball I found, without a label...I wonder...). And I wished I had swatched a bit more, to learn the two tips that really made a difference in my speed.
Subscribe to:
Comments (Atom)