I tried to swatch in tuck stitch again on the Singer 155, and the stitch selector would NOT move into tuck setting. Not, "it's stiff and needs lube" feeling, not "if I push it will going sproing or snap", just nothing. It just wouldn't go!
I took the cover off again, that little piece that bent before is still okay. The stitch selector cam just won't go past slip stitch. I took that off, and underneath, at the bend in the groove near the end that I think means it's in tuck, it's been worn. When I turn the carriage over, I can move the levers and flippers freely. When I try moving the plates under the stitch selector by hand into the tuck position, it's very difficult....a lot of resistance. Not stiffness, but it's like pushing against a spring. Should it be like that? Everything else works fine, although I do check after putting it in slip stitch that both flippers underneath have moved; it was slipping in one direction but not the other for a while. But I don't really like slip stitch. It's neat for Fair Isle look, in that there aren't floats, but it's a pain to change the yarn every two rows (in Fair Isle, both yarns are in the carriage all the time). I did cheat at the tuck, by having it in slip stitch, and manually putting the float onto the needles, but I think the float in Tuck stitch is a bit looser. I would like to be able to do tuck stitch---I can do it manually on the other machines, so it was nice to get a punchcard machine to do it for me :)
Friday, February 25, 2011
Thursday, February 24, 2011
Baby Items
Back when Lucy was a wee thing, I decided I wanted to try selling at craft shows. Two of my knitting group members and I did our first show the day before Lucy turned 1. Most of my items were baby things...stuff I had made that was too big or too small or not my thing, or wrong season, LOL. We did okay, I made some pocket money, and we said we'd do it again, next year, at some bigger shows. We improved our display, made more stuff, and sold less at the next two shows the next year than we had at the first show (one of the two shows was on a day of freezing rain!). The knitting group folded, and we sort of lost interest in doing another show. But I had this box full of items that I've kept adding too over the past 7 years. Whenever someone has a baby I look in the box, and think either "That's not good enough for THIS baby" or "That's too good for that baby". And make something fresh, LOL. I kept hoping maybe I'd do another show, or find a place I felt good about donating the items (like, there's a couple really nice hats that won ribbons at the fair...)
Two weeks ago I got an email from my mother in law saying that her women's group was having a "baby shower" for the local young mom's help center and did I have anything I could donate, as they like to present a complete layette to the newborns, and they have a 'shop' for items up to two years old. I was currently trying to finish a baby sweater in a yarn I HATED and knew I'd be sending that item! LOL. But I got the box out and decided it was time to pass on most of the items.
Some of the items are 'sets' , you'll notice in the pictures, say, one hat matches a blanket and a sweater, but not bootees. The hats: I love the flower hats. Some of the sizing on a couple hats might be weird, I'll let the center decide that. The blue hat with the two pompoms was one of the first things I made on my first knitting machine. The multi-coloured bonnet at the top left is an Elizabeth Zimmerman pattern, to match her BSJ.
The bootees:
Two weeks ago I got an email from my mother in law saying that her women's group was having a "baby shower" for the local young mom's help center and did I have anything I could donate, as they like to present a complete layette to the newborns, and they have a 'shop' for items up to two years old. I was currently trying to finish a baby sweater in a yarn I HATED and knew I'd be sending that item! LOL. But I got the box out and decided it was time to pass on most of the items.
Some of the items are 'sets' , you'll notice in the pictures, say, one hat matches a blanket and a sweater, but not bootees. The hats:
 I love the flower hats. Some of the sizing on a couple hats might be weird, I'll let the center decide that. The blue hat with the two pompoms was one of the first things I made on my first knitting machine. The multi-coloured bonnet at the top left is an Elizabeth Zimmerman pattern, to match her BSJ.
The bootees:
I've had a hard time finding baby bootee patterns I really like. Many are SO cute, but annoying to make, or the yarn I have doesn't match the gauge, or the size turns out wrong for the other items in the set...
The blue sweater on the left I actually kept out, as my sister-in-law's sister was having a baby this week and they didn't know if it was a boy or girl. Turned out to be a boy, so this is perfect. The poncho was crocheted during the poncho craze. The white/multi colour sweater is a "Baby Einstein" jacket I never blogged about because it had been sitting in my drawer waiting for finishing for ages.

This set was partially made on the Singer 327, as a ribber learning project. Patons used to publish machine knitting patterns and the sweater and pants are from a booklet. I had some issues, I won't bore you, LOL. I wasn't sure of the size, so I made two pairs of bootees ("Blue Steps") and two hats ("Aviatix"?). There is also a tuck stitch blanket in this yarn (blogged about it a few summers ago). It's from a Patons/Bernat yarn that I got at their tent sale as a "Tangled Skein" for $3 and a few evenings work (I think I blogged about it....someone "helped" when I was winding it up). The blanket is very soft and squishy, but the top and pants are knit tighter and are not quite so snuggly.

These three sweaters were some of my earliest items on the KnitSmart, summer of 2005.
 These are Elizabeth Zimmerman's baby surprise jackets and baby surplice jackets (number 4 and 5 from the top...date back to 2003/2004). The bottom sweater is a stockinette version of the BSJ, done as a pullover instead of a jacket. I thought I had another one of these...

The blankets:
 The top 3 are tuck stitch blankets done on the LK150, soft and squishy, they don't even need edging! The yellow one was an early Singer 327 project, I blogged about it back in 2007 probably. The pink stripes one is garter stitch, done on the diagonal. Lots of ends! The thick blue stripes one was also done on the LK150, using short rows to make a "square". Generally, you can't miter a corner in stockinette stitch by short rowing one stitch at a time...the row and stitch gauge are not the same like in garter stitch. It turns out not bad, but I was really bothered by how the striping matched up at some of the diagonals, but not others. It's a lovely squishy, large blanket, but I'm annoyed by little things, LOL.
 I hope the items can be used, and are appreciated. If so, I'd love to make more things! There aren't going to be babies in our extended family again (although I do have some cousins that "should" be going down that road...), but I still have lots of baby yarn and ideas!! This was a great motivator to get several items out of the drawer and buttons sewn on, seams sewn up, etc. And as for that baby sweater with the yarn I hated....I got it finished finally, but didn't have any buttons!
The blue sweater on the left I actually kept out, as my sister-in-law's sister was having a baby this week and they didn't know if it was a boy or girl. Turned out to be a boy, so this is perfect. The poncho was crocheted during the poncho craze. The white/multi colour sweater is a "Baby Einstein" jacket I never blogged about because it had been sitting in my drawer waiting for finishing for ages.

This set was partially made on the Singer 327, as a ribber learning project. Patons used to publish machine knitting patterns and the sweater and pants are from a booklet. I had some issues, I won't bore you, LOL. I wasn't sure of the size, so I made two pairs of bootees ("Blue Steps") and two hats ("Aviatix"?). There is also a tuck stitch blanket in this yarn (blogged about it a few summers ago). It's from a Patons/Bernat yarn that I got at their tent sale as a "Tangled Skein" for $3 and a few evenings work (I think I blogged about it....someone "helped" when I was winding it up). The blanket is very soft and squishy, but the top and pants are knit tighter and are not quite so snuggly.

These three sweaters were some of my earliest items on the KnitSmart, summer of 2005.
 These are Elizabeth Zimmerman's baby surprise jackets and baby surplice jackets (number 4 and 5 from the top...date back to 2003/2004). The bottom sweater is a stockinette version of the BSJ, done as a pullover instead of a jacket. I thought I had another one of these...
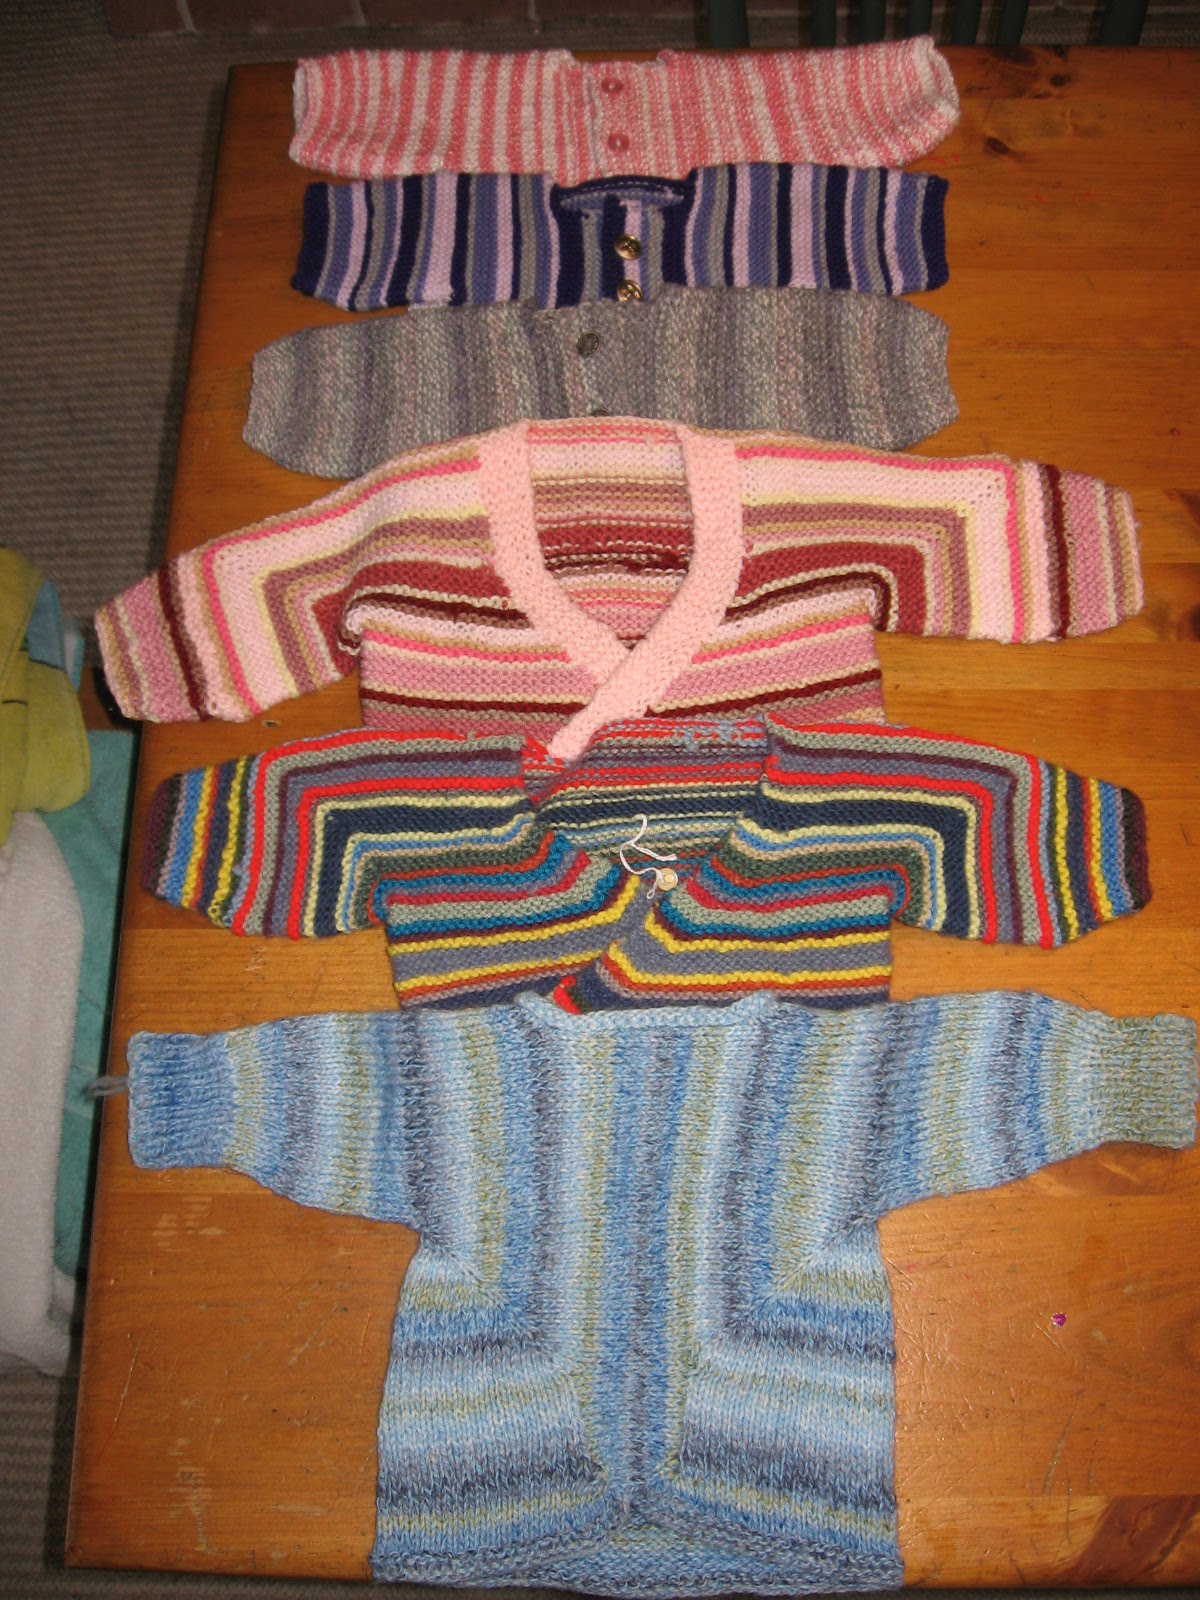
The blankets:
The top 3 are tuck stitch blankets done on the LK150, soft and squishy, they don't even need edging! The yellow one was an early Singer 327 project, I blogged about it back in 2007 probably. The pink stripes one is garter stitch, done on the diagonal. Lots of ends! The thick blue stripes one was also done on the LK150, using short rows to make a "square". Generally, you can't miter a corner in stockinette stitch by short rowing one stitch at a time...the row and stitch gauge are not the same like in garter stitch. It turns out not bad, but I was really bothered by how the striping matched up at some of the diagonals, but not others. It's a lovely squishy, large blanket, but I'm annoyed by little things, LOL. I hope the items can be used, and are appreciated. If so, I'd love to make more things! There aren't going to be babies in our extended family again (although I do have some cousins that "should" be going down that road...), but I still have lots of baby yarn and ideas!! This was a great motivator to get several items out of the drawer and buttons sewn on, seams sewn up, etc. And as for that baby sweater with the yarn I hated....I got it finished finally, but didn't have any buttons!
Monday, February 21, 2011
Baby Cocoon
In the Yahoo USM/ISM group, there is a fairly new member who runs a charity that donates much needed baby items to hospitals and families. She does incredible work, running this organization from the goodness of her heart. One of her current focuses is knitting and sewing baby cocoons for her local hospital. Baby cocoons have been popular among baby photographers for awhile, for a cute and cozy look. They've become popular among new moms now because they are cute and cozy and easier to manage than blankets or swaddling. It's like an external womb :)
 She has started making them on her Bond, and there have been a few attempts to write patterns, and one other member make a YouTube video that got me thinking. The first pattern on Yahoo involved using a garter bar to do decreases at the bottom. The YouTube video involved using short rows, but also having to graft parts together. I thought that was too much work. So I made my own pattern :)
This pattern is now on Ravelry; if you make one, please consider adding it, along with any changes you made!


She has started making them on her Bond, and there have been a few attempts to write patterns, and one other member make a YouTube video that got me thinking. The first pattern on Yahoo involved using a garter bar to do decreases at the bottom. The YouTube video involved using short rows, but also having to graft parts together. I thought that was too much work. So I made my own pattern :)
Machine: LK150
Tension T5, 20st/27rows to 4", worsted weight yarn, I used 111grams, sorry I can't give a yardage as it was a mill end yarn
Cast on 50sts. I used a chain cast on with the latch tool because it matches my cast off, and I didn't know at the time what I might do for edging.
Knit 100 rows.
Short row down to having the center 20sts in work, 15 sts on each side are out of work. To do this, pull the needle on the side closest to the carriage, out to hold/D position and knit across. Pull the needle on the edge closest to the carriage now, out to hold/D position and knit across. Now, pull the next needle that's in work on the side next to the carriage, out. You don't need to wrap the needle, it will do it by itself. Knit across. Keep doing this, pulling the next needle into hold and knitting across. Look for videos by Diana Sullivan on YouTube :) And make sure to have a claw weight under where the stitches in work meet the stitches being held.
Once you've got 15 needles pulled out on each edge, you've got to reverse the process, this time, putting the first needle of the group of needles on the side furthest away from the carriage, into C/upper work position and knit across. No wrapping needed.
This short rowing process will take 60 rows total.
Now, we're going to work up the backside, seaming as we go. To do this, on the edge away from the carriage, find the first edge loop after the short rowing.  You'll notice on the edge that there is a tight stitch (a knot) and then a loop. Stick the transfer tool through the loop, and put it on the first needle in work on that side.
 Knit across. Do the same for the other side, and knit across.
 Sometimes, it can be hard to see which is the next loop to use, but if you just pull it out a little, you'll find the empty loop.
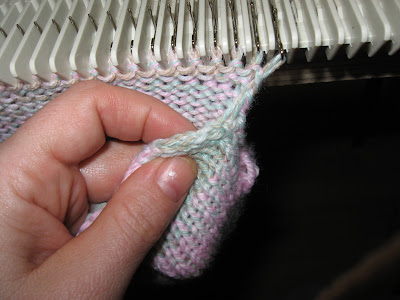 Do this, joining one side to the first stitch on that side, knitting across, for 100 rows. You're back at the top! Cast off.
You'll notice on the edge that there is a tight stitch (a knot) and then a loop. Stick the transfer tool through the loop, and put it on the first needle in work on that side.Knit across. Do the same for the other side, and knit across.Sometimes, it can be hard to see which is the next loop to use, but if you just pull it out a little, you'll find the empty loop.Do this, joining one side to the first stitch on that side, knitting across, for 100 rows. You're back at the top! Cast off.
I did a little pie crust trim across the top, using 3 sts, and 6 rows. I used every cast on/cast off stitch, and I probably could have skipped a stitch in between each loop as it's a bit thick and heavy. I also steamed it a bit to help the curl. I also steamed the seams.

This was a super fast project! The first side, down to the tip, took about 15 minutes (I'm slow at casting on, LOL). The second side also took 15 minutes, doing the seam as you go slows you down a little. The pie crust trim less than 30 minutes I think. It's about 10" across and 18" long. I couldn't find a definitive answer on what size it should be, but about 16-18" long is good.
I hope you make one or two, or 300, to donate somewhere too!
Edited to add: Thanks for the great response to this pattern. It's been suggested that it could be snugger around the neck. I think you still need stretchability, to get a wiggly baby in. Instead of casting on fewer stitches, I'd still cast on 50st, then knit about 3 inches, and convert the previous 2 inches to ribbing, leaving the top 1 inch to either roll over, or to add an edging to. If you have a ribber, doing the whole thing in ribbing would be awesome....it'd be more close fitting but still very stretchy.
I have finally seen another version of this, SO cute! Check out THIS post! And for a few other options (and what NOT to do!)...I'd love to see what you've done with the pattern!
I have finally seen another version of this, SO cute! Check out THIS post! And for a few other options (and what NOT to do!)...I'd love to see what you've done with the pattern!
Friday, February 18, 2011
Yarn Diets
Are you on a yarn diet?
It's so popular, at the start of the new year especially, to go on a yarn diet. I find it interesting to see how others interpret the word "diet" LOL. Some people will say no new yarns except sock yarn, yet they have enough sock yarn to keep their entire family's feet warm for the next 40 years. Some say no specialty/designer/keepsake single balls because they already have lots of single balls that they don't know how to use up, so they're always buying just "one more". Some say only yarn for gifts, or only yarn on sale, or only yarn for actual projects. Sometimes knitters say these things as a way to justify their current yarn addiction ("sock yarn doesn't count as stash"), or sometimes because they can be honest and stick to a plan.
I'm a frugal yarn shopper to begin with, but for years I felt I was personally responsible to adopt orphaned sale balls of yarn, or thrift shop balls. The poor ball, it's been in the sale bin for months, what will happen to it if I don't rescue it? LOL. I've gotten much better about that. I'm usually able to pass up single balls, esp. if I don't LOVE it, or if it's a sock yarn but less than 350yds, or something unknown. On Wednesday, I did fall off the thrift store wagon though....14 balls of Novita Came, a worsted weight (on the finer side) of 90% Falkland wool, 10% camel, 9 balls soft white, 5 balls dark green. For $1 a ball, how could I pass that up--and it fits my other resolution to buy "project" amounts. I did also pick up 4 balls of Bernat Co-ordinates (which I do already have a tiny bit in my stash), as I'm making baby items for donating (and I actually do have a donation place now, not just throwing them in the Rubbermaid bin in the basement).
When Meg was having speech therapy in Shelburne, instead of Orangeville, I had to resist the temptation to visit the yarn shop there....for 12 weeks. Oh, it was hard. I knew if I could get through the first few weeks, it'd get easier, and I had intended to visit on our last week up there...but somehow even managed to not do that! I'm pretty good when I go to knitting festivals too, and being out here, that's not much of a problem anymore :( The Spinrite tent sale always sucked me in but as they moved from single balls to bagged amounts, it got easier to pass yarn up (even with the "buy 3, get 1 free" as there was often not colours I really wanted). I was still a sucker for the cones and the "tangled skeins" though!
And, in reflecting back since we've moved here, I do still have some trouble spots. When FabricLand was clearing out the Moda Dea Superwash Wool, I bought quite a bit, along with the "Georga" wool from Wal-Mart. Neither match the gauge of other wools in my stash, but there's enough of each to make a lot of mittens or hats. I did buy some wool to make gloves for Christmas presents, but got tired of working with the dark colours. I did buy some other wool to make gifts, and some did get used up, but some didn't. I'm trying this year to not even buy yarn to make gifts! That really adds a new twist to the challenge.
So, since this new year started, all I've bought is the yarn this week. That's not too bad! Oh yeah, I did buy a ball last weekend at Michaels' to re-knit a cowl I made last year...I'm going to keep track here of exactly what I buy, and what I use.
Wow, I didn't think I could write so much about not buying yarn!
Tuesday, February 15, 2011
A Rolling Stone Gathers No Moss....
A few years ago at a Spinrite (Patons/Bernat) tent sale, I picked up a large cone of Bernat Masala in beautiful shades of green. I probably paid $20 for it and it weighs 1126gr (includes the cone), which is equal to 11 balls, or 1705 yards (the sweater below used 357grams, or 3.6 balls). Even if I was going to handknit it, working from a cone is great--reduces the number of ends to weave in! I knew at the time I could knit it on my KnitSmart, or maybe even my LK150. I didn't know if it would be a sweater, or an afghan.
After the new year, with all those "Potato Chip Scarves" I decided to give it a try on the LK150 as a scarf. It turned into a very long swatch. It felt a little big for the LK150. It also felt terrible. I hand washed the end of the swatch, and that seemed to improve it. However, it got set aside for other things.
Then, I got the Singer 155! Although there were many ideas running through my head on how to work this yarn (sideways, yoke on a different direction, plain...), I opted to go simple. I measured my favourite fleece sweater and compared it to the largest size of the lady's sweaters for the knit radar patterns. It was almost identical, though the fleece was longer. I also liked the curved bottom on the fleece sweater. I thought I had it all worked out, but the finished sweater turned out a bit shorter than I expected. Perhaps washing in the machine is also partly to blame, even though it's totally acrylic/polyester. When I went to measure the swatch, I couldn't find the gauge ruler with all the knit radar stuff. However, I could use my standard gauge ruler and figure it out. I had some issues with the setting on the Knit Radar. Even though the instruction book is quite good, it was missing an important detail. The row gauge of this sweater was 18.5rows/4" but the knit radar gauge scale starts at 30rows. If you have less than 30 rows, you set it for double the row gauge. But there are two trippers on the carriage....I won't get into it, LOL.
 I wanted a split neck, but not a V neck. I thought the neck would fold outwards....duh, it's stockinette stitch, it rolls inwards (although I thought about sewing it with purl side out, but I didn't need more texture). For the neck, I split it in two, and dec. one stitch on each side. I didn't need to dec. that stitch.
  It's also perhaps a tad low...I like to show some skin, but I do have my limits, LOL. Because it's rolling in, I think what I'll do is single crochet around the neckline, and make some small button loops near the bottom of the split, and sew about 3 buttons to close it up a smidgen. I'll also single crochet around the bottom, which will straighten it out and give me another centimeter or two.
 I decided to do two row stripes for the body. I wound off a large ball/cone, and nicely, for the back (first piece), the ball lasted for the whole back. I did have to cut the large cone and wind a second ball halfway up the front. Then there were ends where it split for the neck...and then on the sleeves, I didn't bother with the stripes, and used up the large ball and the swatch, but to keep the colours in large blocks in the proper colour progression, I did have to wind a few more small balls...
 Something feels a little funny with the shoulders. Maybe they're a smidge wide. When I sewed in the sleeve head, it did seem a little too short. Somehow the sleeves turned out a little too short, but I don't mind, I'm usually pushing up sleeves anyway! I also think sweater (esp. the back) is a little wide at the waist (I think I have a sway back), but the knit radar contour had straight sides and I didn't want to mess with it too much. I did add a couple inches across the front and didn't do any bust short rows ( because of the stripes). I think for the next one I'll nip it in at the waist a little.
I'm not totally sure how I feel about the sweater. Rob gave it his approval though. The yarn does feel better after being washed (SO important with cone yarns...the yarn has a good texture, but was very flat from being wound tightly on the cone), but it is still totally acrylic and the static is huge! LOL. And something just feels a little off....
After the new year, with all those "Potato Chip Scarves" I decided to give it a try on the LK150 as a scarf. It turned into a very long swatch. It felt a little big for the LK150. It also felt terrible. I hand washed the end of the swatch, and that seemed to improve it. However, it got set aside for other things.
Then, I got the Singer 155! Although there were many ideas running through my head on how to work this yarn (sideways, yoke on a different direction, plain...), I opted to go simple. I measured my favourite fleece sweater and compared it to the largest size of the lady's sweaters for the knit radar patterns. It was almost identical, though the fleece was longer. I also liked the curved bottom on the fleece sweater. I thought I had it all worked out, but the finished sweater turned out a bit shorter than I expected. Perhaps washing in the machine is also partly to blame, even though it's totally acrylic/polyester.
When I went to measure the swatch, I couldn't find the gauge ruler with all the knit radar stuff. However, I could use my standard gauge ruler and figure it out. I had some issues with the setting on the Knit Radar. Even though the instruction book is quite good, it was missing an important detail. The row gauge of this sweater was 18.5rows/4" but the knit radar gauge scale starts at 30rows. If you have less than 30 rows, you set it for double the row gauge. But there are two trippers on the carriage....I won't get into it, LOL.I wanted a split neck, but not a V neck. I thought the neck would fold outwards....duh, it's stockinette stitch, it rolls inwards (although I thought about sewing it with purl side out, but I didn't need more texture). For the neck, I split it in two, and dec. one stitch on each side. I didn't need to dec. that stitch. It's also perhaps a tad low...I like to show some skin, but I do have my limits, LOL. Because it's rolling in, I think what I'll do is single crochet around the neckline, and make some small button loops near the bottom of the split, and sew about 3 buttons to close it up a smidgen. I'll also single crochet around the bottom, which will straighten it out and give me another centimeter or two.I decided to do two row stripes for the body. I wound off a large ball/cone, and nicely, for the back (first piece), the ball lasted for the whole back. I did have to cut the large cone and wind a second ball halfway up the front. Then there were ends where it split for the neck...and then on the sleeves, I didn't bother with the stripes, and used up the large ball and the swatch, but to keep the colours in large blocks in the proper colour progression, I did have to wind a few more small balls... Something feels a little funny with the shoulders. Maybe they're a smidge wide. When I sewed in the sleeve head, it did seem a little too short. Somehow the sleeves turned out a little too short, but I don't mind, I'm usually pushing up sleeves anyway! I also think sweater (esp. the back) is a little wide at the waist (I think I have a sway back), but the knit radar contour had straight sides and I didn't want to mess with it too much. I did add a couple inches across the front and didn't do any bust short rows ( because of the stripes). I think for the next one I'll nip it in at the waist a little.
I'm not totally sure how I feel about the sweater. Rob gave it his approval though. The yarn does feel better after being washed (SO important with cone yarns...the yarn has a good texture, but was very flat from being wound tightly on the cone), but it is still totally acrylic and the static is huge! LOL. And something just feels a little off....
Sunday, February 13, 2011
The $120 Dishcloth
I was excited to start exploring the new Singer 155 last week. I tried to be patient though, LOL. On Monday (or maybe Tuesday?), I got a chance to sit down with an online version of the manual and tried casting on. The manual showed a way I wasn't familiar with, the weaving cast on. I could not get it to work! I moved on to trying the standard ravel cord cast on, which did work. But it was really hard pushing the carriage. I had it on T6 and kept loosening the tension, right up to T10, and it was still very hard. I looked at my swatch later, and found it had 22st/4"....no difference from T6 to T10 :(
We replaced the sponge bar that night. Oh, was it gross. Ever seen foam go gooey? It was tight getting the new one back in. The needles had been flush on the bed, but I knew the old "sponge" bar was toast. I tried another swatch, with the same results. At one point, I had to give the carriage a good push, and I know I also tried turning the stitch selector dial. I remember hearing a noise or something, at some point. I don't know if that was at the start, or later on, or if that even was the cause...
I took the carriage off the rails, and turned it over. I turned the tension dial, and nothing happened! I took the Singer 327 carriage off, and turned it over. It was pretty much just a smaller version, but when I turned the tension dial, arms underneath moved, and when I turned the stitch selector, other things happened. Flippers flipped and arms moved and it all seemed so complex.
I spent some time spraying some silicone spray into it, underneath. After some time, things moved a bit. When Rob got home, he played with it, and used some penetrating spray. Things loosened up more, but it was still not right. We planned to take it to his father the next night.
The next morning, I opened my email, and there was a message from a woman who thought I needed the service manual, and sent me a link to her Photobucket site where she has scanned a TON of old patterns and manuals. A service manual!! I took a look through it, and it showed how to take the carriage apart! Starting with removing the handle and tension selector, and cover...I thought I could just take that off, to get Rob started....I just couldn't help myself! I didn't take anything more apart, but I could at least spray it some more....got it moving better.
After awhile, I tried putting the stitch selector dial back on, and try it again. It would not go into tuck stitch. It just wouldn't. It wasn't that it was stiff, it just wouldn't go! I looked very carefully inside and watched how the little bits moved as the stitch selector went around. Fascinating! Little notches hitting guide levers that moved other things...But...something was getting hung up between slip stitch and tuck stitch.
I finally figured out what it was! It doesn't show up on the schematic, but here it is: See the little upside down J pieces, one facing left, one facing right? Underneath those levers are matching ones. You can see in the picture that the lower left one is bent over onto its side!!! It was jamming into the stitch selector cam!!
I put the stitch selector back on before Rob got home but he wasn't pleased I had started without him, LOL. I was so pleased with myself! He carefully bent it back up, put the cam back in, lubed it more, and it was working! It was stiff to go into tuck stitch, but it didn't feel like the carriage would crack in two.
I set out to try another swatch. I could tell right away that the tension arms were working! I put in a fair isle card, and wow! how wonderful! I wish my yarns had better contrast--they did as two separate balls! Then I tried a tuck stitch card. Mmm. It was doing slip stitch. Rob came down and wiggled it, and pushed it a bit harder than me, LOL. And look...there's tuck stitch! It looks so BIG compared to doing it on the standard gauge!
 I had a million ideas for the inaugural project. I had a bunch of pattern sheets for a variety of things, including slippers, which I need. I started out trying the pattern. There was no indication of size, except as "small, medium, large". I gave the large a try. It was the same pattern I had tried before but didn't like...where you short row down, out for the heel, then down and outwards again for the toe, then repeat for the inside. I liked the pattern that did the heel, then a long section straight, then the toe. I did the outside, but stopped before doing the inside so I could take a look at the sizing. I didn't want to continue. There were still many other projects I wanted to try, but opted for my favourite dishcloth: Isn't it lovely?! Sure, I could make it on the KnitSmart, or the LK150...but this is a "real" machine!
 Why is it the $120 dishcloth? Well, I've made two projects so far, so it's the machine cost divided by two, LOL!
We replaced the sponge bar that night. Oh, was it gross. Ever seen foam go gooey? It was tight getting the new one back in. The needles had been flush on the bed, but I knew the old "sponge" bar was toast. I tried another swatch, with the same results. At one point, I had to give the carriage a good push, and I know I also tried turning the stitch selector dial. I remember hearing a noise or something, at some point. I don't know if that was at the start, or later on, or if that even was the cause...
I took the carriage off the rails, and turned it over. I turned the tension dial, and nothing happened! I took the Singer 327 carriage off, and turned it over. It was pretty much just a smaller version, but when I turned the tension dial, arms underneath moved, and when I turned the stitch selector, other things happened. Flippers flipped and arms moved and it all seemed so complex.
I spent some time spraying some silicone spray into it, underneath. After some time, things moved a bit. When Rob got home, he played with it, and used some penetrating spray. Things loosened up more, but it was still not right. We planned to take it to his father the next night.
The next morning, I opened my email, and there was a message from a woman who thought I needed the service manual, and sent me a link to her Photobucket site where she has scanned a TON of old patterns and manuals. A service manual!! I took a look through it, and it showed how to take the carriage apart! Starting with removing the handle and tension selector, and cover...I thought I could just take that off, to get Rob started....I just couldn't help myself! I didn't take anything more apart, but I could at least spray it some more....got it moving better.
After awhile, I tried putting the stitch selector dial back on, and try it again. It would not go into tuck stitch. It just wouldn't. It wasn't that it was stiff, it just wouldn't go! I looked very carefully inside and watched how the little bits moved as the stitch selector went around. Fascinating! Little notches hitting guide levers that moved other things...But...something was getting hung up between slip stitch and tuck stitch.
I finally figured out what it was! It doesn't show up on the schematic, but here it is:
See the little upside down J pieces, one facing left, one facing right? Underneath those levers are matching ones. You can see in the picture that the lower left one is bent over onto its side!!! It was jamming into the stitch selector cam!!I put the stitch selector back on before Rob got home but he wasn't pleased I had started without him, LOL. I was so pleased with myself! He carefully bent it back up, put the cam back in, lubed it more, and it was working! It was stiff to go into tuck stitch, but it didn't feel like the carriage would crack in two.
I set out to try another swatch. I could tell right away that the tension arms were working! I put in a fair isle card, and wow! how wonderful! I wish my yarns had better contrast--they did as two separate balls!
Then I tried a tuck stitch card. Mmm. It was doing slip stitch. Rob came down and wiggled it, and pushed it a bit harder than me, LOL. And look...there's tuck stitch! It looks so BIG compared to doing it on the standard gauge!I had a million ideas for the inaugural project. I had a bunch of pattern sheets for a variety of things, including slippers, which I need. I started out trying the pattern. There was no indication of size, except as "small, medium, large". I gave the large a try. It was the same pattern I had tried before but didn't like...where you short row down, out for the heel, then down and outwards again for the toe, then repeat for the inside. I liked the pattern that did the heel, then a long section straight, then the toe. I did the outside, but stopped before doing the inside so I could take a look at the sizing. I didn't want to continue. There were still many other projects I wanted to try, but opted for my favourite dishcloth: Isn't it lovely?! Sure, I could make it on the KnitSmart, or the LK150...but this is a "real" machine!Why is it the $120 dishcloth? Well, I've made two projects so far, so it's the machine cost divided by two, LOL!Wednesday, February 09, 2011
Knowing When To Call it Quits
I love the whole knitting process...designing, trying, knitting, wearing....some people just want items, some people don't care what the result is as long as the knitting is fun/educating, whatever. I'm a bit of both.
Some people are aghast at the idea of ripping out "hours" of "work". Not me! I've learned, if I'm not happy during the process, how can I be happy at the end? I knit to keep my hands occupied on car trips, while I watch TV, etc. It's a time filling with an awesome end result. With machine knitting it's often easier to rip it out totally than to rip back and carry on. Gasp. And sometimes you change your mind. Gasp!
I picked up two bags of "1lb Mill Ends" from Wal-Mart, for $5 each, which were very obviously Patons SWS. Normally, it'd sell for about $5.99 for an 80gr ball...and I got over 800gr....The one downside of course, is that it's a hand wash only yarn and I wouldn't even try to machine wash it on the gentle cycle! I knew I wanted to do something to show the stripes and brought my LK150 up to the kitchen last summer to try this out while the kids played outside. I had to swatch quite a bit to get the right row:stitch ratio of increases, which is different than if I was doing it in garter stitch. I liked the use of eyelets for the bottom increases.
 Despite getting the ratio to make it square, the edge stitches on the side were tight and the fabric was ripply. Blocking could have helped....but I prefer to knit an item without having to rely on blocking (unless it's lace).

I wanted it to be a slightly set in sleeve, a modified drop shoulder. I figured out how to do it...but it looked a little weird.
Some people are aghast at the idea of ripping out "hours" of "work". Not me! I've learned, if I'm not happy during the process, how can I be happy at the end? I knit to keep my hands occupied on car trips, while I watch TV, etc. It's a time filling with an awesome end result. With machine knitting it's often easier to rip it out totally than to rip back and carry on. Gasp. And sometimes you change your mind. Gasp!
I picked up two bags of "1lb Mill Ends" from Wal-Mart, for $5 each, which were very obviously Patons SWS. Normally, it'd sell for about $5.99 for an 80gr ball...and I got over 800gr....The one downside of course, is that it's a hand wash only yarn and I wouldn't even try to machine wash it on the gentle cycle! I knew I wanted to do something to show the stripes and brought my LK150 up to the kitchen last summer to try this out while the kids played outside. I had to swatch quite a bit to get the right row:stitch ratio of increases, which is different than if I was doing it in garter stitch. I liked the use of eyelets for the bottom increases.
 Despite getting the ratio to make it square, the edge stitches on the side were tight and the fabric was ripply. Blocking could have helped....but I prefer to knit an item without having to rely on blocking (unless it's lace).
I wanted it to be a slightly set in sleeve, a modified drop shoulder. I figured out how to do it...but it looked a little weird.
I had the back done, and was working on the front, getting ready to cast off stitches for the neckline, when I took it off on waste yarn so the table and machine could go back downstairs. Once an item if off the machine....it doesn't always go back on!
I've been swatching and trying to figure out what this yarn wants to be. I tried a big gauge Brioche stitch sweater from Interweave Knits....but the texture (it wasn't a Brioche Rib) made the fabric quite thick, and I didn't think I needed a thick layer over my thick self. I swatched "Tailored Scallops" from Interweave's "Lace Style" book. I really like that swatch, but I'm hesitant cause I wanted to do something to show the stripes in an interesting way. I looked through my machine knitting books and couldn't find anything that meets the gauge. I could just do something simple and cozy, and go with the horizontal stripes....
Any suggestions?
Monday, February 07, 2011
My New Toys!
On Friday evening, I took Meg and we went to Future Shop, and bought my first laptop! A Gateway NV53, with 15.6" monitor, 4GB memory, 500GB HDD.....my brother assured me that it was a great computer at a great price. It's been interesting getting used to it, and Windows 7. I did my last post here using it too. I have trouble highlighting text and moving it, and sometimes I press something and the whole page just disappears, LOL. But, after I write this, I am excited to be able to take it downstairs and use an online version of the instruction manual for my other new toy:  A Singer 155 chunky knitting machine! This is my 4th machine (although I had bought one other machine for my parents). So, for those of you keeping track, I have a Singer 327 (standard gauge, 4.5mm), Singer LK150 (mid-gauge, 6.5mm), KnitSmart (8mm), and Singer 155 (Bulky gauge, 9mm). The "mm" is the spacing between the needles. Only the 327 has a ribber, but the 155 does have a ribber available, I'll just have to be patient!
  The things that made me want this machine, is that it's a "real" bulky knitting machine...it has a 12st punchcard, and can do tuck, slip, punch lace, and fair isle. It also has a knit contour! It's a separate piece that you place onto the left end of the bed, behind the needles. I'm wondering if I can set it next to the LK150 and have it work with it too.
The Singer 155 will have quit a bit of overlap of suitable yarns with the LK150, but it can go much thicker, and just has many more features. Yes, I can easily use worsted weight with the LK, but the knit contour means I can take a schematic from a magazine (and I just picked up a pile of Interweave Knits from Value Village!), and make it so much quicker, and then have the pattern to use again, with another yarn.
When I went in to see the machine, I was surprised at how ....bulky, LOL, it was. The carriage looks huge, and I kept thinking the needles looked too far apart, or were missing every other needle. I haven't had the KnitSmart set up in awhile, so I've been focused on the 6.5mm and 4.5mm gauges. Yes, the 9mm is double the 4.5mm and a lot of tools/patterns can be easily adjusted. I thought a comparison of the every other needle selector tool would be interesting:
 Thank god for auto-save! Some how, this window just switched to my stats page (that I had been viewing prior to writing this), and I couldn't find this post page anywhere! That's happened a few times, I wonder what I'm doing!
A Singer 155 chunky knitting machine! This is my 4th machine (although I had bought one other machine for my parents). So, for those of you keeping track, I have a Singer 327 (standard gauge, 4.5mm), Singer LK150 (mid-gauge, 6.5mm), KnitSmart (8mm), and Singer 155 (Bulky gauge, 9mm). The "mm" is the spacing between the needles. Only the 327 has a ribber, but the 155 does have a ribber available, I'll just have to be patient! The things that made me want this machine, is that it's a "real" bulky knitting machine...it has a 12st punchcard, and can do tuck, slip, punch lace, and fair isle. It also has a knit contour! It's a separate piece that you place onto the left end of the bed, behind the needles. I'm wondering if I can set it next to the LK150 and have it work with it too.The Singer 155 will have quit a bit of overlap of suitable yarns with the LK150, but it can go much thicker, and just has many more features. Yes, I can easily use worsted weight with the LK, but the knit contour means I can take a schematic from a magazine (and I just picked up a pile of Interweave Knits from Value Village!), and make it so much quicker, and then have the pattern to use again, with another yarn.
When I went in to see the machine, I was surprised at how ....bulky, LOL, it was. The carriage looks huge, and I kept thinking the needles looked too far apart, or were missing every other needle. I haven't had the KnitSmart set up in awhile, so I've been focused on the 6.5mm and 4.5mm gauges. Yes, the 9mm is double the 4.5mm and a lot of tools/patterns can be easily adjusted. I thought a comparison of the every other needle selector tool would be interesting:
 Thank god for auto-save! Some how, this window just switched to my stats page (that I had been viewing prior to writing this), and I couldn't find this post page anywhere! That's happened a few times, I wonder what I'm doing!
By the way....I never expected the Superbowl would affect Canadian banks! I had to go to FOUR bank machines on Sunday afternoon to get money! I wish the machine had said it was out of money before I wasted time, or maybe I should have tried a lesser amount, LOL.
Saturday, February 05, 2011
Mmmmm....Nooooo....
Inspired by all the slouchy hats---some of which I, myself, actually knit---I decided to try again to make one for myself. Sigh. I either need to just stick with a proper pattern, or give up. Or get a new head.  Yes, it's not a good picture, overall, but still...I started out trying the "Sweet Honey Beret" from an old issue of Interweave Knits. The Yarn Harlot made it earlier in the fall, and it perked my interest. I thought if it were worn slouched to the back, instead of to the side, it would be "cool". I started the ribbing, and launched into the set up rows. I think there were THREE set up rounds. I barely made it through those. Then, I headed into the pattern rows. It just wasn't worth it!!
  It says it's a "brioche" stitch, but it's quite different from the brioche rib that I did those super cute baby bootees in. I ripped it back to the ribbing, and scanned my stitch dictionaries for a different "brioche" stitch. I found one that's super easy, two rows, one of which is a knit on the wrong side (or, since I was knitting in the round, I did a purl row). The hat moved along quite quickly, although I had to break into the second ball of the yarn ("Bonnie", 95%wool, 5% silk).
  I wasn't sure if I liked the rings of colours. I used this yarn before, to knit Rob a "Thorpe" earflap hat. That version was orange, with red. Yes, I could see that this one was different--with long lengths of different colours, but I just wasn't sure how it would knit up. I think it's a little too colourful for me :( Of course, it looks adorable on Lucy (although a little big...I've just lost another hat to Meg last week, LOL. Why do my hats look better on the girls than on me?!).
So, I started ripping it out. It's too full around the face, instead of hanging behind the head. I'm not sure I'll make another hat out of this yarn, I'm not 100% sure I'd like it on my forehead, and I'm just not keen on the colour rings. I was briefly thinking about just making another sideways, garter st, short row hat. Or, there was a funky one on Knitty.com, I think it was Vortex? Too funky for me with the top point, but I think there's a rounded version. I think a cowl would be awesome. I did start some mittens, but they're on hold while I clean up some other things.
Any suggestions for this yarn? It's great on 6mm-6.5mm needles, down to 5mm I suppose, even 4.5mm for a dense fabric (it's a very lofty yarn).
Yes, it's not a good picture, overall, but still...I started out trying the "Sweet Honey Beret" from an old issue of Interweave Knits. The Yarn Harlot made it earlier in the fall, and it perked my interest. I thought if it were worn slouched to the back, instead of to the side, it would be "cool". I started the ribbing, and launched into the set up rows. I think there were THREE set up rounds. I barely made it through those. Then, I headed into the pattern rows. It just wasn't worth it!! It says it's a "brioche" stitch, but it's quite different from the brioche rib that I did those super cute baby bootees in. I ripped it back to the ribbing, and scanned my stitch dictionaries for a different "brioche" stitch. I found one that's super easy, two rows, one of which is a knit on the wrong side (or, since I was knitting in the round, I did a purl row). The hat moved along quite quickly, although I had to break into the second ball of the yarn ("Bonnie", 95%wool, 5% silk). I wasn't sure if I liked the rings of colours. I used this yarn before, to knit Rob a "Thorpe" earflap hat. That version was orange, with red. Yes, I could see that this one was different--with long lengths of different colours, but I just wasn't sure how it would knit up. I think it's a little too colourful for me :( Of course, it looks adorable on Lucy (although a little big...I've just lost another hat to Meg last week, LOL. Why do my hats look better on the girls than on me?!).So, I started ripping it out. It's too full around the face, instead of hanging behind the head. I'm not sure I'll make another hat out of this yarn, I'm not 100% sure I'd like it on my forehead, and I'm just not keen on the colour rings. I was briefly thinking about just making another sideways, garter st, short row hat. Or, there was a funky one on Knitty.com, I think it was Vortex? Too funky for me with the top point, but I think there's a rounded version. I think a cowl would be awesome. I did start some mittens, but they're on hold while I clean up some other things.
Any suggestions for this yarn? It's great on 6mm-6.5mm needles, down to 5mm I suppose, even 4.5mm for a dense fabric (it's a very lofty yarn).
Wednesday, February 02, 2011
Just In Time!
So, I had made Hugh two pairs of blue mittens, neither of which he was really excited about, although he wore the blue Kroy (doubled mitts) the most. I knew I could do better, and that my kids deserve better, especially since it took me awhile to convince them that wool mittens are so great! I had extinguished all options for bright blue wool in my stash. That meant one thing...dyeing some of the wool I bought a few years ago to dye for making mittens (would have been January 2009, when I made some for Lucy's grade 1 class!). It's elann.com Superwash Merino. They give the gauge as 19st on 4.5mm needles I think...but if you read the comments on Ravelry.com you can see that I'm not the only one who thought it was much thinner. It's very similar to the "mercerized merino" I bought at Wal-Mart for Lucy's teacher's mitts (the bright green ones). That yarn also gave a much looser gauge. I was pretty certain I could knit it up on my standard gauge, but I figured I could still use the LK150 if I needed to. But first, it had to become blue:
 I wound it into a cake, and stuck it into a measuring cup with some Wilton's food dye in Sky Blue. That's the turquoise part on the bottom. I did it in the microwave, about 45 seconds at a time, let it cool, then repeat.
Then, I remembered that I had bought some Jacquard dyes in the summer! Indeed, one was labelled Sky Blue, so I decided I'd dip the other end in it....it's the dark Royal blue. What's the colour of your sky? The bright blue reminds me of Caribbean oceans....sigh...I was too impatient to wait for it to dry before re-winding it (how long would that take?!), so I put it in the oven on the lowest setting, and gradually unwound a bit at a time. Then, when I got to a portion that hadn't got much dye, I repeated the dyeing...with the darker, re-wound part hanging out of the microwave, LOL. I really liked the speckled look of the yarn, although it wasn't until it was knit that I could see just how much variation in intensity there was.
 I traced Hugh's hand, and made a pattern for the Knit Contour. I knit the inside mitt, using the Kroy 3 ply, then switched to the merino, which I had gotten 24st/4" at T10. I got the first mitt done, and was loving it (had done the thumb gussets using my new 7 prong tool!), but as the second one was coming along, I began to feel the "there's no enough yarn" doubt....big time. Indeed, there was not enough of the dyed yarn!!!
I decided to do a pattern, with another ball of the undyed white. We looked at my patterns (I just got a bunch of new punch card patterns, but they have to be punched out!), and the only ones he wanted were 24 st repeats, and he needed at most, 40st, so they wouldn't center, nor match up at the sides. He liked a 12 st pattern from the manual, so I went with that, using 38 sts (36 +2 to seam). It went okay, but once done, I was pretty certain it was too narrow. My Knit Contour told me I needed 40sts as I was now getting 25st/4" in the pattern. I said, to heck with the seam matching, and re-did it with 42 sts.
 But now, my machine was mad at me or something. Nothing went right. I won't bore you with the details, but if you've ever machine knitted with a ribber, a punch card, and a knit contour, while trying to simultaneously care for 3 kids and a old puppy.....even the knit contour acted up and one mitten came out way too long. The other was too short. The inside mitts were two different lengths. Argh. I finished off the tops in the solid blue, by hand....I found out I could have done more on the machine but I wasn't about to tempt things anymore. I undid seams, reknit one inside mitt top, or was it both....

On Monday night I still had the outer thumbs to do. I figured I could do them easily on the machine. But after two tries, I kept coming to the end of the gusset area on one edge, but not the other edge. I decided to do the thumbs the same way, but by hand, so I could see it and fiddle with it easier. Got it right the first try. I also had to reknit the inside thumbs...
 Even though it took me at least 2 days longer than expected, I LOVE these mitts! I want my own! I think it's really interesting how the one mitt pooled the more intense colours, but the other one is much paler. Wish I had realized this was happening, I would have stopped it. What I find fascinating is the punch card. It looks nothing like this. I did it as a slip stitch pattern (which unfortunately doesn't create floats for extra thickness), but the same punch card will give a totally different pattern if done in Fair Isle. How does that happen?
 I wound it into a cake, and stuck it into a measuring cup with some Wilton's food dye in Sky Blue. That's the turquoise part on the bottom. I did it in the microwave, about 45 seconds at a time, let it cool, then repeat.
Then, I remembered that I had bought some Jacquard dyes in the summer! Indeed, one was labelled Sky Blue, so I decided I'd dip the other end in it....it's the dark Royal blue. What's the colour of your sky? The bright blue reminds me of Caribbean oceans....sigh...I was too impatient to wait for it to dry before re-winding it (how long would that take?!), so I put it in the oven on the lowest setting, and gradually unwound a bit at a time. Then, when I got to a portion that hadn't got much dye, I repeated the dyeing...with the darker, re-wound part hanging out of the microwave, LOL. I really liked the speckled look of the yarn, although it wasn't until it was knit that I could see just how much variation in intensity there was.
 I traced Hugh's hand, and made a pattern for the Knit Contour. I knit the inside mitt, using the Kroy 3 ply, then switched to the merino, which I had gotten 24st/4" at T10. I got the first mitt done, and was loving it (had done the thumb gussets using my new 7 prong tool!), but as the second one was coming along, I began to feel the "there's no enough yarn" doubt....big time. Indeed, there was not enough of the dyed yarn!!!
I decided to do a pattern, with another ball of the undyed white. We looked at my patterns (I just got a bunch of new punch card patterns, but they have to be punched out!), and the only ones he wanted were 24 st repeats, and he needed at most, 40st, so they wouldn't center, nor match up at the sides. He liked a 12 st pattern from the manual, so I went with that, using 38 sts (36 +2 to seam). It went okay, but once done, I was pretty certain it was too narrow. My Knit Contour told me I needed 40sts as I was now getting 25st/4" in the pattern. I said, to heck with the seam matching, and re-did it with 42 sts.
But now, my machine was mad at me or something. Nothing went right. I won't bore you with the details, but if you've ever machine knitted with a ribber, a punch card, and a knit contour, while trying to simultaneously care for 3 kids and a old puppy.....even the knit contour acted up and one mitten came out way too long. The other was too short. The inside mitts were two different lengths. Argh. I finished off the tops in the solid blue, by hand....I found out I could have done more on the machine but I wasn't about to tempt things anymore. I undid seams, reknit one inside mitt top, or was it both.... On Monday night I still had the outer thumbs to do. I figured I could do them easily on the machine. But after two tries, I kept coming to the end of the gusset area on one edge, but not the other edge. I decided to do the thumbs the same way, but by hand, so I could see it and fiddle with it easier. Got it right the first try. I also had to reknit the inside thumbs...
 Even though it took me at least 2 days longer than expected, I LOVE these mitts! I want my own! I think it's really interesting how the one mitt pooled the more intense colours, but the other one is much paler. Wish I had realized this was happening, I would have stopped it. What I find fascinating is the punch card. It looks nothing like this. I did it as a slip stitch pattern (which unfortunately doesn't create floats for extra thickness), but the same punch card will give a totally different pattern if done in Fair Isle. How does that happen?
 Tuesday, February 01, 2011
Still Doing Mittens...
When I visited my parents recently, I got to see first hand the sad state of the "mitten drawer". I knew I had to do something about that! My mom was wearing a pair of green mittens, like "Newfie Mitts" although they seemed to be lined (which was good because I think they were also acrylic). She thought they were warm though, and I thought I should be able to whip some up for her. I had been wanting to hand knit that pattern, but her coat is so hard to "match" and well, I'm really on a machine knitting kick right now, LOL. 
I tried out a tuck pattern that I thought might give the same sort of look. Normally, you use the purl side of a tuck pattern for the right side, and although it did look nice in it's own right, it wasn't the look I wanted. It was a little more blended.
I used Headwaters Wool in a beige lace weight (what I used for my Flowerbasket Shawl), and Tanis Fiberarts Pink Label Lace weight that I used for my Sweet Lily Shawl. After I was done, and searching for a better yarn to sew it up with, I found a brown sock yarn that I had actually intended to use for these...the brown yarns are very similar! I thought it would be neat to make the ribbed cuff be on the inside only. I think it turned out exactly like I wanted! For the inside mitt, I used a standard increasing thumb gusset, using my three prong tool. But, I didn't think I could do that on the outer mitt because I didn't want the tuck pattern to get messed up. So, I put markers on the edges as I knit the outer part, where I wanted the thumb gusset based on the measurements of the inner mitt. Then, I did the thumb gusset like I showed with the two-toned purple mitt--picking up one stitch on each side, every two rows...
 The math didn't work out exactly, given the nature of tuck stitch, and I had to space the 'increases' out to get to the full height of the gusset. As I was doing this, I was thinking....if I had taken an outline of her hand while there, I could have drawn a pattern to use in the knit contour! Then, I could make mittens when ever the mood struck me! The thumb gusset looked a little misshapen on it's own, but seemed okay once I tried it on.
I tried out a tuck pattern that I thought might give the same sort of look. Normally, you use the purl side of a tuck pattern for the right side, and although it did look nice in it's own right, it wasn't the look I wanted. It was a little more blended.
I used Headwaters Wool in a beige lace weight (what I used for my Flowerbasket Shawl), and Tanis Fiberarts Pink Label Lace weight that I used for my Sweet Lily Shawl. After I was done, and searching for a better yarn to sew it up with, I found a brown sock yarn that I had actually intended to use for these...the brown yarns are very similar!
 I thought it would be neat to make the ribbed cuff be on the inside only. I think it turned out exactly like I wanted! For the inside mitt, I used a standard increasing thumb gusset, using my three prong tool. But, I didn't think I could do that on the outer mitt because I didn't want the tuck pattern to get messed up. So, I put markers on the edges as I knit the outer part, where I wanted the thumb gusset based on the measurements of the inner mitt. Then, I did the thumb gusset like I showed with the two-toned purple mitt--picking up one stitch on each side, every two rows...
 The math didn't work out exactly, given the nature of tuck stitch, and I had to space the 'increases' out to get to the full height of the gusset. As I was doing this, I was thinking....if I had taken an outline of her hand while there, I could have drawn a pattern to use in the knit contour! Then, I could make mittens when ever the mood struck me! The thumb gusset looked a little misshapen on it's own, but seemed okay once I tried it on.
The other idea I had, was that I could have knitted these from the outer tip down to the cuff, then re-align it on the machine to make the inner mitt circularly. That would have been good given the fragile nature of the single ply beige. You can't go from knitting circularly to knitting rib though, which is a bummer, but I'm sure I'll have other mittens I can try this out on!
Subscribe to:
Posts (Atom)