My youngest went to college to study welding. When she wanted a fancy welding cap for her birthday in November, I realized this was a perfect sewing opportunity! I've made hats! Surely I could do this!
I started with a free tutorial with some badly sketched pattern pieces that you're supposed to print at different percentages based on how big you want it. I'm not even going to try to find the link for that one, but I think I did manage to make a Christmas cap.


This one somehow ended up very small. Like, for a child. I messed up the band, but I don't know why the rest of it was too small.

I'm not sure what the issue was with this one! Yes, I could have done better pattern matching at the front seam on the band, but I was dealing with scraps.
I think these ones were 4 panels, so I thought a pattern for six panels would have more contouring. I found one on Etsy that even said it wouldn't cause "dome head."


I was not thrilled with the pattern. Instead of separate pattern pieces for different sizes, you use different seam allowances. Megan's head did not really fit in the chart. It indicated she should have several inches of ease, which she thought was absurd. We also misinterpreted "high crown" vs "low crown". I also made some silly mistakes. Each version seemed to be getting worse.


This one ended up a bit too big.


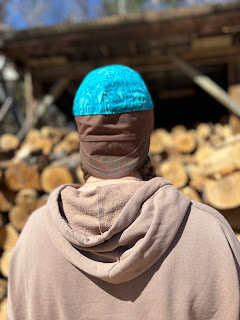
I liked this one but it's a bit loose and comes up too high. She was confused about low vs high crown.


This is the winner cap!


I think that this is the inside of the teal/brown hat.

There was a horse fabric hat too....and a blue and white damask that was way too shallow....
Here's the details, mainly so I can remember, but someone else might find it helpful.
Head=22 1/4" Sew with a 5/8" seam allowance which means 23" finished size (supposedly).
Band cut 24" x 3.5". This barely left any extra in the seam allowance to close the band--not the inch like that pattern says. Changed band so it's 2 1/4" at front, 2 3/4" at back" (is this the finished width?), sew on with 3/8" seam. This gave her more length at the back. Her head seems a little shallow.
I really struggled with sewing the sides to the middle, and matching the top seam. I think I switched to sewing the top seam with 5/8" instead of 1/2".
Step 7 in the pattern doesn't mention turning the band right sides out, but do it.
Next time, taper the band seam so it's narrower at the bottom by 1/8". It was sticking out a bit but she says it's better after being washed again.
These were made with quilter's cotton and the special one we ordered was more like a twill. I'm going to try to find some twill, but what I've found is boring solids.
No comments:
Post a Comment