It happened. I started a new crafting journey. I've always been interested in "personal doc(ument) cutting" machines. For awhile, I was seriously considering getting a Brother Scan N Cut. It didn't seem to be available locally and seemed to be the shy, smart kid off in the corner compared to the Cricut and Silhouette machines. Everyone knows about Cricuts and Silhouettes, but not many knew about the Brother. As soon as Rob started looking at them, he declared that we should get a "real" vinyl cutter, not any of these small ones. Of course, he wasn't about to invest the money in one, or set it up (some are big!), etc, so the idea just lingered. The home machines are pricey enough that I couldn't just rush out to purchase one. I mean, I've been putting off getting a new camera, which would have cost the same or less.
Schools shut down at the start of March Break here. It was initially for two weeks after the break. Then it got extended....a few times...I knew I would be getting some money back from a cancelled trip, and a camp, and thought maybe this would be a good time to indulge and treat myself. I watched the prices for the Cricut Maker at Costco and Michaels, and then one day Michaels had a sale with the lowest price I'd seen (I've been getting their emails for years so I casually kept informed on the price). I was able to place an order for curbside pick up locally. There seemed to be very few machines available! I picked it up, plugged it in, and got started. Nervous but excited. I like learning things! But I also know there can be a lot to learn, and a lot of ways to mess up. Which I have certainly done!
Set up went smoothly. I tried to do the first, intro, project, and couldn't find it! I found "unboxing" videos and they were able to find it easily. I did find it but not with the kite cut from fabric. Eventually I figured it out.
I don't think I took a picture of the card, but here she is, all set up. Well, not really. I realized there were no outlets close enough here.
I didn't get any additional supplies but I used to do scrapbooking, so I thought I would have what some materials to get started. I started looking at the projects in the Cricut software and realized I had very little to work with. I did find this red cardstock and this neat maple leaf design, so I gave it a try. I didn't get it sized up properly and a tip got cut off.
These are the bits that are left on the mat. I thought they were almost as good as the paper that got cut out. But what to do with them? I did get some clear contact paper from Dollarama and tried to get them off the mat all together....but the contact paper stuck to the mat, it got wrinkled, etc. I then put some on the backside too so the stickiness was contained.
So now what? I trimmed it close (because I got a grease spot from dinner on it), but then what? I decided I'd put it on a card for my niece who just got her Canadian citizenship.
I went to Dollarama to see what I could stock up on. They had pads of printed cardstock that was a great deal! And a bunch of other assorted things I thought I could use. I even needed just plain old glue.
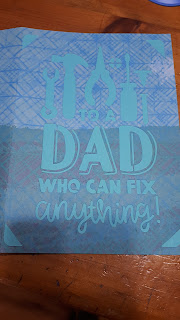
Father's Day was coming up, and although I don't usually do much, the kids don't either--and especially now that they aren't in elementary school, making gifts. Lots of projects out there. I found this card design, but it needed an envelope. I found an envelope but wanted to try sprucing it up. I took a heart, and welded a star into it. However....I had taken the score lines off because I don't have a score wheel, and so I wasn't paying attention to where the flap gets folded and the heart is too low.
I added slits so I could tuck a solid paper behind. The design was totally not mine, I wasn't ready for that yet.
I was making freezer meals for my eldest to have on hand while living away. I bought a small Crockpot and thought I should dress it up. I don't think this was the first thing I cut from vinyl, but I had some challenges.
There's so much to learn. Design aspects, materials, just how to use the software and machine. It's hard to know what's a user error, and what's a material error or a machine error.
I knew I had to shrink the letter spacing with cursive so the letters touch, but didn't realize it's a challenge to cut the thin lines in vinyl
It's so not me, that makes it even funnier! I still need to do my Instant Pot!
I made a simple two layer decal for Megan's Airpods case. Originally, I wanted a small M inside a big M. Kind of like an outline. I couldn't figure out how to do it though (tip: you can't, using Cricut Design Space, you have to do this--offset--in other software).
I went back to paper for the next item. I thought it would be nice to have a simple gift box pattern. I could not find any that were free, and very simple! I did find this, from
Jennifer Maker. It's adorable, though I haven't done anything with it. It's not as box like as I wanted, but still a great, easy project with good impact.
Back to vinyl. I have this IKEA plastic cover for in the microwave. People often take it out and leave it on the counter. So I made a reminder to put it back in if you take it out.
Some people say not to use items with vinyl in the microwave. At this point in my life, I've probably gotten enough plastic poisoning that I don't know if this little bit of vinyl, for the little amount of time the microwave is used, is really an issue.
I was getting ready to deliver the Crockpot and meals, and I was including some cornstarch for making slurries to thicken the meals. I wanted to make a label for the little jar. The font I used for Cornstarch had extra cuts between all the letter segments. It did go on fine though. The instructions, in blue, were a different story. I think I used a different font. I made sure it was thick, but the cut letters kept getting lifted as it cut, so it was all out of line. No way to get it back in proper order. So I just put the cornstarch label on the jar and wrote out the instructions. Not sure what happened here.
The kid also needed a birthday card.
Jennifer Maker came through again, with this 3D card.
I didn't have spray adhesive, just Dollarama clear glue and the card kind of looks like a 1st grader put it together. It doesn't really "pop up" like in her video. I had a hard time figuring out where to score since I took off the score lines. Next time, if they're not visible when done, change to draw lines, or make them skinny cut dashed lines.
I wanted to move on to more complicated things. Our mailbox was looking a little sad, so Rob painted it and I created this monogram. However, when I applied the vinyl, despite having marked where to place it, it didn't go on straight. Rob couldn't tolerate it, so he carefully scraped off the curlicues.
I love it, though I wish it was fancier LOL.
Something else I got into this spring was cocktail chemistry. On our cruise last fall, we had our first drink package. I tried to try a lot of different drinks, though I didn't even know what I'd like. I found some YouTube channels that are all about cocktails, and got into making my own syrups. I bought some jars off Amazon, in two sizes, and realized very quickly that I need to label them better than with a Sharpie! This one is honey syrup. I'll make another post with all my bottles. With this one, the yellow bits are individual, but get applied as one piece. If I ever do this one again, I'll make the yellow a single piece and put the black over it.
My FIL wanted his bicycle back and since Rob had to do a bit of fixing up, I added a decal. I wanted to include his cell phone number but got told no LOL.
I started to make more complex designs after this, so I'll make different posts for those.
What I would tell another Cricut newbie---find a YouTube channel with beginner tutorials. Watch some more advanced videos too, but don't get ahead of yourself. You really do need to start with some basic projects to learn how your machine handles different materials, and how to put things together. While a 4 layer vinyl decal looks not that difficult when you see an expert doing it on YouTube, keep in mind they've been doing it a long time, and the power of editing is real.
One downfall with Cricut is their design program has some strange deficiencies. In any FB Cricut group, when you ask how to do somethings, people will chime in that you can't, you need to use another program like Illustrator or Inkscape. I decided to get on the Inkscape bandwagon. It's free, and surprisingly powerful. Overwhelming at first, but again, watch tutorials for beginners, especially ones geared for Cricut users. The best thing about using Inkscape is that you can save your files as SVGs. This means you can share or even sell your designs! In Cricut, when you save your project, you're saving to their server. You can't take it outside of Cricut. You can share with other Cricut users, but I believe they have to have the same fonts, etc, installed. If Cricut has an off day, you might not be able to access your projects. Learning Inkscape has been really fun. I've created all sorts of non-Cricut designs too! Sometimes I get stuck, and I have to email the design off to Hugh, and he can use it in Illustrator and fix my mistakes and send it back. You can't do this with Design Space. I'll post more about Inkscape later.


No comments:
Post a Comment