I actually had to look at my photo albums to see if there was anything I made recently that I hadn't posted about! I got caught up last week because I had no vehicle to go anywhere in the afternoons, LOL. I did make a giant sized cloth diaper and a ring sling last week, but I'm sure you don't need to see them. I made two dresses early in the summer and you really don't need to see them. I did some baby booties over the last week or so, but they're not quite finished and I want to re-write the pattern so I can post it too. That leaves the one ginormous project that I did finally finish.
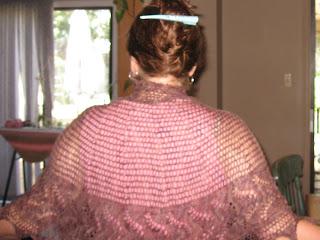
Falling Leaves Fichu (...leaves...LOL).

According to Ravelry, I started this July 10th. I had been inspired a couple summers ago by 3 fichu patterns in an issue of Knitters. They had been based on fichu's from "Victorian Knitting Today". I didn't really care for any of the lace patterns they showed, but felt pretty confident that I could figure something out on my own. I studied lace shawls that I liked, and realized that I didn't like it when stitches in each partial pattern repeat at the start and ends of rows were knit in stockinette stitch. I liked designs which seemed to emerge right from the increase lines, such as Flower Basket Shawl or Heartland Lace Shawl (look at that...they're both by Evelyn Clark!). So I knew I needed a pattern that had a diagonal element. There was this one in a stitch pattern book that I had always liked, "Falling Leaves". It was bold, graphic, and not too fussy. It took some careful consideration to figure out where to start the shawl in the pattern, and I did have some complications along the sides at times, where there were double decreases. It didn't remain symmetrical along the increase lines, but as I'm not about to publish this, I just wanted to get it knitted up. The yarn is, I think, Handmaiden Fine Yarns, "Angel Hair"; 70% mohair (not curly), 30% nylon, 875yds for 100grams. I can't find the label right now, but I do remember how long it took me to wind it up! I bought it at the Kitchener-Waterloo Knitter's Fair, Sept. 2005. I was very pregnant with Meg, Handmaiden and Fleece Artist were all the rage and selling out, and I really wanted something to make a nursing shawl for the new fall baby. This skein literally fell on me in a booth...it had fallen off the table and someone from the booth on the other side of the curtain just dropped it over the curtain, landing in front of me. I took that as a sign, esp. when the lady next to me said it would look great on me. I quickly got started on a nursing shawl. A rectangular stole in a fairly easy lace pattern....yards and yards of an easy pattern....Meg soon came along and I was not half-way done. I quickly realized that a mohair shawl would not play well with a nursing pillow that had velcro on it. I had never used a shawl to nurse before, why now. It sat for a long time....I got it out to take a picture at the last "new" house, just as I decided to give up on it. What I thought would be a mindless knit ended up driving me crazy for it's mindlessness!
The yarn is, I think, Handmaiden Fine Yarns, "Angel Hair"; 70% mohair (not curly), 30% nylon, 875yds for 100grams. I can't find the label right now, but I do remember how long it took me to wind it up! I bought it at the Kitchener-Waterloo Knitter's Fair, Sept. 2005. I was very pregnant with Meg, Handmaiden and Fleece Artist were all the rage and selling out, and I really wanted something to make a nursing shawl for the new fall baby. This skein literally fell on me in a booth...it had fallen off the table and someone from the booth on the other side of the curtain just dropped it over the curtain, landing in front of me. I took that as a sign, esp. when the lady next to me said it would look great on me. I quickly got started on a nursing shawl. A rectangular stole in a fairly easy lace pattern....yards and yards of an easy pattern....Meg soon came along and I was not half-way done. I quickly realized that a mohair shawl would not play well with a nursing pillow that had velcro on it. I had never used a shawl to nurse before, why now. It sat for a long time....I got it out to take a picture at the last "new" house, just as I decided to give up on it. What I thought would be a mindless knit ended up driving me crazy for it's mindlessness! The patterns in Victorian Knitting took a variety of yardages, and I was uncertain about how big this would turn out, as I didn't seem to have a huge amount. I thought about doing the last shawl (Sweet Lily) with it, but that one called for 900yd+ (I think) and I thought the mohair would obscure the pattern in the lace section. For the fichu I used uhh...5 or 5.5mm needles and it was fairly open before blocking. As it got huge, I started a second needle. I'd knit from one needle, onto the second one, instead of using both to hold 1/2 of each row. At some point, I stopped the increases as I figured it was full enough. I could have stopped a lot sooner! This thing is huge. It's definitely a "wrap up in it" sort of thing. I had once considered using it to make a sweater but didn't think I'd have enough. Oh, I would have for sure!
I had wanted some sort of edging, but it's hard to know when to start that, and I wanted to finish up the last pattern repeat I had started. Ideally, I should have ripped that out, and done the edging from then. Hindsight...
As it was, I was unsure if I would have enough to cast off. On the last row, I took my remaining yarn and tied a little knot in the middle. I did get to the end of the row before the knot...but barely. I knew I needed to cast off loosely and really had no clue if that would take more or less than knitting a row of lace. I went down to my stash, and found a ball of elann.com yarn, Highland Aran, I think. It was 3 ply, and a single ply was just about perfect. I'd cast off loosely, untwisting the plies, until it got unmanageable. Then I'd cut it, and start with one of the two plies left. Repeat again with the 3rd ply when I got to the point where the other two had been cut. Repeat the whole process again. Once I had it all cast off, I wove the mohair yarn over the cast off edge, loosely, going from one edge to the other, and then I pressed my luck and came back again. I BARELY made it to the first edge. Then, I thought, what I should have done was cut off the last of the mohair, find the middle of the piece and start weaving it from the middle of the shawl outwards to each edge. That way if I ran out, each side would still match. Anyway, doing this did make the cast off edge blend in better, and provided a nice finish with a bit of oomph. I should have beaded that bit of mohair....LOL.

It was impossible to block. I initially wanted to block it into points, but I didn't have enough room. And the sides...it is a BIG shawl. I washed it gently, stretched it out as best I could, then folded the sides over to keep everything lined up nicely, and pulled it as best as I could into a good shape. The next day I picked it up. It felt almost dry, so I shook it to It's warm and fuzzy and almost like wearing a mini-afghan. I think I got a perfect combination of colour, pattern, and design!


 And yes, that's not Lucy. She was in a bit of a cranky mood when she tried it on and declared it too hard to get on and too small. Meg (at the time I made the sundresses) is a bit bigger in the chest than Lucy. But more patient. So now she has a new dress. Meg looks super tall in this photo. The other day she was standing behind a

 I really shortened it. Then I took 4 narrow pieces of the cut off section and sewed two of them together, twice (so I had two pieces). I stitched a gathering stitch along the top edges of the narrow piece and gathered each one to fit (one for front, one for back...easier than one really long piece). I LOVE the little ruffle. I kept it narrow as I thought that looked more modern and grown up than a deep ruffle. I also made a belt, but I don't like the position of it in this picture. It looks much better higher up as an empire waist. Without a belt, the back is droopy. You should have seen the google results I got when I tried searching "Fix a droopy back".
  The sewing went fine, I just followed the directions for sewing the pleats and the zipper (bit ripply the first time). Had no problems with the facing but handstitching the hook and eye drove me crazy as it was a tiny one and I can never get them lined up right. Did a nice job hemming. But all the while of doing the zipper and facing, I was thinking I should try it on. But how could anything be wrong? I measured myself, the pattern, added what I needed...
 The weather was cool on the first day, so I wore this very light knit top. Inside, the whites matched, but outside...not so much. I tried on the white gauzy top I had made long ago, and it was too full around the waist. I have two other white tops to try with it when I'm feeling a bit skinnier. Shoes are another issue. I wore some nice summery beige shoes, but they are not comfy! My other beige sandals are too clumpy, the next pair too flat/casual, the fourth (?! really?) pair are closed toe loafer heels with open backs that I'm just aren't sure are skirt shoes (I think they're pant shoes).
 I cut the top and bottom borders off and unpicked it so I had one even row of live stitches. Then, along the sides, I had done two rows of machine stitching, like for steeking, but I picked up sts just to the ....oh, I've forgotten....I think to the inside of the stitching. I hadn't decided how I wanted to finish the sides so I didn't cut the side borders off, but I needed to prevent any unravelling in case I did cut the sides off. I worked a new border, all in one piece, outwards, using the same stitch pattern as the original border. By working outwards, it will be much easier to fix in the future as the sts will run only to the start of the border. I meant to machine stitch the top and bottoms too to stop any possible running into the blanket, but I doubt it'll happen anyway (the boy is already 8, the new yarn is fluffy and thick and not likely to run easily). I did increases on the corners every other row. It's not a very wide border but it did take quite a bit of knitting! And a long time to cast off!


 They feel very long, and very wide at the calf. I do have nice calves, so I'm not excited by this length (mid-calf). I could shorten them--I really do need shorts. However, I don't know if it's the colour or the fabric, but I think if I took them above the knee, I'd have to find a field-hockey stick to carry around as a prop. Total high school gym shorts look.
 Again, Rob said I can't go out in public in these,
  I first tried it with the very-multi-coloured yarn I ended up making Moonlight
 As I got near the end of the shawl, I noticed a big mistake. Okay, it was probably not much more noticeable than those other ones (that weren't "mistakes"
 After wearing for a day, I noticed a larger than expected eyelet:
 It all seems secure, so it was probably just an effort to correct a mistake in a previous row,
  Although I didn't get the whole shawl in the picture, you can easily tell it's not a big, wrap it around the neck, type shawl on me. Although it's nice and delicate, I've ended up with 56grams of the 123 grams leftover (it used 67 grams; the skein was labelled 115gr). Not enough for another identical shawl, but there are lots of patterns for 400yd shawls. However, I don't need another smallish shawl.


 It's called
 And here it is! I'm really happy with it! I do see that the skirt pulls up in the middle of the bodice seam and the ribbon (not sewn down) emphasizes this as it's straight across. I really wanted to use the ribbon. A little history now. This fabric is the same fabric as the very first dress, but in a different colour. I had bought about 1.5m and sliced it down the length, then stitched the ends together, and made a really long ring sling. I liked the length, but it was a little slippery. Later on, I took one of the pieces and using this ribbon, made a bathing suit wrap for the cruise. However, once wet, it was cold and icky (it's a 'washable rayon'). And it looked odd. So, the two pieces sat around just waiting. I bought some FOE (fold over elastic) in turquoise, thinking I might make a shirt like I've done before, or a dress. But Meg got it and cut it into a couple pieces. I probably could have used it across the back instead of making an 'invisible casing'. I thought I might use the ribbon for the straps, but after reading the sundress tutorial, and seeing how it improved the fit and look of the test dresses, I assumed it would work for this one too.

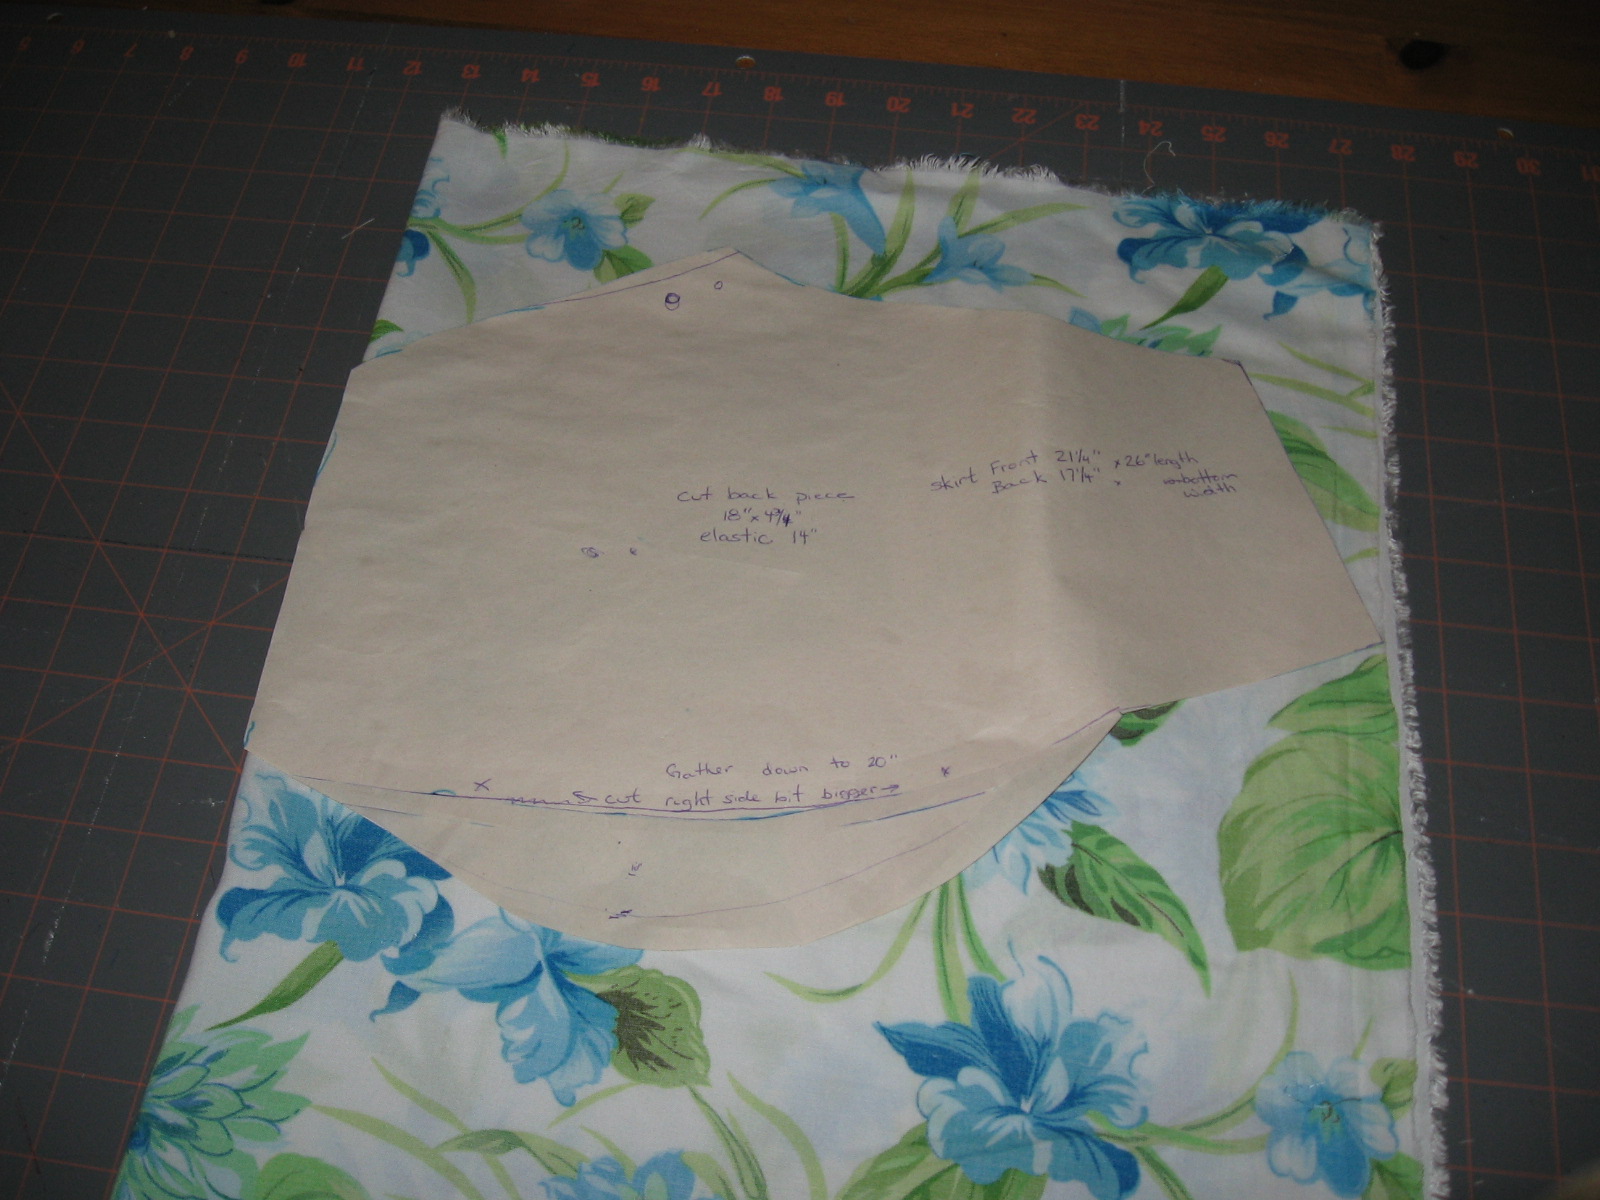
 The flat area at the bottom gets gathered. This pulls the short angled parts downwards into line with the flat area. Wow, that really got my brain rolling. Along with finding a forum where another lady had a similar issue and was told she needed more curvature along the bottom.
 I did much googling and found out that the type of skirt I wanted had 'godets' not gores. This would mean 4-6 panels, with triangles at the bottom. I thought this was going to be a great way to make the narrow fabric be wider and 'swishier'. However, there are a lot of seams...each eating away at some fabric....
 I was happy with the construction, however, the cups didn't offer enough coverage on the sides, but they did lay flat on the chest! And lets not talk about how the skirt portion fits. I could pull it up quite a bit and find it's "sweet spot" but that made the skirt too short!
 I moved onto a few other sewing projects but I was hesitant to make anything more for me, especially tops. And, I seemed to be ...ummm...growing. Recently, I felt that my skills were improving enough to try again. I decided to make a top using the same pattern. I drafted a slightly larger size, and altered the back so there wouldn't be a zipper.
 At first, I was happy, but really, it just didn't 'cup' me enough and didn't have the coverage. Plus, I HATE tieing things behind my neck. I gave it to my mom. As I mentioned a few posts ago, while we have the same chest size, we do not have the same bra size. It fit her fine.
 I used the sewing techniques from the dresses I just made for the girls, but this made it hard to tell exactly how the dress was going to look until quite a bit had actually been done. I dress the pieces larger where I thought I needed it, but I wasn't sure what to do with the bottom curve. Trying it on showed that while I could get the right coverage and fit, the pieces would not be sewn straight along the original seam line. I just didn't have enough hands to hold it, pin it, mark it, etc. I knew that something was still not quite right.
 I could see that it was pulling at the base of the V neck so I needed more width. I was pretty much happy with it though. So I got a better fabric--some blah beige quilter's cotton I had bought off Cheapcycle. It's rose blooms, actually. I didn't like how it looked in the middle (the skirt seam goes straight across, but the bodice seems to dip in), but I was pretty happy, although it was still not 'cupping' me. I wanted to be able to go braless, and not have elastic under the bust, which would gather the skirt and make it look like a maternity dress (even though I have a permanently maternity shaped body). There were some issues with the skirt. The fabric is only 44" wide!
 For ease of adding photos, I'm just going to start another entry for the rest of the story!
 I dug down deeper in the bin and found the blue print, and the flowered one was a remnant from the fabric store (I was very disappointed that they had barely any quilter cotton remnants! This was the only one!). The pink and black one is to match Lucy's dress. The black one with beige stitching was to go with a dress I haven't yet posted about. I made all of these (except the pink and black one) plus three more, out of the one package of "Cracked Ice". It wasn't all wine and roses though, I did have an issue with trying to dry out the crystals...in the oven...
 For all but the last one, I made closed tubes so I wouldn't have to finish the raw edges. I decided to do Lucy's differently, so it'd be more like a scarf with her new dress. I placed the tube seam in the middle (instead of the edge), so the tails could open up.
  My edge finishing sucks. But it's cute. The kids aren't really into them though. Rob also doesn't take his anymore. He also won't even take a water bottle! But I did get him to move to the lower level of the two level train, LOL!
 Meg chose a wild orange flower print, a very light weight woven cotton (I don't know the 'proper' names for all the different cottons). I lined the bust with off-white bastite on the advice of the fabric cutter, and I was glad she pointed it out because it was what I needed for other projects too. For Meg, I cut the top as a size 10! and I think they both got size 7 skirts but Lucy's I eased out to a size 8 for her tush :) Lucy's top was a 7, I think.
 Lucy's dress is an unusual quilter's cotton. She "doesn't do" flowers, pink, cute, or "weird polka dots". I was hoping to get them in co-ordinating fabrics, but oh well. LOL. They are both a smidge too big in the bust, causing some gaping when they move around, but they are cute dresses. I hope to make the other view someday, although Lucy thinks it's too pouffy. While Meg loves anything I make for her, Lucy is another story!
 Instead of the cross over pieces laying flat on my chest wall, they pull out (I've stitched it together) so it's like a V-neck. I'm going to re-shape the pieces so there's a bit more coverage, but I still don't know what to do where it overlaps. Should they be closer together? Further apart? Further apart and then the overlap needs to get tucked under a girl. I thought of cutting it a bit larger and gathering it to fit between the same notches on the body. I don't need to extend the side seams, I need more? in the middle.