Thursday, October 23, 2014

Kelly Sweater Techniques Tutorial

So, just HOW did I do the beige sections on the Kelly sweater?

When I first started, I was using worsted weight yarn on the SK155.  Or maybe I was using the LK150.  I have no problem with worsted yarn on that, though many people say not to use it.  I only had a single bed, so there was lots of reforming stitches.  The swatch I got was slightly different than what I ended up with on the Singer 327, but still close.  But, I still had to re-swatch on the 327.

I started with examining the picture of the inside of the sweater.

I know that's not a great picture--it looked better on my iPad.  I examined how the lines of knit stitches moved, and where the eyelets were.  Although it was the inside, I figured if I could get the inside to match then the outside would.  Also, the inside is what was facing me on the machine--or what I thought would be the easiest side to have facing me.
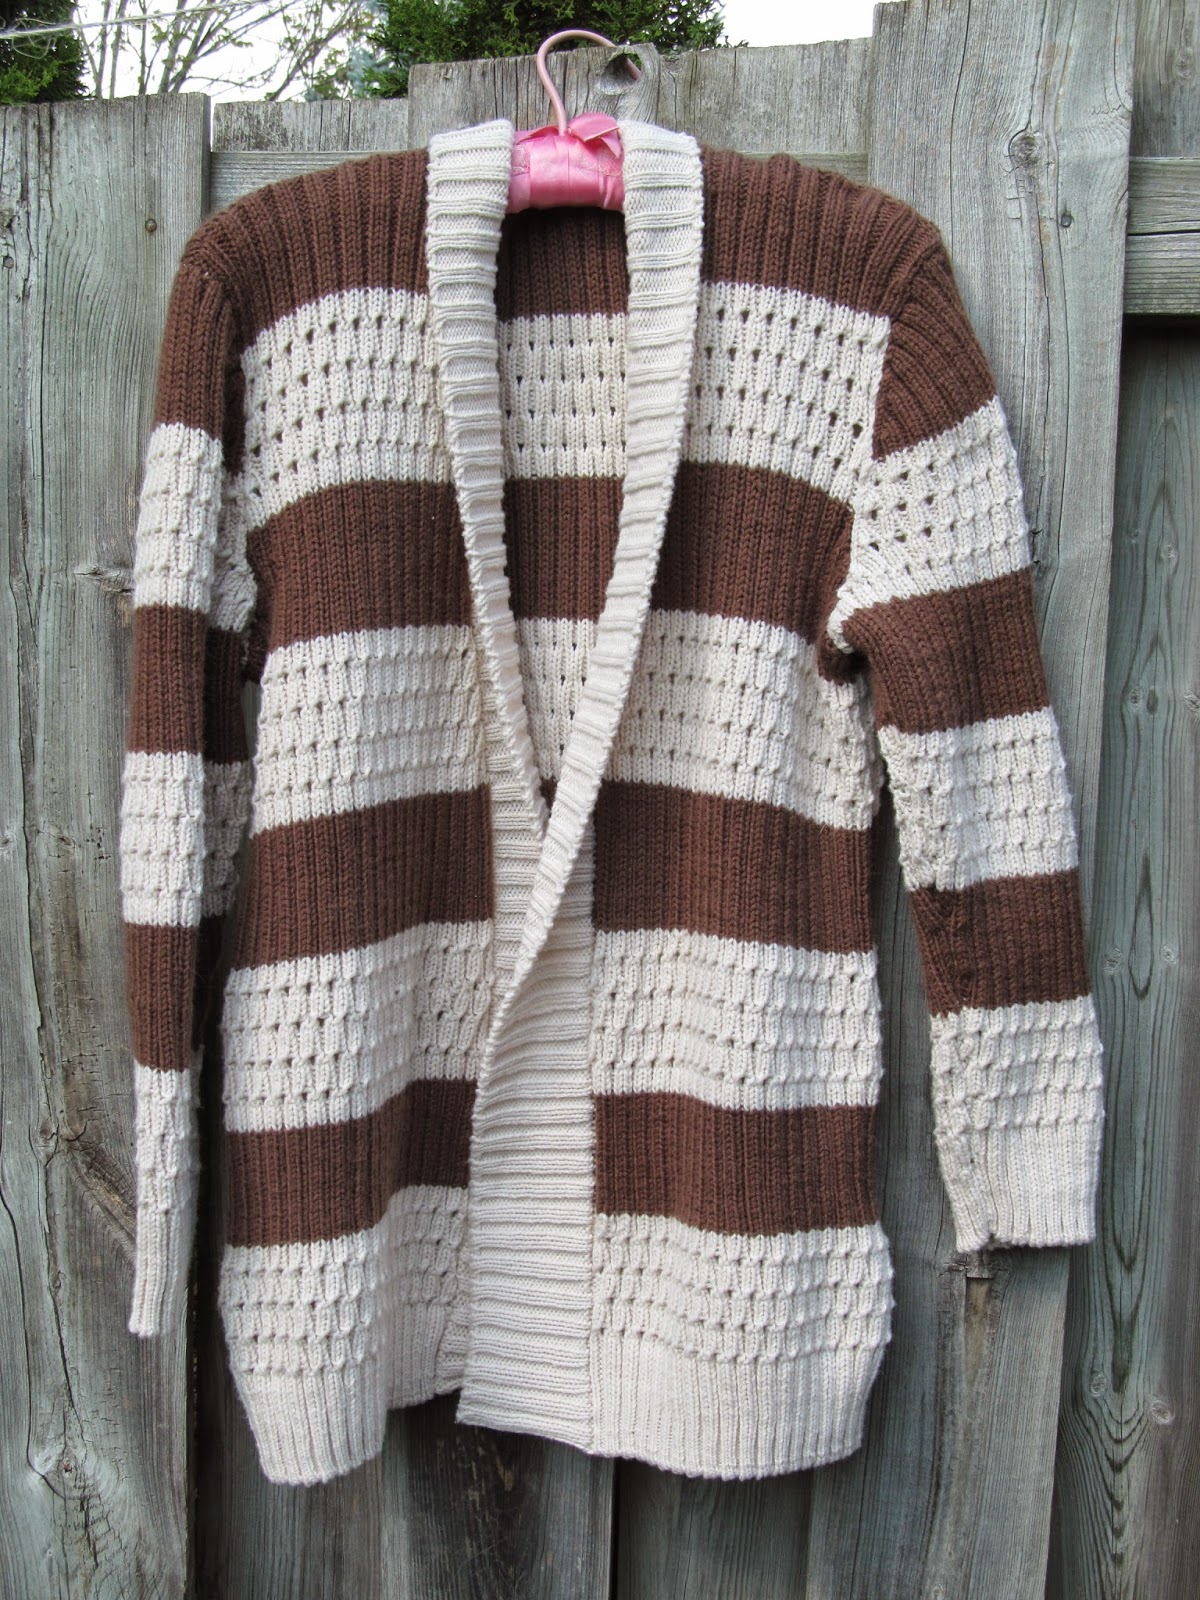
 Just another shot of the whole sweater.
 Once the fabric is stretched out a little, you can see the undulating columns inside.  I think I matched it pretty well!
This is one of the swatches, trying different ways to get the eyelets.  I actually liked this side better, LOL, but Kelly did not.  You can see places where the stitches did not form above the eyelets.  Then it becomes drop lace, and Diana Sullivan did a video on this while I was actually working on this sweater.  WAY easier than what I was doing, but it looked too different, especially on the public side.  It would have been an alternative if I wasn't trying to copy the sweater so precisely.  Anyway, more about those dropped stitches later.
 This is the "public" side of the above swatch.  Still pretty messy!!  I still wasn't 100% sure how I was going to form the stitches over the eyelets when I casted on for the back.  But I wanted to move ahead.
Not sure why I took this picture.
This was my first run at doing the back.  I wasn't happy with the proportions of the light and dark. It also seemed a bit long, and once stretched, a bit wide.  I recalculated my gauge after letting this sit for a month and indeed, I needed to re-work the math.  I later found out that the KnitLeader was malfunctioning partway up the pattern.  And it was kind of sloppy knitting.  I hadn't "warmed up" enough.

I started out with 2x2 ribbing, using the cast on in the book for "heavier" yarns.  I started with a tight tension and after the circular cast on, gradually increased.  This kept the bottom from flaring out and helps eliminate stretching.  
 First step of the pattern is to move all the ribber stitches.  Of each pair, the left ones got moved one stitch to the left, the right ones, moved to the right.  At first, I was doing this with the single prong tool, because I was looking just at each group of two stitches.  Then I realized I could use my adjustable 7 prong tool, and move two stitches over at a time.  Sometimes, if I lost focus, I got confused, but in general, this really sped things up (I think I knit almost the entire back the first time using the single tool!).
 These two pictures are just to show the steps needed.  Pull needles all the way up, place transfer tool in hooks, push needles back down so stitches go onto tool, lift off tool, pull up needles being transferred to, put tool on needles, and push back down so the stitches go into the hooks and in working position.
 Once the stitches are all moved, they now line up directly with the mainbed stitches.  Of course, this is a no-no with double bed knitting!
 Then, I pushed all the mainbed stitches forward to hold position.
 Using two two prong tools, I transferred all the mainbed stitches to the ribber bed stitches that were now directly below the mainbed stitches.
 I think there's three steps to transferring.  Slid the MB stitches onto transfer tool, slide another tool into those stitches from the top,
 use the top tool to hook them onto the ribber stitches
 I wondered if the little P carriage could have transferred these stitches, but I didn't want to try mid-sweater!
 Mmmm, not sure why it's sideways.  After all the MB stitches were moved down, the empty needles went back to A position, and the alternate needles (that fit into the spaces on the ribber bed), came into work position.
 Take one pass of the carriage over.  Now, here's where the big issue lays.  You can't have essentially what is a double yarn over.  In hand knitting, you would knit and purl into a double yarn over to form two stitches.  On the machine, I tried doing a single YO  then knitting a row and  then trying to make the YO bigger.  I tried bringing up the heel of the stitch from the ribber.  I could maybe have done one of the needles on the ribber and one on the MB and then moved the RB stitch back up?  What I ended up doing what taking my single prong tool and inserting it from the top into the loop,

 Twisting it 180 degrees to the left (because that way just felt easier)
 And placing it back on the needle.  At the bottom of the back piece, I had all 200 needles in work, so this was done to all 100 mainbed stitches.  Every six rows in the cream section.
Then I would knit the row.

Here came the biggest game changer I figured out part way through.  When I would knit the first row after twisting the eyelets, not all the eyelets would knit.  I was finding myself having to re-work many of them.  Some groups would have just the twisted stitch that didn't knit, some had both stitches that didn't knit, and the twisted stitch would have come untwisted, so I essentially had to re-do that row.  I realized it was because there was no weight on the mainbed, after moving all the stitches to the ribber bed.  So I tried hanging the ribber comb back on, and that helped, but not 100% and was awkward. I was in the last beige stripe on the second run of the back, when I had the idea to use ravel cord (or, thin waste yarn).  I figured this was sort of like casting on--forming new stitches where there were none.

It worked!  Almost every stitch knit!  This idea, shown in that last picture above, truly saved my sanity, and combine with switching to the 7 prong tool for the ribber stitches, really shaved time off.  
I still ended up with mistakes.  Some of the mainbed stitches were fond of tucking instead of knitting, and even though I tried to check them every row, some still slipped by, so I'd have to decide if I wanted to unravel that stitch and re-work it, or let it go.  Then, once while checking for tucked stitches, I noticed that I had a row of eyelets where quite a few hadn't formed right and the stitches above laddered.  So I took it off the machine and when I laid it out to rip back, found that I had forgot two rows in between the first and second rows of eyelets (in the top beige section above, see how the lower two rows of eyelets are closer together?).  Ugh.  What a pain in the butt to get back on the machine.

After knitting the back and most of a front, I decided to do a run through of the other pieces, without patterning but with changing colours, to see how the yarn was going to last.  It appeared I would just squeak by, so when I re-did the front, I went a bit smaller.  
 Finally, I had all the pieces.  And a lot of ends, loops at edges, and other tidbits to clean up.  The sewing didn't go too badly, everything fit pretty well together!  After sewing the shoulder seams, I made the collar.  I used the cast on edge as the outer edge, knit half the collar, until I had used up half the yarn I had left.  Took it off on waste yarn.  Hung the body edge, right side facing me, onto the needles, spacing evenly (I found the middle first).  Then hung the collar, right side facing the body.  Knit a row, then casted off. Repeated for the other half of the collar.  I was glad I had shortened the sweater, otherwise I would have had to do three sections, and would not have had enough yarn at all.
 The biggest problem with sewing and blocking was the dog kept laying down on the pieces I had spread out on the floor.
I washed it up and laid it out to steam it so it would open up.  When I looked at it, and then at the picture of the original, I was mighty pleased!
I didn't have it stretched out for the length enough for this picture, it was just a quickie.
So hard to get a good picture!  I really needed a model, but there's no one here this size except me LOL.  I was quite pleased in the end.  It's really cozy, she can wear it as a shawl collar, or let it just fall open.  The sleeves aren't too long for a normal sized lady, LOL.  The only thing I wish was different was a bit more width on the collar (that half ball I found, without a label...I wonder...).  And I wished I had swatched a bit more, to learn the two tips that really made a difference in my speed.

Monday, October 20, 2014

The Sweater

Some projects are epic because they're creative.  Or because they're pushing your boundaries.  Or because they're just SO darned adorable, like my pocket bunnies.  Sometimes a project becomes epic just because it's been finished LOL.

Last spring, I was browsing my FB newsfeed and someone posted a picture of a sweater with the request to find someone who could make it.
 The first few comments were typical "Find the pattern and I/my grandma/my sister can make it".  I KNEW there'd be no pattern available for it, just going by the photo that was posted.  So, I said I could probably do it.
Much googling revealed that it was made by Aeropostle.  So, no pattern would be available.  I also really felt that a handknitter would not be able to replicate the sweater.  

Doesn't it look cosy?  I spent some time finding a yarn that had both colours and wasn't "too heavy".  Now, "heavy" is obviously a relative term.  Most cozy, oversized sweaters seem to be made out of thicker yarns.  I chose a worsted and made up a swatch, and went to meet Kelly and get her measurements.  I was all set to get going, using the SK155 bulky machine.  Still a lot of hand manipulation, but faster than hand knitting, right?

Then Kelly emailed me, wondering if I had started....and would it be too much trouble to change to a lighter yarn?  Well....you're the client; I'm not going to knit a custom sweater only to have you say you don't like it!  I did a lot more research, trying to find an easy care yarn, no thicker than DK, in both colours, that was affordable and available.  That took a lot of time.  I finally suggested Snuggly DK by Sirdar, and luckily, Soper Creek Yarn in her town had it.  We met up in her town at the LYS and took a look.  Kelly chose a cream that was a little different, cooler, than what I imagined, but it grew on me.  They had only 7 balls of the cream (Rice Pudding), and lots of the chocolate, so I got three of it.  I really had no idea how much would be needed.  How do you estimate something like this?!  At least with the Snuggly DK I could use the Singer 327 with ribber.  Which  meant even more complicated swatching.

 I got started on swatching again.  I liked the reverse side, LOL, but Kelly liked the original front side.
Although I had spent a lot of time with swatching, and a tape measure and calculator and scrap paper, I wasn't happy with the back.  It was too long, too messy, and the brown stripes were too wide.
It took a lot of work to recalculate the design.  The gauges of the beige and the brown were different.  I was making custom adjustments to the Knit Leader pattern.  It took a lot of figuring out.  A lot.

Eventually, I got the math all worked out and re-knit the back.  It looked so much better!!  I was so much happier.  I sort of think I re-knit it a third time, but I can't quite remember LOL.
I kept having the typical machine knitting troubles.  I'll get into them in the next post, which will go into detail about how I actually did the design.
 I got skeptical that I would have enough yarn, particularly the cream.  Soper Creek didn't have anymore in that dyelot.  No one did.  I did buy a few balls in another dyelot but I wasn't happy.  They seemed stringy and I could see a colour difference. I thought I could do the ribbed band in it, but I really didn't want to.  In the end, I pretty much used every inch of the cream of the first dyelot.  I would have like the ribbed band to be a smidge wider, but....and then a few days after getting it to her, I found a part ball which had gotten lost, looks very much like the original...ugh.
 Very hard to get a nice sweater picture.  I tried using the self-timer, and modelling it myself...but I'm a knitter, not a model.
This dragon fly liked it though!


Before I delivered it Kelly, I had to stop at Apple Melon Designs to pick up some samples of tag possibilities.  I've searched for fabric tags, and haven't found any local, then another crocheter posted that she was working with another metal tag maker, and I thought--I know someone who does that!  I love being able to support someone local!  Sorry the picture is not the best, I couldn't get a picture in the dark, I sewed it on while sitting in the truck under a streetlamp :)
Did you know if you press backspace while doing the spellcheck, Blogger closes your post and goes to your blog and your heart will stop for a minute?  :)

Yarn In:   7547gr
Yarn Out: 533gr + 3161gr = 3694gr
Balance: 3853gr more brought IN than out
Cost:  $394.48/287 days = $1.37/day

Saturday, October 18, 2014

Bunny Buddies

After Jenna received her second white mini bear, she requested two more for her nieces.  Or, little bunnies would be cute too, she though.  Similar, but not quite identical.  At first, I was considering pink and peach, but I didn't have two yarns similar enough.  Digging through my stash, I came up with these two balls of Patons Lace.  Single strand was too flimsy, so I tried one strand of each.  I started with the belly, and I was picturing this long legged bear that Megan has.  The belly has a cute bulge and I tried to replicate that, while switching to two strands of the same colour for the front.  It wasn't as successful as I had hoped, but still cute.  I noticed that the two strands of beige did not stand out as well as the two strands of white.  Interesting how that works.
"Did you see what Miffy wore to the dance?  Always, the same dress!"

 Then I moved on to the legs.  Starting at the bottom, I wanted a long, narrow foot.  I sort of got what I wanted, and did one with each colour combo.  Then, for some reason, I moved on to the head.
Maybe if we hide here, no one will see us!

 When I came back to do the 3rd and 4th leg, I couldn't get them to match the first two.  So, I came up with the "design element" of one leg of each combo!  That way the foot shape would match on each bunny and by having one element that matched the other bunny, it really tied them together.
 Uh Oh!  Busted!  Faces to the wall, hands up!

The faces have the solid colours at the noses, and again, the tan didn't show as well as the white.  The facial features were done a little darker on the tan bunny to help them stand out a bit.
"You're my hero!"

The arms were easy, just doubled the colour for the tips. 

The ears were a bit of a challenge, but not difficult.  I pictured a long floppy ear, rounding out at the bottom, with a patch of the solid colour on the inside of each.  To keep them flat and hide the ends, I knit them in the round.  They weren't quite as floppy as I imagined, but still adorable!  The tails were mini pompoms made using the fork technique.  First time I've done that.  Don't double wrap the centre!  Then, like I always do, I steamed the pompom to fluff it up.

I LOVE LOVE LOVE these bunnies.  They're perfect size to sit in your hand or go in a purse.  The sequins are cute, the tails are adorable, and the different facial expressions make them each unique.  One bunny, on it's own, is adorable, but put the two together?  Awwww!!  Totally adorabubs!

Yarn In:   7547gr
Yarn Out: 53gr + 3161gr = 3214gr
Balance: 4333gr more brought IN than out
Cost:  $394.48/285 days = $1.38/day

Wednesday, October 15, 2014

Romper Room

Probably only Canadians will know about Romper Room.  A fun children's show with an odd main character--an adult in a costume--and a "human" host.  That seems to be the model for many childrens' shows LOL.

I wasn't happy with the sizing of the first romper I made.  I immediately got started on a second, smaller one.  Of course, I didn't have great notes from the first one, LOL, and it was no longer in my possession...I was hoping for narrower, and just a bit shorter at the front, so the bib wouldn't be right up to the chin, since babies dont' have necks.  I'm not sure which of these rompers is closest to a newborn size, but hopefully, she now has some options for different sized babies.

Yes, that's the only picture I have.

Thank you, Jenna!

Yarn In:   7547gr
Yarn Out: 26gr + 3161gr
Balance: 4386gr more brought IN than out
Cost:  $394.48/282 days = $1.40/day

Monday, October 13, 2014

Yarn In, Again....and Again....

I was working on the teddy hoodie in the darker colour. I got to the point where I thought "I'm not going to have enough yarn, am I?".  I really thought one ball would be enough, 90yds, since I didn't use the whole ball of Thick n Quick...but being crochet, it took more.  So, hen the dilemma was, do I keep going, hoping I can get another ball of the same dye lot, or just stop, I case I have to rip it back to blend in another dye lot.  And....I felt the fabric was a bit stiff.

I was able to get another ball of the same dye lot, and I bought a larger crochet hook.  The one I had, didn't have a size on it, and I couldn't figure it out!  The new one is obviously larger, the new fabric is more pliable.  Still a little stiff, but it seems in the larger sizes, the sizes jump up quite a bit between each size.  The hoodie is a quick piece, but then I made the two tone ears and sewed them on.  Then I reread her message and realized she wanted single coloured ears.  Oops.

The yarn was Loops & Threads "Cozy Wool".  50% wool!

Yarn In:   127gr + 7420gr = 7547gr
Yarn Out: 3135gr
Balance:4412 gr more brought IN than out
Cost: $9.03 + $385.45= $394.48/280 days = $1.41/day


Wednesday, October 08, 2014

Yarn In, Again...

I had to take my daughter and her friends to Value Village for Halloween costume shopping.  They're of an age where they can do this sort of thing some-what independently, so I headed to FabricLand at the other end of this oddly planned strip mall.
I was looking for reflective thread to carry along with yarn.  They had wide 3M fabric backed ribbon, so I got a metre ($10.50/m!!) and I'm going to try slicing it down with my rotary cutter.  I don't actually have to carry it with the yarn while knitting, but I can duplicate stitch or just thread it through.  I could duplicate stitch a person's initials!  Or "Look!" or "Stop!" etc!  The cutting lady told me they had the Red Heart Reflective yarn though.  They changed the store around and I thought they weren't carrying yarn anymore.  It was on the wall I rarely go to.  They had the safety orange, but it's $7.99!  I paid $1.99/ball for the clearout stuff at Michaels but they had no orange.  I got ONE ball, LOL.

Today, I've been Googling, trying to see if there is a source for carry along reflective thread.  I have a couple leads, and I hope something works out!

Yarn In: 100gr + 7320gr = 7420gr
Yarn Out:    3135gr
Balance: 4285gr more brought IN than out
Cost: $385.45/275 days = $1.40/day

Tuesday, October 07, 2014

Resurrected

Remember these Cookie A. socks I had worked so hard on?
Okay, searching for that picture and post....July 2011!  These sat in time-out for a long time!! 

I decided after I finished my last pair of socks that I would finally get these done.  I worked two at a time on one circular, and finally finished sometime this summer.  It wasn't a warm summer and I got to wear them right away.  Soooo soft!  Excuse the fact that these pictures are of worn, un-cleaned socks LOL.  If I waited any longer they might not get their pictures taken!

 For these ones, I did a few increases on the top of the foot, and the main increases on the bottom.  I don't follow any formula or pattern.  My foot is quite wide with a high arch.  I just keep trying it on and make sure it fits. 
 Then I do the "Fleegle" heel, which is just short rowing across the back of the heel, like doing a top down heel, and the short row turning at the bottom.  But in this case, you do the short rowing up as far as needed to get rid of all the extra stitches.
 Or, until it's back to the width you need.  However, I find for me, that doesn't make the heel section come up high enough.  So, I do a few more short rows at the top of the heel.  You can see in the picture above that I missed knitting one of the wraps.  The short row section at the top really doesn't bulge out like that--that one light section, combined with wind and shadows makes an optical illusion!

For the cuff, I did a picot cast off.  After trying a few other options.  I wanted something that would look good folded down too.  The simple picot cast off won.

These are so soft.  Not at all tight--even socks that don't feel snug tend to leave marks on my legs, but these ones are good.  The heel fits really well.  I'm so glad I got them finished and into my sock rotation!!

Yarn In:    7320gr
Yarn Out: 80gr + 3055gr = 3135gr
Balance: 4185gr more brought IN than out
Cost:  $385.45/274 days = $1.41/day

Monday, October 06, 2014

Yarn In Update

Hopefully, a quick post to get the Yarn In totals updated!  I finally have finished items to show, though the photos need editing and watermarking.  It goes in spurts--nothing for awhile, and then all of a sudden, deluge!  Anyway.

Picked up a bunch of yarn at Michaels' for those animal hoodies.  Didn't even get anything for myself!  Total, $40.62; 910gr (ouch!  But they all have projects lined up!).  A stop at a LYS to pick up more of the Snuggly DK in a dyelot that really didn't match what I had, plus a ball of Kertzer Coolspun Cotton in bright red (no one carries the true red of Handicrafter!), and a ball of Schachenmayr "Boston Mix" in a cool camo/safety orange mix.  This will be a hat for my dad!  I just looked on Ravelry and this yarn doesn't appear.  There is a "Boston" but the composition is slightly different.  Total, $30.12, 250gr.

Yarn In: 910gr + 250gr + 6160gr= 7320gr
Yarn Out:   3055gr
Balance:  4265gr more brought IN than out
Cost: $40.62 + $ 30.12 +$314.71 = $385.45/273 days = $1.41/day


I do have a couple projects to show off, one used 533gr!  (The Snuggly DK sweater).

Wednesday, October 01, 2014

Wake Me When September Ends

Well, that month was not fun!  Back to school kicked my butt.  From getting moved from daily lunch superviser to "supply" supervisor, to big projects, to getting really sick....

Hopefully things are back on track.  I'm still on another week of antibiotics, and a puffer, but I'm feeling better every day.  Until I cough.  Or go to bed.

I've had a lack of finished projects lately because I've been working so much on a couple big projects.  And some projects just needed a finishing touch or three.  So, I'm expecting a big surge in finished items to show finally!

Let's start with these two.  Back in July, someone posted to a FB group that they wanted an animal hoodie, and posted a picture of several.  Of course, I had to chip in that I could do them.  Then, a woman (Sandra) who I've met through my business/Facebook also posted that she wanted these hoodies.  Sandra is a fun loving, hard working business woman and I knew I had to make her what she wanted.  She loved the pictures so much, she even tracked down the patterns, which she forwarded to me.  Conviniently, one of the patterns included the child size bear hoodie, which I knew I could also adapt for other animals, though I had an immediate request for a toddler sized one (the one I wrote about before, with the dyelot issue...).

Since Sandra has two dogs I knew she's probably out at night with them (and since "night" starts at like, 5pm, come winter, this wasn't too hard to imagine), I wanted to work in some Red Heart Reflective yarn. 

She opted for purple, which was great, and I combined it with another textured yarn on the spikes.

The cowl part took forever it seemed.  Soooo boring.  That part should be done in crochet!  Then I had to pick up for the hood, which wasn't too bad.  I had a few issues with button location.  The picture in the pattern shows a young child, with the cowl part pulled down over their shoulders.  I don't think this can happen with the adult sizes.  Then I had issues with the buttons.  I wanted the buttons to also be reflective!  I just happened to come across a Pinterest post of someone crocheting over a button, to make a flower, but I thought I could do that to cover the button.  I picked three ugly buttons from my stash, and finally, last night, crocheted over them and sewed them in place.  Getting pictures is not easy!

Where you see the silvery thread in the buttons, that is the reflective thread in the yarn.  It sort of shows up silvery in the middle picture.  Not enough to blind drivers, but enough to make them slow down and say "What is that?!" 

Yarn In: 6160gr
Yarn Out:   400gr+ 2655gr= 3055gr
Balance: 3105gr more brought IN than out
Cost: $314.71/268 days = $1.17/day


Ohhh...those totals are SO off...bought more yarn just after the last post, plus more today....

Tuesday, September 16, 2014

Timeless Tuesday, Prehistoric Edition

I haven't done a Timeless Tuesday post in a long time.  These were posts showing items I'd made before having a blog.  So many of those items don't have pictures, or else the pictures are print and need to be scanned.
 I dug this guy out though.  My son was a dinosaur nut when he was young, and I found the pattern in Family Circle's Easy Knitting. 
It's not hard, but the instructions were awful. It's as though they were doing the layout, and they got to the end of the page before the end of the instructions, so they just wrote "Sew together and embroider facial features."  I didn't have much stash at the time, so I actually went out and bought the red Red Heart yarn.  I'm not sure why we chose red.  The beige was a very light yarn I think I inherited from my grandma, probably a sock yarn.  The purple spots were Koigu. 

Yes.  I had made socks, weren't happy, made a new pair...and had bits left over from having cut the yarn numerous times for the first pair.  I should have doubled the beige and the Koigu, but didn't really clue in.  It took a lot of stuffing, I remember that.  And, of course, after all that hard work...it was mostly left in a corner, neglected.  Sigh.

Wednesday, September 10, 2014

Frosty #2

I wasn't happy with the bear hat I made for Jenna.  Sure, it was cute, but I didn't like how it gaped around the forehead.  So, I made another one (26gr), the same design, but this time I decreased about 7 sts--two per row, every other row, centred at the top, before starting the ribbing.  I liked it much better, though I don't have a photo on my "newborn head".
She had also ordered a little romper (36gr).  I struggled with much of this.  Do you know how hard it is to find out how long a baby is from shoulder to crotch?  I finally asked in a Frugal Mommy group--someone always has a newborn in that group, LOL.  I could go measure some outfits in a store...but you don't know how they're intended to fit.  I still felt this looked a little loose.  Sometimes it's cute when babies are in clothes that are too big.  But I decided to make up a smaller one too.  Which now looks way too small.  It's not quite finished.

You'll also see another tiny bear.  Jenna messaged me to say her son had adopted the first one, and so she needed another one, and perhaps with brown features instead of black.  I tried that once years ago, on a big bear, and it looked odd.  However, I think I did okay on this one.  I also made up some scarves for him, using a variety of yarns, including yarns from other things I've knit for her!

 Just chillin' in the garden
 A bit of colour
And a little bath after his adventures!

Now I'm working on two little bunnies for Jenna, gifts for her nieces :)

Yarn In:   6160gr
Yarn Out:   17gr(bear) + 5gr(scarves) + 36gr + 26gr + 2655gr= 2739gr
Balance: 3421gr more brought IN than out
Cost:  $314.71/247 days = $1.27/day


Sunday, September 07, 2014

Yardage Pt 3

After going to Michaels and getting the second ball of LionBrand WoolEase Thick n Quick in the same dyelot, I got started on the bear hoodie.  And finished it with plenty of the first ball leftover!!
I had sent a picture of the ball to the client before I started.  She thought it was lighter than the picture she sent.  The picture was the actual designer's picture, so I messaged her through Ravelry.  She replied that she had used Linen for it--and I had bought Fisherman.  I didn't recall another beige shade there.  When I went for the second ball, I asked, and indeed, they haven't had Linen for awhile.  I told the client this and went ahead with the hoodie.  Finished it and sent her some pictures with different button options.  She sent pictures of other items with very large brown buttons...the type of buttons that cost $6+ at specialty stores.  I went button shopping at the regular fabric store and picked a few more options.  Then she sends me another picture of someone else's bear hoodie done in the darker Linen, and says that person lives to the east of me and got the yarn at Michaels---but bought out all the skeins in that shade.  So, I answer that I can check at a different Michaels' next week....it's really a drag to go to that other store, but I want her happy and I can probably easily sell this hoodie in Fisherman. 

While I have your attention...I'm in another Facebook auction.  This one is good because the money actually comes to me :)  Go take a look at some great items!

Saturday, August 30, 2014

100 833

100 833!  That's how many page views I've had since Blogger has been keeping track!  I noticed last month that I was getting close, but I didn't think I'd be over the 100 00 mark by so much before I noticed.  Between trips, and computer issues, I haven't had much time for blogging.  I hope to get more regular once the kids are back in school. I've got quite a bit to show, but most needs to just get finished up.  Or "real" photos.  It's hard to show a newborn romper, just laying flat in the grass.

Anyway...it's late, I'm off to bed.  Hopefully I'll have some new stuff for you in a couple days!

Thursday, August 21, 2014

Yardage Pt2

I went to Michaels and was able to get another ball in the same dye lot, and use a 40% off coupon.  Yay.  Now, what will I do with the 90yds left over? LOL.   Messaged the client to arrange deposit and she hasn't answered yet.  Do I start anyway?  Everyone seemed to want one of these hoodie when someone posted the picture on Facebook, but I can't imagine toddlers will actually like them....they'd turn their head, but the hoodie is oversized, so it doesn't move....
Also picked up some "pumpkin orange" for a potential order.

Yarn In:  128gr + 170gr + 5862gr = 6160gr
Yarn Out:   2655gr
Balance: 3505gr more brought IN than out
Cost: $6.77 + $307.72 = $314.49/227 days = $1.39/day

Wednesday, August 20, 2014

Yardage

I'm going to be knitting an animal hoodie.  The client suggests size 10-15 months.  I have the actual pattern, and the size choices are 6-9 month and 12-18 months.  I guess 9-12 month olds wouldn't wear this?  Anyway, the yarn requirement for 6-9 months is 108yds.  It's mainly in one colours, with a small amount in a second colours (inside the ears).  The recommended yarn, that I'm using, is 106yds per ball.  Ugh.  The 12-18 month size takes 125yds.  Even trying to resize in between these won't make it a one ball project.  I have ONE ball.  I can get more, but not necessarily the same dyelot.  Ugh.  These animal hoodies seem really popular, so hopefully I'll get more orders for the light cream version....

Friday, August 15, 2014

Blues

One day, my youngest wanted to rollerblade.  She sat on the basement stairs to put them on, while I looked for all the gear.  I found a cloth tote bag, cheapy-give-away-from-politician.  Inside, was a nearly finished blue pod, in Patons "Divine".  WHAT?!

I went  to my Facebook biz page and asked if I had promised a blue pod to anyone.  No one recalled anything, but one woman responded that she'd buy it.  The same woman that bought the grey pixie bonnet a few posts back!  I quickly finished it off and got it in the mail.

Aww!  I love that yarn.  Of course, it seems to be discontinued!

I picked up some more white "mohair" at Value Village; $2.14 for 119gr.  Also picked up more of the Sirdar Snuggly for the cardi I've been machine knitting for what seems like forever.  Five balls, two of brown, three of taupe.  It's a different dye lot, and I'm not sure I'm happy with it.  I've been trying to get to a different store to check out another dye lot, but I've been so busy.  And away.  I had 45 days to return it, I think I might be past that now :(  And, where is the bill?  I'm going to guessimate, $4.99/ball (Mary Maxim's price)...250gr for $28.19.

Yarn In: 119gr + 250gr + 5493gr = 5862gr
Yarn Out:   50gr + 2605gr = 2655gr
Balance: 3207gr more brought IN than out
Cost: $30.33 + $307.72 = $338.08/227 days = $1.49/day

Friday, August 01, 2014

Explanation

Just a quick post as I'm between vacations, LOL!

I had a comment on the Violet Sunset post about my Yarn Totals at the bottom of most of my posts.  For several years now, I've been keeping track of how much money I spend on yarn, how many grams I buy/acquire, and how much I use up/give away.  I chose grams because much of my yarn is thrifted, vintage, or unlabeled, so I don't know the yardage.  I take how much I spend, and divide it by the number of days in the year so far, to figure out my "per day" yarn costs.  I don't add in the costs for needles, patterns, buttons, etc.

It's been interesting.  I'm down in productivity this year, I think.  If I was at my regular computer I would be able to link to the recaps, but if you choose "Confessions" under the Labels, over on the right, you should be able to find them :)