true up pattern and make swimsuit
finishing sewing muslin
-perfect fit
sew green dress based on muslin above
copy pink/black/white knit dress and sew copy
make at least one other knit dress, preferably two
make woven dress
make tops
make shrug (black?)
make cardigan with penguin for Nya
make Indianapolis Super Bowl scarf
Update: Forgot to put Lucy's camera case and hem animal print dress on the list.
I'm almost done the muslin. I've decided to not make the green dress at this time...I think the fabric would be too heavy for summer, and I feel a little frumpy in the princess seamed muslin. Although the vertical seaming is supposed to add height, what I see is a big blob, LOL. With no horizontal definition, you can't tell that I have (a bit of) a waist. Sure, it's loose and flowy, and probably nice for summer (but so sheer it needs a full slip), but I'd rather have the horizontal seam of an empire waist dress. I've also been experimenting with tucking in my shirts. OMG. It's been like, 15 years since I've tucked in a shirt!
Right now, I'm hemming the animal print sundress. Cause summer came!
Tuesday, May 31, 2011

Monday, May 30, 2011
Eh?
 Back in September 1995, I somehow convinced Rob to go on a road trip to the States. We'd been dating only a few months, but had gone on weekend camping trips, so, hey, what's a 10 day trip to another country? LOL. I had hoped to get to Tennessee, but we made it only as far south as Kentucky, which we loved. We spent a few days at Mammoth Caves National Park; it was just after Labour Day and a great time to visit. One day we were looking at a large info board and struck up a conversation with another tourist. At one point, he stopped, and asked "So, what part of Canada are you from?". I laughed, Rob was confused. The "eh?s" gave him away.
Right now, Rob's parents have a house guest from England. She's come every year since 2006, and stays for a month. I thought it might be nice to send a little bit of Canada back with her.


I don't know if I should try to alter the chart or just leave it as is. Your thoughts?
Sunday, May 29, 2011
Cutie Pie!
A while ago, I found through another blog (Angry Chicken?), a link to a EDIT: tutorial on making sock monkeys using dollar store novelty socks. I knew I had to do that, esp. since two of my niece's like sock monkeys. I bought a pair of Valentine Socks, but one of the girls wore them and got them dirty before I got around to sewing. So I went off to Dollarama to get more socks. Poor selection! And, the two socks were not quite the same size!
It was fairly easy to follow the tutorial, although I changed the ears a little. I also used the purple heel that came from the second pair of socks in the set...I thought the black wasn't contrasty enough. The buttons are from my stash. Slim pickings for those!


This wasn't on the list I just made since I actually did this last weekend. Today, I sewed a little camera bag for Lucy, which I had forgotten to put on that list. So, there's nothing to cross off yet!
Friday, May 27, 2011
Plans
I've got so many plans/projects going on that I think I need to make a concrete list, make it public, LOL.
In 6 weeks we head out to Indianapolis to spend a week or so with Rob's sister and her family. Many of the things I really want/need to get done by then!
true up pattern and make swimsuit
finishing sewing muslin
-perfect fit
sew green dress based on muslin above
copy pink/black/white knit dress and sew copy
make at least one other knit dress, preferably two
make woven dress
make tops
make shrug (black?)
make cardigan with penguin for Nya
make Indianapolis Super Bowl scarf
Is that it? Oh my. Since it seems to take me at least two weeks to sew a dress....yikes. I'm hoping once I get the muslin done, the actually dress will be quick. And since I'm copying my knit dress (and enlarging), hopefully that goes quick. The shrug should be fast as I'll do it on the machine, same with the cardigan, although I don't know what pattern/knit radar I'll be using.
This weekend is busy. Next weekend is busy. Busy weeks. So, I might not blog a whole lot for now :)
In 6 weeks we head out to Indianapolis to spend a week or so with Rob's sister and her family. Many of the things I really want/need to get done by then!
true up pattern and make swimsuit
finishing sewing muslin
-perfect fit
sew green dress based on muslin above
copy pink/black/white knit dress and sew copy
make at least one other knit dress, preferably two
make woven dress
make tops
make shrug (black?)
make cardigan with penguin for Nya
make Indianapolis Super Bowl scarf
Is that it? Oh my. Since it seems to take me at least two weeks to sew a dress....yikes. I'm hoping once I get the muslin done, the actually dress will be quick. And since I'm copying my knit dress (and enlarging), hopefully that goes quick. The shrug should be fast as I'll do it on the machine, same with the cardigan, although I don't know what pattern/knit radar I'll be using.
This weekend is busy. Next weekend is busy. Busy weeks. So, I might not blog a whole lot for now :)
Thursday, May 19, 2011
Why Is It So Hard?!
First off, some proof I do still hand knit! Lucy took this picture on Tuesday night during Meg's skating. If you read my other blog, you'll have read how I got really distracted during Meg's swimming class and I didn't get much knit then, LOL.

Next up, more sewing. I want some dresses with sleeves. I don't have many patterns, I bought a pattern at Value Village for a dress or top with or without sleeves. I decided to try tissue fitting, but I decided while doing that that the pattern didn't have enough shape for me to make a dress.
There was one dress I made last summer and never showed you. I made it before I learned about "full bust adjustment", so I had made it for my chest size. Well, it fit like a sack everywhere else. The only picture I took was blurry, dark, and my hair was in a towel. So you never got to see it, LOL. I decided I would give it another try, since I found a couple blogs with awesome instructions on how to do a FBA on a princess seam pattern. It'd be no sweat, right?
Why are things always so hard for me?

Today, I decided to retrace the side seams. I had graded from an 18 to a 22, partly cause I want some swishiness, and because I was worried since I needed the 18 for the shoulders but the 18 waist (body measurement) is way too small. I realized last night that the extra 3" I added in the bust would be going all the way down the length of the dress, and hence, over my belly (while it wouldn't be added over the back or bum, where I don't really need it!).

However, when I laid the pattern piece back on, I saw how weird the armhole had changed, despite the tutorial saying the armhole wouldn't change. So now I need to go back and do something about that. I decided that while doing all these adjustments I would do a muslin, despite hoping that the dress that I was making was going to be a (very) wearable muslin. It might just be a top though. I found out I have a shortage of woven tops in my wardrobe! This is why I didn't know I have very big problem with "forward shoulders", the other dress I was going to make, which turned into a top, is woven and the shoulder seams were strange.....
Monday, May 16, 2011
Quick Dress
A while ago I thought I might try sewing underwear. FabricLand had a bin with stretch knit remnants and I picked a couple pieces, but once I got home I found they were rather narrow. And this one, felt a little thick, but it probably would have been fine. However, Meg found it a couple weeks ago and wanted me to make a wedding gown, or at least, a train (thanks Kate & Will!).
After the success of my last knit dress, I figured a simple dress for Meg would be nice. At first, I had this hilarious idea of folding it in half, cutting out a neckhole and armholes, and stitching up the sides. LOL. But I wanted the bottom more gathered. I took a knit tank top pattern for kids that I already had, and traced a shortened version for the top. I actually went a little large cause I didn't want it tight, but I didn't want it too loose. And it's a smidge loose, but actually, it's not gaping and being indecent though.

Then for the skirt, I wanted it gathered. But when I picked up the fabric, I discovered that it's a 2-way stretch (up/down and side/side). So, I could do the skirt in any direction, but I was worried about it being too short, although the fabric was almost square, so it didn't really matter. I did the gathering stitch across the top of the bottom piece (which was about 4" bigger), and then pinned it to the bodice and gathered it to fit. But as I sewed, the gathering seemed to disappear! I don't know if that's because of the stretch, or what, but it lacks the gathered look I wanted.
About a week after creating this, I was at Value Village and found a Simplicity pattern, in the right sizes, for this style of jumper dress, in wovens. Of course.
Monday, May 09, 2011
Yes, I Still Hand Knit
I was wondering today, have I showed you any handknitting lately? There was the dropped stitch in the black socks, but that's not new knitting. I showed new yarn and needles. I showed that I finally sewed buttons on a baby sweater and made a little hat for it. I showed that I finished off some other baby items that were just needing minor work. But it's been two months since I showed the "Fumbling Fleegle Socks" (and I think I finished them in February actually). Wow. What have I been doing?!
Before finishing all the baby stuff in February, I was having post-Christmas letdown, I think. I had finished all the 'interesting' stuff, and all that was left was some uninteresting stuff to finish--like the baby items. There were MANY projects I wanted to knit, but trying to find the right yarn for the right pattern was feeling overwhelming. I was keeping busy with the new knitting machine, and then a big project on the LK150, but I knew I had to have handknitting too! I started a pair of Cookie A. socks (Stricken Socks) but quickly realized I need the chart with me for awhile until I got into the rhythm. Then it became portable, but fairly soon an even more complicated section started, relegating it to the couch project again.
I also started a baby sweater or dress. I have a LOT of vintage patterns that all seem to take fingering/baby yarn (a few take DK). I always think that maybe I'll knit up some, perhaps using DK or worsted, so they're a little bigger. The yarn I wanted to use this time is a light worsted (what I used for the machine knit baby cocoon), and although I didn't want newborn size, it seemed every pattern I liked was already for a bigger size, which meant, when knit in worsted, would be quite large. I finally picked one but after a few repeats of the pattern, I still was not getting into it, and I couldn't even tell if I had been knitting it right! Ripped it back to the band, and picked an easy pattern from a stitch dictionary. It's my "purse" project right now, although the ball of yarn and the size of the sweater does make it bulky, LOL.
And lastly, my other current project is Omelet, from the lasted knittty.com. It was a total impulse cast on, although I had been wanting to knit a shawl for awhile. I decided to use a cone of mossy green yarn, quite fine. I had previously wound (is the past tense of "wind" ("why-nd", not "win-d") wound...the same as "woo-nd, or injury? English is so weird sometimes!) off a ball, so I didn't have to knit directly from the cone, although I was looking forward to having only 4 ends to weave in. However....twice now (still using the small ball), I've found the yarn broken :( It's not a soft, squishy yarn (although I think it will wash up a bit better than it is now). I felt that this pattern, due to the small motif, needed a solid colour yarn, and my choices were fairly limited--some off white, some black, grey, and some other coned yarns. However, I sort of wish I had chosen a thicker yarn as I think this is going to take forever! Luckily, although it's not a fuzzy, squishy, warm, wool, the colour seems more autunmy than summery, LOL. I still want another summer shawl, so I might do it on a machine, LOL. The shawl started as a couch project, but now that it's grown, I can do the right side rows on the couch, and then take it with me and do the purl row while Meg has her swimming lesson/skating lesson, etc.
I'd still like some brainless sock knitting, however, I always feel that brainless socks can be so easilly knit on the machine that there's no point doing them by hand, LOL. I have more of the Kroy Stretch, and I'm not sure how the machine would handle it, so maybe I should cast on for another pair of socks with that. I really like the first pair I did. Any other ideas?
Before finishing all the baby stuff in February, I was having post-Christmas letdown, I think. I had finished all the 'interesting' stuff, and all that was left was some uninteresting stuff to finish--like the baby items. There were MANY projects I wanted to knit, but trying to find the right yarn for the right pattern was feeling overwhelming. I was keeping busy with the new knitting machine, and then a big project on the LK150, but I knew I had to have handknitting too! I started a pair of Cookie A. socks (Stricken Socks) but quickly realized I need the chart with me for awhile until I got into the rhythm. Then it became portable, but fairly soon an even more complicated section started, relegating it to the couch project again.
I also started a baby sweater or dress. I have a LOT of vintage patterns that all seem to take fingering/baby yarn (a few take DK). I always think that maybe I'll knit up some, perhaps using DK or worsted, so they're a little bigger. The yarn I wanted to use this time is a light worsted (what I used for the machine knit baby cocoon), and although I didn't want newborn size, it seemed every pattern I liked was already for a bigger size, which meant, when knit in worsted, would be quite large. I finally picked one but after a few repeats of the pattern, I still was not getting into it, and I couldn't even tell if I had been knitting it right! Ripped it back to the band, and picked an easy pattern from a stitch dictionary. It's my "purse" project right now, although the ball of yarn and the size of the sweater does make it bulky, LOL.
And lastly, my other current project is Omelet, from the lasted knittty.com. It was a total impulse cast on, although I had been wanting to knit a shawl for awhile. I decided to use a cone of mossy green yarn, quite fine. I had previously wound (is the past tense of "wind" ("why-nd", not "win-d") wound...the same as "woo-nd, or injury? English is so weird sometimes!) off a ball, so I didn't have to knit directly from the cone, although I was looking forward to having only 4 ends to weave in. However....twice now (still using the small ball), I've found the yarn broken :( It's not a soft, squishy yarn (although I think it will wash up a bit better than it is now). I felt that this pattern, due to the small motif, needed a solid colour yarn, and my choices were fairly limited--some off white, some black, grey, and some other coned yarns. However, I sort of wish I had chosen a thicker yarn as I think this is going to take forever! Luckily, although it's not a fuzzy, squishy, warm, wool, the colour seems more autunmy than summery, LOL. I still want another summer shawl, so I might do it on a machine, LOL. The shawl started as a couch project, but now that it's grown, I can do the right side rows on the couch, and then take it with me and do the purl row while Meg has her swimming lesson/skating lesson, etc.
I'd still like some brainless sock knitting, however, I always feel that brainless socks can be so easilly knit on the machine that there's no point doing them by hand, LOL. I have more of the Kroy Stretch, and I'm not sure how the machine would handle it, so maybe I should cast on for another pair of socks with that. I really like the first pair I did. Any other ideas?
Wednesday, May 04, 2011
Good Things Come in Threes
 Back in February, I was worried I wasn't going to have any projects to show you, but I'm actually behind in posting new projects! I decided, in a lull while working on a big project on the LK150, to do some pinwheel blankets for the donation/gift box. I had gotten 4 balls of Bernat Co-ordinates in yellow, white, tealish blue and pink, from the Salvation Army (plus I had a white ball in the stash). I would make the blankets on the Singer 155 as the LK150 was sort of in use (and on the backside of the table, a little cozy).
The first one I did was this tealish blue and white. I used 50st, hold 2st per row, 10 wedges, T6 (I think). 120gr.
I felt this blanket was a little small for my liking, although I'm sure it's fine for a newborn/infant.
The next blanket was a challenge. I picked up this interesting yarn at the Spinrite Factory Outlet tent sale one summer, probably no later than 2006. It's a chenille which changes shade and texture, from a dry, thick pale pink, to a shiny, thinner, almost white. I used T10, but it wasn't quite loose enough for the thicker sections. I was really concerned about having enough yarn as I had tried to make a square, mitered blanket a few years ago, but ran short. I got the blanket finished with a small amount left. However, this blanket had a terrible problem...it wasn't laying flat. I don't mean at the edges...I mean, in the middle!

It looked like a volcano! I gave it lots of steam, and it started to behave. I knew I didn't have enough yarn for a worm trim, so I decided to crochet around it, ending whenever I run out of yarn. Well, on the first try, I did two rounds but made it a few inches shy of joining the third round. It looked dumb. I ripped back, hoping to space the sts so that I'd make it on the next try. But I lost the crochet hook. I had to use a smaller one, so I ripped back even further, and this time I JUST made it to the finish line.

I took a bit of a break after the two as I wanted to make the next ones with the Bernat Co-Ordinates a bit bigger and had to figure that out. Turns out, you just add more sts, keeping to the 2st taken out of hold each time, and 10 wedges. Adding more sts automatically means more rows.


The third is yellow and white, and I think I used 60sts and T6, which is a bit loose. I like the size of it though. I finished off one ball of the white Co-ordinates, but there's still quite a bit of the 3 colours left. I did weigh it, but I didn't write it down, LOL. I'll probably make little sweaters to go along with these blankets. I predict I'll make more....they take about one hour for the blanket, and then there's the edging/sewing up!
Monday, May 02, 2011
Ahhh, Man!!
I was inspired by the revelation that I could take a knit contour/radar pattern and turn it into a sewing pattern. I wanted to make a simple pullover. For awhile, I've thought of using the red fleece sweater that I based the green striped one on, as a pattern to sew another simple top, but altered to fit me a bit better. So, I'm not sure if I'm going to make a sweater based on the red top, or based on the knit contour pattern that's based on the red top, LOL!
I was at Fabricland, picking up a "couple small things" (thread, zipper...) and of course I looked at the clearance bin. There was some perfect knit fabric pieces. I wasn't sure how much I'd need, but at 1.3m and 1.5m, I thought I should be able to do something. I've also thought maybe a wintery nightgown. It'd be more comfortable than flannel, and perhaps not so granny-ish.
 Meg took all the bands off the pieces of fabric that I bought. I was feeling chilled, so I shook out one of the knit pieces to wrap around me. I was stunned to see two patches where there wasn't any dye! (The picture shows one spot). The label didn't say it was flawed! I don't know if I'll be able to layout a sweater and avoid the two patches. Maybe a pattern with more pieces that could be jigsawed around the patches. Bummer. I'll probably end up with a nightgown after all (and this was the bigger of the two pieces!).
I was at Fabricland, picking up a "couple small things" (thread, zipper...) and of course I looked at the clearance bin. There was some perfect knit fabric pieces. I wasn't sure how much I'd need, but at 1.3m and 1.5m, I thought I should be able to do something. I've also thought maybe a wintery nightgown. It'd be more comfortable than flannel, and perhaps not so granny-ish.

Thursday, April 28, 2011
Seeing Things From a Different Angle
The Knit Radar/Contour is a nifty device; I've talked about it before. You have a paper pattern, either half width or full width, and it's drawn to half the scale of the finished item. You do your swatch and measure it, and put a ruler with your stitch gauge in a slot at the bottom of your pattern. You turn a dial to your row gauge. As the carriage trips the row gauge lever, the pattern moves up an appropriate amount. The stitch ruler tells you how many stitches to have, where the pattern line intersects the ruler is the row you're working on. You can draw a pattern using your own measurements, you can draw one using schematics from a handknitting pattern, and you can even take a sewing pattern (for knits), and reduce it by 50% and use it. It's even been suggested to me that if you have a handknitting pattern with no schematic, you can use blank paper, and no yarn, and "knit" your item, but mark on the paper every time you dec/inc/etc. Then connect the lines and you have a new pattern.
Recently, I encountered something else. I have some yarn I want to use to make a springy, drapey, cardigan. I have a pattern for the standard gauge (and even the recommended yarn, but I don't want to use it!), and it has schematics. However, the yarn doesn't work on either of my machines with Knit Radar! If I were handknitting, I'd just start and then work out the pattern (dec. for shaping) as I go. But that's not easy on the machine. I was wondering if I could make the KR 7 on my bulky (which comes off), work for the LK150 as I didn't want to work out all the pattern calculations for a new gauge, and then write out the pattern.
A Ravelry member said to:
A) Work a Gauge Swatch on your LK150, block it and then measure the rows and stitches.
B) On the KR7, set the row setting dial, then select and insert the appropriate stitch ruler. Insert your 1/2 Scale Garment pattern, either pre-printed or one you have drawn yourself.
C) With pen and paper or laptop/iPad handy to take notes, and without any yarn in the bulky carriage, move this machines carriage back and forth to trip the row advance lever. You’re not knitting on this model, just using it’s carriage to advance the lever, and you can really fly through a pattern this way. Write down the pattern instructions; IE How many stitches to Cast On; How many rows to first decrease/increase, write down how many stitches to bind off for armhole shaping, rows to shoulder, etc.
What this method allows you to do is to quickly work through and write down the pattern instructions for the front, back and sleeves. Then you use this information on your LK150 and knit the sweater, when time allows. The front one evening, back the next, both sleeves a couple of nights later, and then onto blocking and finishing.
This process allows you to do a dry run in a sense, to think your way through and consider things like closures, IE button and buttonhole placement, or facings for zippers, how you might want to work the shoulder finishing, attach and work a neckband or modify a pattern to incorporate the shaping required for a shawl collar. This way you don’t have to unknit any mistakes that come from surprises or construction methods that you did not consider until the knitting was underway.
Isn't that clever?! "Ghost Knitting" is what came to mind. Using the Knit Radar instead of a calculator. On one hand, the thought of taking the time to knit WITHOUT yarn...LOL...but I'd really like to use this yarn, and on the LK150 (I know you can get a proper KR for it, but that's money!). I thought once I had the bulky and the standard gauge, I'd have all yarns covered with one or the other, and this yarn should have a gauge of 26st/4" which is doable on the standard gauge. I think however, the fiber mix, or the structure of the yarn, just didn't work on the standard. I do have some other little things to take care of first, but I'll keep you posted on how it works out!
Edit: I totally forgot the other part to this! LOL. I recently saw a nice, sewn, hoodie on a blog. I was lamenting that I don't have any sewing patterns for things like that. Then I realized that I could take the KR pattern that I've altered to fit me (perhaps not as shaped as the SWS sweater I just showed), and use that to make a sewing pattern! After all, it's just a flat representation of fabric!
Recently, I encountered something else. I have some yarn I want to use to make a springy, drapey, cardigan. I have a pattern for the standard gauge (and even the recommended yarn, but I don't want to use it!), and it has schematics. However, the yarn doesn't work on either of my machines with Knit Radar! If I were handknitting, I'd just start and then work out the pattern (dec. for shaping) as I go. But that's not easy on the machine. I was wondering if I could make the KR 7 on my bulky (which comes off), work for the LK150 as I didn't want to work out all the pattern calculations for a new gauge, and then write out the pattern.
A Ravelry member said to:
A) Work a Gauge Swatch on your LK150, block it and then measure the rows and stitches.
B) On the KR7, set the row setting dial, then select and insert the appropriate stitch ruler. Insert your 1/2 Scale Garment pattern, either pre-printed or one you have drawn yourself.
C) With pen and paper or laptop/iPad handy to take notes, and without any yarn in the bulky carriage, move this machines carriage back and forth to trip the row advance lever. You’re not knitting on this model, just using it’s carriage to advance the lever, and you can really fly through a pattern this way. Write down the pattern instructions; IE How many stitches to Cast On; How many rows to first decrease/increase, write down how many stitches to bind off for armhole shaping, rows to shoulder, etc.
What this method allows you to do is to quickly work through and write down the pattern instructions for the front, back and sleeves. Then you use this information on your LK150 and knit the sweater, when time allows. The front one evening, back the next, both sleeves a couple of nights later, and then onto blocking and finishing.
This process allows you to do a dry run in a sense, to think your way through and consider things like closures, IE button and buttonhole placement, or facings for zippers, how you might want to work the shoulder finishing, attach and work a neckband or modify a pattern to incorporate the shaping required for a shawl collar. This way you don’t have to unknit any mistakes that come from surprises or construction methods that you did not consider until the knitting was underway.
Isn't that clever?! "Ghost Knitting" is what came to mind. Using the Knit Radar instead of a calculator. On one hand, the thought of taking the time to knit WITHOUT yarn...LOL...but I'd really like to use this yarn, and on the LK150 (I know you can get a proper KR for it, but that's money!). I thought once I had the bulky and the standard gauge, I'd have all yarns covered with one or the other, and this yarn should have a gauge of 26st/4" which is doable on the standard gauge. I think however, the fiber mix, or the structure of the yarn, just didn't work on the standard. I do have some other little things to take care of first, but I'll keep you posted on how it works out!
Edit: I totally forgot the other part to this! LOL. I recently saw a nice, sewn, hoodie on a blog. I was lamenting that I don't have any sewing patterns for things like that. Then I realized that I could take the KR pattern that I've altered to fit me (perhaps not as shaped as the SWS sweater I just showed), and use that to make a sewing pattern! After all, it's just a flat representation of fabric!
Tuesday, April 26, 2011
Time Travel Would Have Been Useful
This is weird, but my typing screen is grey, and I can't see my cursor, and when I type, the type is showing up in a white strip. I'm not sure I like the changes to blogging....I did this cause the "solution" for getting a space between paragraphs didn't work...
I haven't blogged this week (now the white strip is gone, but the background is still grey and there's no visible cursor) cause last Wed. I got a notice that we're at 75% of our internet usage for our new billing plan....and not at 75% of the month! Then Lucy was home sick on Thursday, then it was a 4 day weekend for EVERYONE in the family. I'm trying to cut down on blog surfing, etc. However, today I looked at my emails, one was from Patternreview.com and they had a contest and the winner was shown in a dress that I thought I had in my pattern collection. So I went off to her blog and fell in love. Yup. A sewing crush. Sigh. You know how on some blogs, they have at the bottom of posts "Other pages you might like" suggestions? Well, one of the suggestions looked a lot like my "Empire Strikes Back" dress I worked (click on the "Sewing" label at the right and then scroll down,down,down to see the three posts) on last August. I read through it and it was like re-living everything I did! It was a different pattern, but extremely similar (Simplicity and New Look are the same after all). I searched and googled so much last summer and if only she had made her dress LAST year instead of this year! I feel very validated now, knowing that what I was doing was more or less the way to do it! I also feel like it might be okay to have to grade a waist up 5" so that I can use the patterns I do have that are not quite big enough. I just might give that dress another go now!

I've been really good about not buying yarn this year. Earlier in the year I did find a good score at the Salvation Army, and I bought that Chromos yarn from Knitpicks.com but I've been really good. Then I took Meg to Michaels for some craft stuff, and they had some Patons Classic Wool on clearance, so I bought 6 balls. I know it'll get used for felting, so I like adding to my CW stash when they clear out colours. Then, Meg and I dropped into the yarn store in Oshawa, cause I needed some wool wash. She had the bright red "kitchen" cotton I need for a special gift project. And she had a ball of James Brett Marble in boyish colours in the sale bin, so I got it, and one more (full price) ball of a different dye lot just to be safe. And then I turned to my left and saw the Patons Lace, which I did pass up, for the more expensive but lovelier, Regia Lace, in black/charcoal/grey. Ooops! Still, I am using up yarn at a good rate this year, as I'll show in another post!
Tuesday, April 19, 2011
Catch Up
Okay. I was having trouble with my other blog, and not being able to get blank lines between paragraphs. I did what it said in the help section, but that didn't seem to work. So I changed something, and now the whole editing is weird. I know I've complained about being able to load only 5 pictures at a time, but what I normally did was get typing while the pictures were loading. Can't do that now. And you don't choose at that time the picture alignment, and now I'm not sure how to get them in the center but the text to go to both edges....it's really weird typing! Anyone out there can help me?

So, I made these socks just over a year ago, and when I put them on them on the other day, I thought something at the toe looked odd. I looked closer, and it appears I missed a stitch when I grafted the toe!
I turned 40 in January, and like every other year, my "grandma" sent me a cheque. I usually get myself something knitting related, like a magazine subscription. This year, since I was turning 40, I wanted something a little more indulgent, significant, noteworthy. I had seen the Namaste circular needle holder at www.knitpicks.com and thought about that, but it won't hold ALL my needles. Then I saw this little box. It's actually "eggplant". I had been using a chocolate bar tin, but the hinge broke so the lid often got jammed down and then it got stuck and Rob had to pry it open. So that sealed it, LOL, and I had to order the Namaste notions box.


Thursday, April 14, 2011
Last summer I had brought the LK150 up to the kitchen so I could knit while the kids were in the yard. I was planning on making a diagonal knit sweater using Patons SWS that I had bought as "1lb Unknown Fibers" yarn at Wal-Mart. I did lots of swatching, and had the back and most of the front knit when it got put on hold....long term hold. There were some little issues that were bugging me. When I got the Singer 155, I knew I'd just "whip up" a plain sweater. I made the green stripe one and did some fine tuning of the shape.  I wasn't sure what I was going to do with the neck, I couldn't decide between a hood or a shawl, but I went with the shawl collar, although it didn't quite turn out how I was hoping....it's not big enough and tends to flip up (which is also okay, but not what I planned).
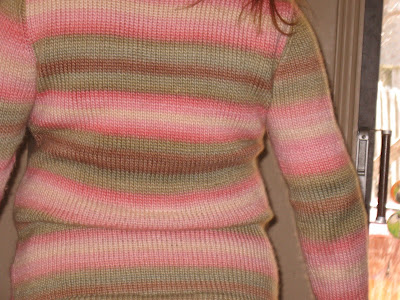 There is a bit of an issue with the back. I did do short rows in the bust, and I did make the back narrower, but you can see that it's saggy. I need even less length in the center back, which is not a fun adjustment in knitting. Basically, I'd have to do short rows along each edge, and leaving the center stitches unworked. Maybe, instead of doing that in wedges like for the front (but in reverse), I could do it in stages as I go up the back.
 At first, I felt it was a smidge snug, but I think it's loosened up. I hadn't planned on how I wanted to do the edgings either, so I had casted on with waste yarn. On the body, I rehung the open stitches, doubled up on every other needle, to get a picot edge, then knit 7 rows and joined and cast off. However, I somehow didn't get the front and back the same and one of the hems rolls and the picots are not quite along the bottom edge. For the sleeves, they were a little long, so I just turned it under and stitched it down. They look good. I do think the body is a bit long, and I had thought about redoing the body hems....but that'll be later, LOL.
I wasn't sure what I was going to do with the neck, I couldn't decide between a hood or a shawl, but I went with the shawl collar, although it didn't quite turn out how I was hoping....it's not big enough and tends to flip up (which is also okay, but not what I planned).  There is a bit of an issue with the back. I did do short rows in the bust, and I did make the back narrower, but you can see that it's saggy. I need even less length in the center back, which is not a fun adjustment in knitting. Basically, I'd have to do short rows along each edge, and leaving the center stitches unworked. Maybe, instead of doing that in wedges like for the front (but in reverse), I could do it in stages as I go up the back.
  At first, I felt it was a smidge snug, but I think it's loosened up. I hadn't planned on how I wanted to do the edgings either, so I had casted on with waste yarn. On the body, I rehung the open stitches, doubled up on every other needle, to get a picot edge, then knit 7 rows and joined and cast off. However, I somehow didn't get the front and back the same and one of the hems rolls and the picots are not quite along the bottom edge. For the sleeves, they were a little long, so I just turned it under and stitched it down. They look good. I do think the body is a bit long, and I had thought about redoing the body hems....but that'll be later, LOL.
 Thursday, April 07, 2011
Felted Clogs Update
I got around to felting another 3 pairs of the felted slippers I wrote about last week. So much fun.  It's fascinating how the same wool, knitted exactly the same, all felted at the same time, turned out differently.
  The pair on the left were the first ones, that turned out too small after I let them go into a cold rinse cycle while putting the kids to bed, LOL. The next pair are the bolder lime green and purple, in the same fair isle. Then there's the brown/lime green where I reversed the yarns on the bottom, and the right pair are the same polka dots, but I made them 30sts wide, short rowed down to 10 sts, and did 42 rows. The purple ones and the brown ones should be the same. They are very close, but the purple ones are a bit bigger. Both of them are a little too long on me, but snug across the top of the instep. The blue/pink ones are too big for me. I'm keeping the brown ones for me because of the mistake on the top of the toe (see the original post, LOL).
 Man, look at the difference, LOL. The polka dot ones feel kinda neat when I first put them on, almost like textured insoles. I don't know if that will last though. For my next attempt, I'll stick with 28 sts, short row down to 11 for the heel, do 40 rows (plain) for the sole, short row down to 12 or 14 for the toe (so they are a little shorter and not 'pointy', and then as I go up the top, I'll increase a couple stitches. Then, I'm going to knit a second sole in fair isle, hopefully seaming as I go. Stay tuned.
It's fascinating how the same wool, knitted exactly the same, all felted at the same time, turned out differently. The pair on the left were the first ones, that turned out too small after I let them go into a cold rinse cycle while putting the kids to bed, LOL. The next pair are the bolder lime green and purple, in the same fair isle. Then there's the brown/lime green where I reversed the yarns on the bottom, and the right pair are the same polka dots, but I made them 30sts wide, short rowed down to 10 sts, and did 42 rows. The purple ones and the brown ones should be the same. They are very close, but the purple ones are a bit bigger. Both of them are a little too long on me, but snug across the top of the instep. The blue/pink ones are too big for me. I'm keeping the brown ones for me because of the mistake on the top of the toe (see the original post, LOL). Man, look at the difference, LOL. The polka dot ones feel kinda neat when I first put them on, almost like textured insoles. I don't know if that will last though. For my next attempt, I'll stick with 28 sts, short row down to 11 for the heel, do 40 rows (plain) for the sole, short row down to 12 or 14 for the toe (so they are a little shorter and not 'pointy', and then as I go up the top, I'll increase a couple stitches. Then, I'm going to knit a second sole in fair isle, hopefully seaming as I go. Stay tuned. (I can't get this picture deleted below, so just ignore it!)

Wednesday, April 06, 2011
Nearly Forgot
When I got the call from my MIL for baby items, I had one little sweater that had been in a time out for awhile. I started it in the early fall when I needed a 'brainless' project while the kids were doing their evening classes. I had found a ball of Bernat "Olympic" ("Olympia"?) in my stash, with a Giant Tiger sticker for 2.99 (GT is a bargain store in Ontario). I know I would not have bought it there, but I might have got it at Sal. Army. I started a stockinette stitch Baby Surprise Jacket. Not really brainless even though it's stockinette!  I HATED the yarn. I could have used slightly bigger needles, but still...ick. I had set it aside to finish up Christmas presents and I just never wanted to get back to it. I decided to finish it up for the donation, but it was way down on the list...I thought it would be better to sew the buttons on the sweaters that were actually finished, LOL. And then I found I didn't have enough buttons. There are 5 buttonholes, and it seems most buttons come in 3 or 4 per card.
  Since I missed the donation date, I decided to use up every last bit of the yarn and make a hat. There wasn't enough so I added plain white. Well, the first attempt didn't work, yarn wise, and the second attempt took me about 3 tries to cast on and do the garter stitch band and I still didn't have it right. I alternated rows of white and the variegated, but each time I changed colours, I knitted a few stitches in the old colour before starting the new colour. It's a nice way to make a 'matching' hat that isn't exactly the same.
I HATED the yarn. I could have used slightly bigger needles, but still...ick. I had set it aside to finish up Christmas presents and I just never wanted to get back to it. I decided to finish it up for the donation, but it was way down on the list...I thought it would be better to sew the buttons on the sweaters that were actually finished, LOL. And then I found I didn't have enough buttons. There are 5 buttonholes, and it seems most buttons come in 3 or 4 per card. Since I missed the donation date, I decided to use up every last bit of the yarn and make a hat. There wasn't enough so I added plain white. Well, the first attempt didn't work, yarn wise, and the second attempt took me about 3 tries to cast on and do the garter stitch band and I still didn't have it right. I alternated rows of white and the variegated, but each time I changed colours, I knitted a few stitches in the old colour before starting the new colour. It's a nice way to make a 'matching' hat that isn't exactly the same.
Monday, April 04, 2011
Butterick 5382 Part 2
After the first fit photos, I sewed the sleeves in using a zig zag as the basted stitches seemed tight. I took in the waist seam; I just used the old seam and ran the edge of the Q foot along it, which amounted to 3/8" taken off the bodice and 3/8" off the skirt. This brought the seam right at the top of the darts, which I didn't adjust. There is a little puckering but I think it's okay. I didn't adjust the back seams at all as I didn't have anyone to help pin it and I didn't want to get silly. This is the "real" look...hair, make up, good bra and undergarments, LOL. The pictures in the last post were unhemmed, and I hemmed it, I think 1 1/2" (even though the patterned "allowed" for 1 1/4"). I see here that the front is a little shorter than the back, so I do need to adjust the back center and waist seams.
 This is the "real" look...hair, make up, good bra and undergarments, LOL. The pictures in the last post were unhemmed, and I hemmed it, I think 1 1/2" (even though the patterned "allowed" for 1 1/4"). I see here that the front is a little shorter than the back, so I do need to adjust the back center and waist seams.
 I'm not sure why I'm standing crooked, LOL. The pleating around the neck is not too obvious with the patterned fabric, but it is visible in real life. I think the fabric worked well with this pattern, considering that it was a Value Village find. Again, not my ideal colour, but I needed a thin fabric that wouldn't be too thick with the pleating.
The shoulder/sleeve seam is a little off my shoulder, although in this picture, it looks like I don't actually have shoulders, just a gradual slope down from the neckline to the elbow, LOL. Would it be possible to take out the sleeve, trim the shoulder back just a little, and resew in the sleeve? Would that create other issues, or could the knit fabric compensate? I know if I was redoing this, that sort of alteration would mean lengthening the sleevehead too, right? Or widening? I am really pleased at my first major attempt at sewing a knit garment. For the most part, the seams weren't nearly the issue I thought they'd be. While I had used a 3 step zig zag on the sleeve hems, I used a straight stitch on the skirt hem. I did hear that dreadful sound as I was getting in the truck though, and indeed, I will need to re-hem it. I also think the join between the bodice and skirt could be better--I had just used a straight stitch, but it seems a little jagged when you look at the inside. My biggest beef was using the seam tape on the shoulder--oh boy, the first step and I was hating it....LOL. Then, you fold the seam taped shoulder seam so both seam allowances, AND both seam allowances of the facing are pressed the same way. Well, that's six layers (plus the knit interfacing, which actually worked for me!). I opted to spread the shoulder seams open instead.
 I am really pleased at my first major attempt at sewing a knit garment. For the most part, the seams weren't nearly the issue I thought they'd be. While I had used a 3 step zig zag on the sleeve hems, I used a straight stitch on the skirt hem. I did hear that dreadful sound as I was getting in the truck though, and indeed, I will need to re-hem it. I also think the join between the bodice and skirt could be better--I had just used a straight stitch, but it seems a little jagged when you look at the inside. My biggest beef was using the seam tape on the shoulder--oh boy, the first step and I was hating it....LOL. Then, you fold the seam taped shoulder seam so both seam allowances, AND both seam allowances of the facing are pressed the same way. Well, that's six layers (plus the knit interfacing, which actually worked for me!). I opted to spread the shoulder seams open instead.
Today I got some Threads issues, and one of them had an article about knit patterns, and how you have to make sure the back armhole is this much bigger, and the seams match, and this and that...and I'm SO glad I didn't read this first! LOL. I'm eager to sew some more knits! I don't need a lot of dresses, but this blue dress is actually my only dress with sleeves!
Well, Ain't That Odd?
Back when Meg was a newborn, fall/winter 2005, I decided to join the blogging world. I signed up for Blogger, created a blog name "Knits and Knots" and got it all set up. But then, before I posted even once, I couldn't get logged in again! I tried various times over the next 7 months until I gave up and created this one from scratch. Today, I opened my yahoo email and there was an email from blogger saying that I had inquired about my tracykvm account and here was the info. Skeptical, I clicked the links. It seemed real, but I had to give an email address and I was leary of giving my yahoo or Rogers email, so I created another one. But it all seemed legit, so now I have two knitting themed blogs. I could turn this one into a sewing blog as the web address is generic, or make one for machine knitting and the other for handknitting, but it seems silly to split things up. Is there a way to move posts from one blog to another one (like some of my early posts from here that should be on my 'general' blog instead)?
Friday, April 01, 2011
Butterick 5382 Part 1
I really took my time with this dress, although in the end, I wish I had another day or two to fine tune the fit. But I'm still happy. I made a garment with a knit fabric, with sleeves, adjusted the shoulders, AND, I wore it in public! The fabric was perhaps not my first choice--I don't really like the pale colour, but I think I paid $5 at Value Village.  It's a thin double knit (I think--it doesn't roll), but the inside is slinky nylon and the outside has a sueded feeling finish. It stuck to every little rough spot on my fingers, and to its self. It felt great when I put it on, but then I noticed when it was hanging up to dry, how see through it is! So, I had to wear a slip :( and it kept sticking to my nylons below the slip. These pictures are from the initial try-on; don't worry, I didn't go to the concert with my hair like that and wearing socks!
 It's supposed to be an empire waist, and I did add a bit to the bodice to make sure the seam wouldn't end up in the bust zone. I even added a little extra in case it needed adjusting. As you can see, there wasn't a problem! There is some problems with the fit of the back.
  I'm pretty sure I have a bit of a swayback. I left the center back seam in even though I wasn't putting in a zipper, so that I could make adjustments. I was worried about getting the dress on, being that it's fitted at the waist, but there was plenty of stretch. I tried clipping the excess together on the back with a hair clip before I took it off, and I still had no trouble getting it off.
  It's not too bad from a distance, although I think the back hangs a little lower. But up close you can see the baggy bits.
 I tried pulling the skirt up higher, I tucked it into my bra, LOL, and although I sort of liked it from the front, it felt very maternity-ish.
  I also hadn't hemmed the skirt yet.
It's a thin double knit (I think--it doesn't roll), but the inside is slinky nylon and the outside has a sueded feeling finish. It stuck to every little rough spot on my fingers, and to its self. It felt great when I put it on, but then I noticed when it was hanging up to dry, how see through it is! So, I had to wear a slip :( and it kept sticking to my nylons below the slip. These pictures are from the initial try-on; don't worry, I didn't go to the concert with my hair like that and wearing socks! It's supposed to be an empire waist, and I did add a bit to the bodice to make sure the seam wouldn't end up in the bust zone. I even added a little extra in case it needed adjusting. As you can see, there wasn't a problem! There is some problems with the fit of the back. I'm pretty sure I have a bit of a swayback. I left the center back seam in even though I wasn't putting in a zipper, so that I could make adjustments. I was worried about getting the dress on, being that it's fitted at the waist, but there was plenty of stretch. I tried clipping the excess together on the back with a hair clip before I took it off, and I still had no trouble getting it off. It's not too bad from a distance, although I think the back hangs a little lower. But up close you can see the baggy bits. I tried pulling the skirt up higher, I tucked it into my bra, LOL, and although I sort of liked it from the front, it felt very maternity-ish. I also hadn't hemmed the skirt yet.Holy cow, I can't believe how fat I looked when I pulled the skirt up! I was having a fat day anyway, but this is horrid.
I wish I had a local friend that would help me with pinning, etc. I'm sure my MIL probably would, or my SIL actually. But really, I'd like someone that lives next door, LOL. I'll show the finished results in the next post and some more thoughts about the dress/pattern.
Thursday, March 24, 2011
Versatility
This is post 450! Woo Hoo!!
I was a little disappointed when I realized the Singer 155 came with only 5 punch cards (plus a couple the owner had punched). It's true, the 20+ cards with the Singer 327 were a little overwhelming, but there should be a happy medium! However, I'm having a lot of fun with what I do have so far! This is one area where hand knitting and machine knitting really differ. With hand knitting, you're more likely to get bored/tired of a stitch pattern after one project, because it's what you focus on. It's one of the primary reasons to knit whatever it is you're knitting and takes a lot of brain power. However, with machine knitting, it takes very little brain power to knit a stitch pattern. Put in the card, get the yarns in the right feeders, and off you go. The real work is in the pattern prep and swatching. Also, with MK, if you're going to commit to punching a punch card, you want to make sure it's a pattern you like, and probably re-use. For the small hat I made, and the current obsession I have, punching new cards seems indulgent. So, I'm having fun re-using the same card over and over!
This is the pattern in it's most basic form: (The Fair Isle pattern on the right half) My biggest complaint is that each band is overlapped with the one before it so when you change colours, one of the repeats gets gypped.
 That effect is a little hard to see on the hat, but if you look at the first dark brown triangle band above the red one at the bottom, you can see that I finished off the red band, but the lowest points of the brown band are actually in red as well as the uppermost points of the red band. One plain row after the band would have solved this (or, if I were hand knitting, I'd just carry a third colour on this row, but the knitting machine carriage only allows for two yarns at once).
I was a little disappointed when I realized the Singer 155 came with only 5 punch cards (plus a couple the owner had punched). It's true, the 20+ cards with the Singer 327 were a little overwhelming, but there should be a happy medium! However, I'm having a lot of fun with what I do have so far! This is one area where hand knitting and machine knitting really differ. With hand knitting, you're more likely to get bored/tired of a stitch pattern after one project, because it's what you focus on. It's one of the primary reasons to knit whatever it is you're knitting and takes a lot of brain power. However, with machine knitting, it takes very little brain power to knit a stitch pattern. Put in the card, get the yarns in the right feeders, and off you go. The real work is in the pattern prep and swatching. Also, with MK, if you're going to commit to punching a punch card, you want to make sure it's a pattern you like, and probably re-use. For the small hat I made, and the current obsession I have, punching new cards seems indulgent. So, I'm having fun re-using the same card over and over!
This is the pattern in it's most basic form:
(The Fair Isle pattern on the right half) My biggest complaint is that each band is overlapped with the one before it so when you change colours, one of the repeats gets gypped.That effect is a little hard to see on the hat, but if you look at the first dark brown triangle band above the red one at the bottom, you can see that I finished off the red band, but the lowest points of the brown band are actually in red as well as the uppermost points of the red band. One plain row after the band would have solved this (or, if I were hand knitting, I'd just carry a third colour on this row, but the knitting machine carriage only allows for two yarns at once).One pattern that is constantly requested in machine knitting groups, is a felted clog type slipper, like the Fiber Trends ones that are SO popular. I love hand knitting those, but I don't find them quick enough (esp. if for a gift for someone I don't want to invest a whole lot of time in). I've made other MK slippers and some are better than others (for me!). But the nice thing about the clogs is that the sole is two layers, and both layers are in garter stitch. While we CAN put in a little extra work to get garter stitch on the machine, it's a drag to do. And the construction method of the clog does not transfer to the machine very well at all. As in, do not even try.
A while ago, there was chit chat about making the Fuzzy Feet from knitty.com on the machine. But of course, MK style--a short row heel, and knit flat with side seams. I had HK those slippers, and didn't like the thinness of the single layer of stockinette felted fabric (and the sock shape bothered me). Last week, one of the members of the Yahoo group, Kris, from www.kriskrafter.com, posted a felted clog style slipper, doable on a flatbed bulky (like the Bond, KnitSmart, or metal bed machines). The group has gone crazy for these! They are SO simple to make. I opted to do them "seam as you go" and for some extra thickness,  I did Fair Isle on the soles (Kris had done weaving, but I haven't tried that on the machine yet). Here, you can see, on the right edge, blue stripes instead of Fair Isle. This is what happens when you forget to unlock the punch card mechanism and it just knits line one of the pattern over and over again until you realize. I also learned (but apparently not well enough as I repeat the error more than once) that when switching back to stockinette stitch, after taking the second yarn out of the carriage...turn the selector back to stockinette!! Otherwise you end up with empty hooks where the second yarn should have been!
  Here's the felted blue ones (don't start felting at the kids' bedtime...they turned out a smidge too small). The felted Fair Isle is thicker than single layer stockinette, although since they felted a bit too much, it's not a huge difference. There are some ideas floating around about how to make it a double sole, I think two layers of Fair Isle would be very cushy.
I did Fair Isle on the soles (Kris had done weaving, but I haven't tried that on the machine yet). Here, you can see, on the right edge, blue stripes instead of Fair Isle. This is what happens when you forget to unlock the punch card mechanism and it just knits line one of the pattern over and over again until you realize. I also learned (but apparently not well enough as I repeat the error more than once) that when switching back to stockinette stitch, after taking the second yarn out of the carriage...turn the selector back to stockinette!! Otherwise you end up with empty hooks where the second yarn should have been! Here's the felted blue ones (don't start felting at the kids' bedtime...they turned out a smidge too small). The felted Fair Isle is thicker than single layer stockinette, although since they felted a bit too much, it's not a huge difference. There are some ideas floating around about how to make it a double sole, I think two layers of Fair Isle would be very cushy.Next to them are the next pair, done with a higher contrast to see just how much the pattern might show when felted (the blue ones are much more subtle in real light).
Then, I thought, what about a different card? I looked through them, and saw that I could use a polka dot pattern. Weee!  To spice it up, I switched the yarns around for the second slipper (the tops are the same green though). These ones gave me some challenges...you can see on the right edge of the lower one that I had the card locked again. I also forgot to stop the Fair Isle at the tip of the toe on one, so the Fair Isle continued up onto the top of the foot for a few rows. I also had settings wrong, forgot to turn back to stockinette, etc.... But that didn't stop me from casting on another pair with this pattern; the first one is still on the machine....how many will I end up making? Not sure yet!
To spice it up, I switched the yarns around for the second slipper (the tops are the same green though). These ones gave me some challenges...you can see on the right edge of the lower one that I had the card locked again. I also forgot to stop the Fair Isle at the tip of the toe on one, so the Fair Isle continued up onto the top of the foot for a few rows. I also had settings wrong, forgot to turn back to stockinette, etc.... But that didn't stop me from casting on another pair with this pattern; the first one is still on the machine....how many will I end up making? Not sure yet!I'm using the Singer 155, T7, Patons Classic Merino/Classic Wool; about 117gr per pair.
Wednesday, March 23, 2011
Patience!
After re-drawing the bodice pattern, I set it aside to start on the back alterations. I had to clean up for dinner and I had a few questions to myself, before I kept going. In the end, it was a good thing I slept on it because I remembered something I had to change on the front (shorten the armhole).
I cut out all the pieces, and it's just waiting for the sewing. I do have to get some interfacing (I do have some in black, but it's woven and since the dress is a knit, I should get knit interfacing, right?) and some seam tape (never used that before) and I think some finer needles (ballpoint or stretch?) and probably some matching thread (haven't checked what I have). I can do the front pleating before I get to the fabric store though. I've put it on hiatus this week as I have a concert on Saturday and I really need to do some practicing! Plus, I had to bathing suit shop while they were on sale, and I thought I might get back to exercising...the sewing is supposed to be easy, so I should get it done fairly quickly, but I won't have much time for it on Saturday. And, of course, I hope the alterations worked!
I've also been working on some machine knit felted slippers (awesome), and a crazy lace baby sweater that I ripped out last night. I need to start some new handknit projects (and finish a few old ones), and I'm having trouble deciding what I want to work on---there's SO many things I want to knit, but not a whole lot that I'm madly lusting over. Or, I'm concerned about matching yarn and pattern. I'm just having a hard time making decisions! I'd like it if I gave my pattern list to someone, they looked through my stash, and told me what to make, LOL. I do know that my indecisiveness does usually pay off in the end, with items that I do love, so I'll just have to be patient with myself and not settle for less than what I love!
I cut out all the pieces, and it's just waiting for the sewing. I do have to get some interfacing (I do have some in black, but it's woven and since the dress is a knit, I should get knit interfacing, right?) and some seam tape (never used that before) and I think some finer needles (ballpoint or stretch?) and probably some matching thread (haven't checked what I have). I can do the front pleating before I get to the fabric store though. I've put it on hiatus this week as I have a concert on Saturday and I really need to do some practicing! Plus, I had to bathing suit shop while they were on sale, and I thought I might get back to exercising...the sewing is supposed to be easy, so I should get it done fairly quickly, but I won't have much time for it on Saturday. And, of course, I hope the alterations worked!
I've also been working on some machine knit felted slippers (awesome), and a crazy lace baby sweater that I ripped out last night. I need to start some new handknit projects (and finish a few old ones), and I'm having trouble deciding what I want to work on---there's SO many things I want to knit, but not a whole lot that I'm madly lusting over. Or, I'm concerned about matching yarn and pattern. I'm just having a hard time making decisions! I'd like it if I gave my pattern list to someone, they looked through my stash, and told me what to make, LOL. I do know that my indecisiveness does usually pay off in the end, with items that I do love, so I'll just have to be patient with myself and not settle for less than what I love!
Subscribe to:
Posts (Atom)