Friday, August 28, 2015

Ride 'Em Cowboy!

Back in May I was contacted by a lady who's daughter was having twin boys in the summer.  She wanted some newsboy hats, and then cowboy hats for the twin mom's wedding in September. Like most projects, the hardest part was deciding on the yarn.  This was Paton's "Decor" and in the True Tracy Way, I bought two balls...but had to go back for a third!  Crocheting eats yarn!

 They want to co-ordinate a ribbon or something with the wedding colours, but I wanted something for the photos.

 I made them with an extra round in the brim, for a wider look.
 They are very shapeable, if that's a word.
I hope I get to see a picture of the twins in them!

Yarn In:  3017gr
Yarn Out:  127gr + 4447gr= 4574gr
Balance:  1557gr more used UP than brought in
Costs:  $145.08 /240 days = $0.60/day

Thursday, August 27, 2015

Pink Shorts

My youngest, Megan, has a hard time with clothes.  She's 9, just shy of 5' tall.  Built solid, figure skating is sculpting her body but she still has a little belly...she prefers to wear her pants below the belly, but then they don't fit right, and shirts end up being too short to cover up the difference.  She likes simple clothes but not plain LOL.  I came across a pattern on Ohhh LuLu and thought it might solve her current obsession/need for "yoga shorts".  Back in 2011 when I first got my serger, I made her some "undershorts" to wear under dresses, using mainly old t-shirts.  It was a great way to experiment.  I don't think I showed them since there really wasn't much too them.

Megan didn't want the lace on the shorts, which was fine, so I lengthened the leg.  I cut a small for the leg and hip, then morphed out to a large at the waist.  I should have measured her thigh, but since she has muscular legs, I figured they would be alright.  I didn't expect them to be on the loose side.

 I found the instructions to be good, but I still had trouble visualizing how the gusset gets sewed in.  I like having the gusset though.
I tried doing a small rolled hem on the legs, but the fabric rolled up still.  After washing, the serger stitching came loose so I had to touch up both legs and did a basic serger stitch, and that seems to lay flatter.
For the waist, I used some glittery elastic from an old pair of her underwear!  I wasn't sure how to do though.  What I didn't realize until after was that you line the top of the elastic up with the top of the shorts, and stitch, and then trim the fabric on the wrong side!
The fabric was a Tommy Hilfiger bedsheet I had picked up long ago at Value Village.  I also made this dress from it.  She loved that dress and I still can't believe I made it LOL.  I still have a lot of this sheet left!  I made a matching headband for the shorts, but used a wider elastic from other underwear.

I'll probably make her some more, maybe even a pair for skating (they wear them over their thick tights).  Might make myself a pair, though my days of wearing a t-shirt and bike shorts are over LOL.  Would be nice for under a nightgown.  Like last summer when we went to family camp and I found out my nightgown was a little shorter than I thought, especially as I walked up the steep hill from the cabin to the washroom!


Tuesday, August 18, 2015

Christmas is Coming

Oh, c'mon now.  You can't stick your head in the sand forever.  You should have seen the shocked faces when on the last day of school I told people in the office there was only SIX months till Christmas.  You'd have thought I said it was snowing.  LOL.

 For a refresher, there is the stocking I'm replicating.

I was able to match all the colours really closely, except the green.  I thought one of these yarns would work, and in the above picture, the one on the right isn't too "bad".


But in brighter light, it wasn't right at all.  I just couldn't bring myself to use it.  I thought I'd wait until the fall yarns come out, and see what I can find.  I was using mainly Astra, and two weeks ago heard that there was a new green.  The colour on my computer looked promising, but when I saw it in the store?  Way too bright :(  I picked out a couple other colours and came home.  I took some time looking at Sirdar's website and found some colours that would work.  BUT...one store was closing for holiday (new grandson!) and the other store didn't have colour cards with yarn samples and I don't trust printed colour cards in this situation.  I might have had luck at another store, but it's further away and I just didn't want to make another trip.

One of the colours I picked up when I went looking at the new Astra colour, was really close.  But, it's Red Heart "Soft"...a worsted weight yarn with 4 plies.  I would have to pick out one of the plies.  Ugh.  I got started on the first stocking, using one of the bigger names, to see how it would look because the white section was going to be one row longer.  


Interesting, now my gauge is off compared to my solid coloured sample.  On one hand, the two coloured side is a bit loose and takes up more than half the swatch, and the solid white part (not seen in the photo, but is the back side of the stocking) is too tight.  I know blocking will even out some of this.  But this was a great working swatch, and I know somethings I want to do differently now.  Like, last night I sat there and while watching TV, picked out one ply of the "Soft" and made little balls, rather than trying to work directly from the large ball!  I see a blib of green next to the S at the end of Christmas, and I don't like the K in Patrick.  Also, the middle of Patrick somehow ended up using the full 4 plies of "Soft" and is a little lumpy.

Everyone who sees the picture seems to think it looks awesome.  So here's hoping the improvements work and Jason loves the end results!

Yarn In:  141gr + 2876gr = 3017gr
Yarn Out:   4447gr
Balance:  1430gr more used UP than brought in
Costs:  $5.53 +  $139.55=$145.08 /230 days = $0.63/day

Monday, August 17, 2015

Do Over Socks

Please don't ask me how long it takes to knit a pair of socks.  This pair is a great example of how it's never a simple answer.  I believe I started them early in the summer of 2014, when we were going to a Movie in the Park and wanted something simple to work on (in the dark).  Isn't that how it always starts?  "Something simple".  "Brainless".  Yeah, right.  Actually, these started before that...back in early 2010 I started to learn to use my ribber.   I made some socks, and tried this yarn--because I knew it needed to be knit rather plainly.  I think I made one sock, and it came out too big.  Rob said it fit him, but I knew he'd never wear them.  I always thought I'd get back to them but decided to HK this instead.

 Every part of these socks, except the leg, got a "do over" at least once.  Starting with the toes, two at a time on one circular, I wasn't happy with the increasing.  I don't remember now exactly what was the issue, but I think I got creative and did some increases in the middle of the toes...and it created a pucker I didn't like.  And maybe the stitch gauge wasn't good.  I don't know.
 I also quickly got bored with the "simple knitting".  I played around a bit, and decided to purl the stitches that landed on top of red stitches in the row below.  This instantly made them inappropriate for in the dark knitting, of course.
 I opted to do the increases over the top of the foot--since that's where my foot increases.  But I wasn't following any mathematical logic, or a pattern...and I ended up not liking what I did, so I ripped back and did it over.
 I wanted the Fleegle heel, but I didn't have the pattern with me at the time so I winged it.  I winged it wrongly, at least twice, before I got back to having the pattern.  Then I tried adding some short rows at the top of the heel, at the back since I have deep heels and normally do this.  It created a weird bubble, so I ripped back and did it over.
 I was concerned they were a little tight around the ankle, so I did some ribbing at the back.  I have shapely calves, so I added some increasing at either side of the ribbing, incorporating it into the ribbing.  This actually seemed to work out, and there was no do over and the legs just flew!
I would have liked to have had no yarn left over, but they were getting tall, so I ended with some simple ribbing around the top.  No fancy cast off, just did it "in pattern".
I haven't worn them yet, but they seemed to be functional.  A little odd looking,, both colour wise and pattern wise...but I don't care!  There is a time and place for odd socks.

I ended with a 2.5mm needle, though I don't know what I started with.  Not sure of the yarn!

Yarn In:  2876gr
Yarn Out:  75gr + 4522gr = 4447gr
Balance:  1571gr more used UP than brought in
Costs:  $139.55/229 days = $0.61/day

Of course, I did buy a bit more yarn for the custom Christmas stockings I'm doing, and I got started on them.  And another pair of simple socks...so far, I've only redone the toes once! :)

Friday, August 07, 2015

Quick Sewing

I wanted a headband in a colour I actually wear.  And that actually fit me.  Megan had a pair of yoga pants with a colourful waistband.  The pants had an unfixable hole, but I kept them around because I knew the waistband was worth it.  It didn't take too long to unpick it from the waist seam, and bonus--a length of clear elastic came with it.
 I worked with what I had, for the width.
 I'm not a selfie person.
 I tried to just serge the long edges of the band part, but it still rolled.  So I hemmed it.
 Super duper heat wave.  This thermometer is in the shade.
For the band, I didn't do the stitching close to the edges, but did do two lines down the middle, to create two casings.  However...it does some funky things on the head.  So, having the edge stitching helps the back band stay flat.

This one is quite wearable...though I haven't worn purple since.

Saturday, August 01, 2015

Top #2

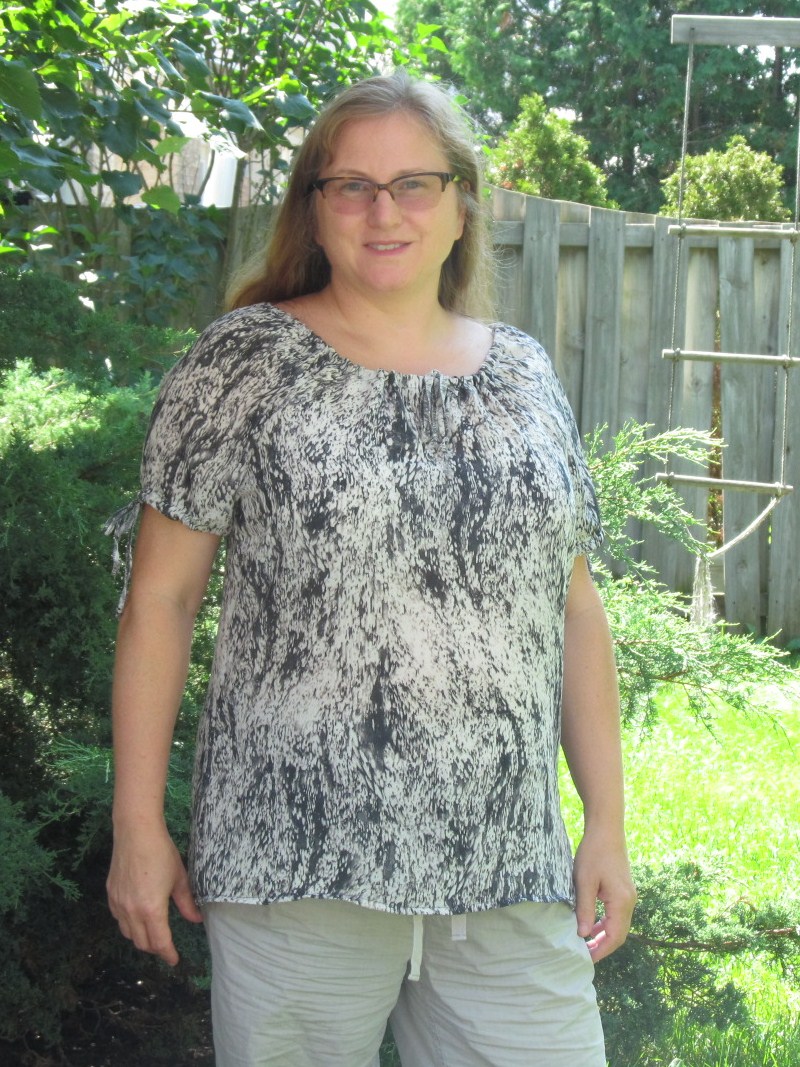
After the fairly good results of the first top, I went ahead with another one.  I sort of combined that pattern and one I've done before, a couple times already.  I dont' wear that top enough because for some reason, I hang it in my closet, instead of fold it with my t-shirts.  And it doesn't seem like something to wear in the winter.  But everytime I wear one of them, I think, "I need more tops like this!".  So much cooler than a close fitting t-shirt!  This time, instead of elastic for the neck and sleeves, I used skinny ties, like the floral shirt--but for the neck, I did it to go all the way around like the elastic in the original solid colour gauzey ones.  I didn't do the back darts--I figured I'd try it on first and see the fit.

 I'm quite happy with it!  A little disappointed when I found the stamp with the fiber content--100% polyester, but what could I expect for a $6 1m remnant?!

I did have to put my thinking cap on to figure out where to put the buttonholes for the neck and arm ties.  They were a little sloppy, but at least I did it mostly right LOL.
 I opted to serge this one.  I hadn't used the serger in a while, and thin, slippery fabric is probably not the ideal way to get back into it, LOL, but it actually went really well.  I used the book "Sew U:  Home Stretch" by Wendy, to get the order in which to sew the pieces.
 My bottom hem is a little sloppy and cutting this fabric was terrible, so it was pretty uneven.  I just try to pull it down in the front and keep myself in motion.
 The ties.  Ugh.  I saw in one of my serger books that you could make skinny ties by serging, then turning right side out.  Well...obviously mine were too skinny!  So I left them, inside out, with serging showing--different colours on each side.  Oh well.  If anyone gets that close to me and comments...their problem, not mine!
 I had a bit of fabric left (I had forgotten to length the sleeves), and knew I needed an infinity scarf.  I love the ones I knit, but they're not suitable in the summer!  I found some instructions through Pinterest.  I did have to piece my piece a bit to get the length (kept it on the shorter side still, because, well, I'm short) and kept it narrow since I don't have much of a neck.  Again, I did a crappy cutting job, which meant the very last seam was sewn REALLY crappy.  But I'm not expecting anyone to get right up in my bosom to check it out.
 And I still had a bit left!  I've seen girls wearing these gathered headbands--Megan has one but never wears it.  One day I saw a lady with it pulled out wide, covering most of her hair.  I thought that would be great on no-hair-wash days, or even instead of a hat!  So, again, Pinterest to the rescue.
 Wide...
 Narrow...
 I did have to seam it, I'm not what happened cause I thought I had measured right.
 Rough join!  The pattern called for making a row of stitching right near the fold of the band, on either edge, and then 3/8" of an inch over from each...but I could NOT get the edge stitching to stay tidy near the edge!  Then, I couldn't fit two more lines, so I just did one down the middle.  Then you use two narrow elastics, instead of one wide.
Here's the seam....A lovely flower could hide that!
I'm finding this a smidge tight on me.  I can wear it, but I sort of feel like it's giving me a headache.  If anyone's interested, I'm offering it as a giveaway on my Facebook page.

I promise not to wear all three matching pieces at the same time!

Thursday, July 30, 2015

Sewing!

I had gotten my sewing machine onto the dining room table recently, for some simple sewing and mending.  I decided it was time to really sew.  Like, clothing!  Most of my shirts are t-shirts, and starting to wear out (or be too small).  I'm hoping to get back to supply teaching this fall, and will need slightly nicer clothes (it appears supply teachers don't wear two piece suits or dressy dresses anymore!).  I hit the fabric stash and the pattern stash, and measured my chest.  Oooohh.  I've grown a bit LOL.  I gave away a lot of pattern a while ago because I wasn't sewing and I had shrunk a bit, and learned how to do a "Full Bust Adjustment" so I was buying for my upper bust size, not full bust size.  So a lot of my patterns are a smidge small now!  I picked out Simplicity 5849.  Because, "it's so EASY!".  LOL.  And although the bust size was a bit small, the finished size matched a similar shirt I love.  I chose some lightweight fabric, the leftover from Megan's dress, made way back in 2010!

I'm trying to find a link to the pattern, I found one on Pinterest, and one on http://vintagepatterns.wikia.com/ but that Simplicity 5849 is NOT the one I made.  Google is giving me a hard time today.

I adjusted the pattern by taking out 1/2" in the upper bodice, 1/2" in the sleeve length, and 1/2" in the length...but then I added 1 1/2" to the bottom (there was some shaping so I wanted to shorten the waist length).  I didn't do any bust adjustments.  I thought I was doing good by remembering to take 1/2" out of the sleeve cap to match the reduction in the upper bodice.

My first try-on confirmed all my fears.  It was sad.  The shoulders were too wide.  There was pulling across the upper bust, pulling across the upper arm, and it was too short.  Even on me, being only 5'1".

 And the sleeves fell at an awkward spot.  These pictures are from after my adjustments though.
I had to resew one sleevehead, I don't remember why now.  I was thinking of how I could get more width in the bust...since the sleeve was sewn in it seemed that I would just have to go outwards from where they connect.  Then I realized I could re-do the whole sleevehead with a narrower seam (thank god I hadn't trimmed the seam allowance yet!).
 Doing this got me almost enough room.   It made the upper bodice and sleeve heads almost an inch wider (3/8" on body, plus 3/8" on the sleeve, times two, per sleeve), and a bit longer in the sleeve head, though I didn't adjust the shoulder seams because I had already topstitched down the shoulder seam and applied bias trim along the neckline.  Got extra through the bust and upper back.  The lower back is quite boxy; I could put an elastic strip on the inside, but I don't know.
When I was cutting it, I did a size 18 for the body width but tapered in to a 16 for the armholes.  Obviously, I didn't need to do that!
 The pattern called for bias trim on the neckline, to make the casing.  I was going to make my own, but  I wanted to get it done.  I had some trim with simple green stripes that looked cute, but I thought it might show through, so I picked out this vintage flowered one.  I'd been waiting for the perfect time to use it.  I don't really think this was the perfect time as it's all a little busy, but no one sees it.

My changes really helped, but the shoulders still felt like they were slipping, and my bra straps showed.  When I was sewing it up, you were supposed to sew the end of the drawstrings at the "dots", it didn't go all the way around the neck.  I didn't seem to have marked where those dots were on the fabric, so I eyeballed it based on the diagrams.  I thought perhaps I hadn't gone high enough on the sides of the front neck, and maybe moving it up would help draw in the shoulders a bit.  It did help, but it's now down to the fact there just isn't enough fabric at the shoulders for me.

I toyed with the idea of making a wide band to draw the bottom in and give it some length.  But I wanted a billowy, loose, sort of summer shirt and I just don't think I could do a good job...I'm just not a very good, accurate, cutter and sewer!

Now...if only I had some better pants to wear with this top...

Monday, July 27, 2015

Oh Bother!

My sister in law is a big Pooh fan.  She's been in the hospital for awhile, and my brother shared a photo of how she has a bunch of her favourite things on the window sill.  One is a Jean Greenhowe bear.  I know I made bears for her girls...but I don't remember if I made THAT bear.  I know her grandma, I think it was, also knit.  How do you ask "Did I make that bear?" without looking like an idiot?  LOL.

So, I decided I suddenly needed to make a Pocket Pooh Bear.  It started out quick, using Patons Lace in the off white, that I planned to dye.  I used the Jean Greenhowe pattern.  I'd done this before, with a different yarn, and got a tiny bear.  But not this time.  It was more "Purse Buddy" than "Pocket Buddy".  So I re-did the head and body, using half the stitches and half the rows, approximately.  It was going quick.  Then I took it to an outdoor concert and made a leg.  Then realized I made a full sized leg instead of half size.  Oops.  It was all going well, even got the dyeing done in good time...and then procrastination set in.  And I took my kids up to my parents for 5 days and barely got anything knit!
 I used a fine tip Sharpie for the eyebrows.  If I had looked at a picture sooner, I would have made smaller ears, and made sure his belly was fuller.


But he's done.  She's still in the hospital and I hope it gives her a smile!

His legs turned out a little big.  It was hard to get the shaping reduced down.  But he's cute in his big-pawed awkwardness :)

Yarn In:   2876gr
Yarn Out: 17gr + 4505gr= 4522gr
Balance: 1646gr more USED than bought
Costs:   $139.55/208 days = $0.67/day

Monday, July 13, 2015

New Photos

I took new photos of my stock of water bottle holders, so that they were a little more organized.  It's been hard, because I was making two styles (crocheted, and sewn) and at least two sizes.  This time I put the small, disposable bottle sized ones together, and the larger ones together.


I wasn't happy with the top photo though.  Perhaps the crocheted one on the right should be at the far left.  

These ones are tricky because I don't have enough water bottles in the right sizes.  The crocheted holders really need a water bottle to fill them out.  And neither picture show the insides of the reversible holders.

In other news, I think I finally came up with how to make the sewn straps adjustable, at an affordable price!  Snaps!  I was wondering around the local fabric store, looking for something like "buttonhole elastic" but not elastic.  I saw hook and eye tape, but boring colours!  Then I was in the drapery department, and saw a twill tape with small plastic rings sewn along it.  I thought, if I had something that could hook to...(but it was only white).  The assistant started talking to me, I explained what I was looking for, and she said there was nothing.  As I walked away, it hit me!  Snaps!  I could do one half on the holder, and then maybe 5 spaced along the lower half of the strap!  Bingo!  I even concluded that I could put a snap along the top edge to narrow in the larger holders.  Oh, and how about a loop with a snap to attach your key ring?  (Mine used to be on a carabiner clip, but not now).

So, I came home and started looking at snaps.  The fabric store sells the Babyville pliers, but I had heard, from my diaper sewing days, mixed reviews.  I've been fixing up some cloth diapers for my cousin's wife, and she mentioned that she had gotten snap pliers and was loving them.  She lives just a bit too far to be convenient, so I asked in a local FB WAHM craft group if anyone in my town had snap pliers and could show me the ins and outs so I'd know better what I want, and test it to see if they would hold the weight of the water bottles.  I got two responses, and knew (not well, but they weren't strangers!) them and they weren't far from me!  Yesterday, I went to one of their houses (oh, the lady that did the embroidery for the "Rude Robot" hat!) and she showed me how to do it, etc and let me borrow it.  She didn't have many snaps, and not the complete set in black, so I will probably go buy some more today, LOL, and then order my own snap pliers.

I'm really excited by this!  Snaps might be showing up everywhere!

Tuesday, July 07, 2015

Headbands!

I know I've been saying for awhile I had some headbands to post about....but I finally got some pictures!!


I think this one started it.  I know my niece likes pinks and orange, and I made a water bottle holder out of this, some old Bernat "Cool Crochet" cotton blend.  It's from http://www.myhobbyiscrochet.com/2013/08/thread-headband-free-pattern-and.html

It was pretty easy enough. The scallops sort of flip up though. 


I think this one was next.  It's from http://cre8tioncrochet.com/2013/09/queen-annes-lace-headband/
I used an OLD Kroy 4ply sock yarn.  I think there's a typo in her Step 3.  She says she likes to do 16dc instead of  14, but then Step 3 doesn't work out.  I found I actually needed to do 12 dc to make it lie flat.


I do notice though, that her's have more of an interlocking look, where as mine are "this side and that side".
Then I moved on to this one:

It was linked to from the first headband's pattern, but really, the pattern didn't show up well, so I thought just doing DC would also work.


This sparkly blue one was just double crochets. Nice and simple.

A lighter blue one, like the first one.  This yarn was too soft though.  

I really wanted to make this one:  https://www.pinterest.com/pin/442900944581218438/  but the pattern isn't available anymore (or at least, not on it's own).  So, I set out to create my own.  It was going well with the swatches, and then I choose this yarn.  


It wasn't doing what I wanted, and I realized the flowers were too close together.  So I tried a solid colour.  Much better.  I think it needs a very delicate yarn though.


I tired again with white cotton, but it was too bulky I think (even though this was probably a sock to sport weight)


At some point, I made another one of these.  This is a #10 crochet cotton with a silver thread in in.  No beads.  Very crisp and delicate!
A bulky, textured purple yarn for another simple one.


Another Queen's Ann Lace, with very small blueish beads.. Or maybe they were clear with silver on the inside.  It's amazing how different the beads look once you put yarn through them.  This was a very thin coned yarn that I'd use on my standard gauge knitting machine.  Thinner than #10 crochet thread.

Another one similar to the  very first one.  I changed the scallops a bit and added a plastic clear bright pink bead in each.  It's a very fuzzy fake mohair (I used it for the Lilac Sunset Sweater last summer).

And one more simple one, in the Neapolitan yarn.

This is all of them, except the Neapolitan one.


 Edit to add:  I'm getting rusty at blogging!  I thought I was forgetting something in this post.  I was!  My yarn balance sheet!

Yarn In:   2876gr
Yarn Out:  106gr + 4399gr = 4505gr
Balance: 1629gr more USED than bought
Costs:   $139.55/188 days = $0.74/day