Layered Designs Tutorial Part 1--Create an Offset in Inkscape
Credit for this project idea comes from Patty Ann's Place on YouTube. She uses a different program though.
Did you work through Part 1? Any questions? The key take away is Text---Object to Path---Ungroup---Union---Outset. The rest is just icing.
Now, we're going to expand on these steps and make a one of a kind layered letter.
These are great to make in school colours, subtle ombre look, or wild and vibrant.
These ones have gold foil cardstock from Recollections. Careful with that though. Spritz the air around your machine with a water bottle. If it's dry, the foil can create static and shut the machine down!
Let's get started! First go to www.dafont.com. Enter "Zengo" in the search bar. It will take you to a free font called Zengo. Click "Download". Then go to where it downloaded. If it's in a zipped file, extract the files. I don't remember if it comes with both .otf and .ttf but the .otf is the one you want to open, then "Install". I don't know anything about doing this on a Mac or Apple type system.
Open up Inkscape, and let's set the Document Properties right away so it's done. Go to Files--->Document Properties, then make the adjustments so it matches this:
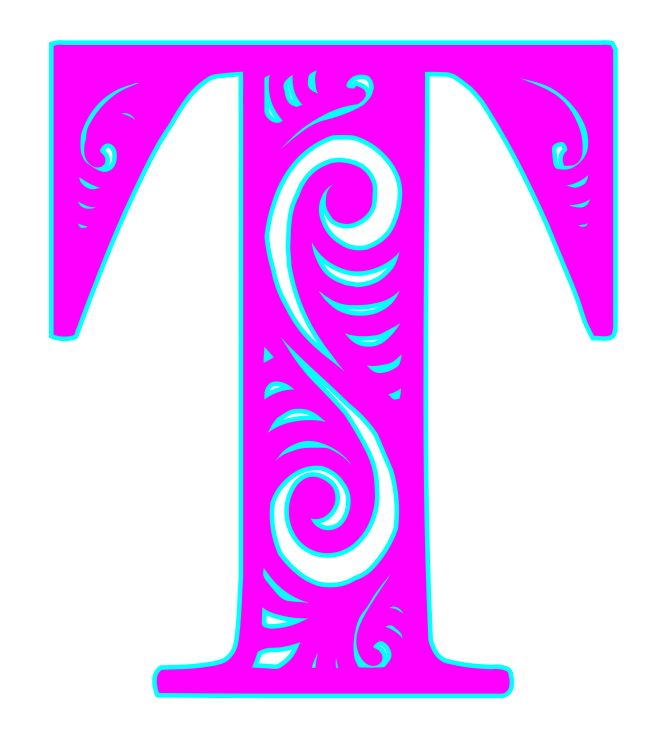
Select the Text tool and type your uppercase letter. Using the Font drop down box or the panel on the right, change it to the Zengo font. I haven't done this with all letters yet (A, C, F, L, M, T), but I did find that the N did not work. I'll try again some day. If you try a letter that doesn't work, let me know.
I suggest locking the scaling lock, and then enlarging the letter until it's about 7.5" across and up to 10.5" long. You can tweak it at the end if it turns out too large to cut out of 8.5"x11" paper. Of course, if you're planning to use 12x12 paper, you can go bigger. It's hard to see my sizing in this picture.
Now we need to select the letter with the selector tool (S on the keyboard), go to Path--->Object to Path, and then Path--->Union. Check that it's been vectorized by clicking the Node editor tool (or N on the keyboard), and click on it to see the nodes. If it says "One of the objects is not a path..." try Ungrouping and then Union (even though it doesn't look like there's groups).
I have noticed with this font that the edges can be ragged. See below:
With the node editor selected, click on some of those jagged nodes and hit delete. You can also try holding Ctrl while clicking on a node, and that will smooth it. Don't like a change, just "undo".
See the four shapes along the left edge, the third one down has a ragged bit on it's right edge.
Remove the nodes! It will speed up the file saving, uploading and cutting out. Make sure you get this top layer how you like it as the offsets will be built upon this and a little bulge in the outer edge will balloon up.
Now we're going to do the same thing as with creating an offset for a word. Select the letter with the selector tool, Ctrl + D to duplicate, page down, change colour, Path--->Outset. Click the Outset as many time as you want. I did three. Some people use the linked offset when doing words or images, but it you're going to make several offsets, it can be hard to get them the same size doing it that way. Using Outset keeps it precise (and you can change the amount of outset per click if you want to). Select just the top layer and move it out of the way.
Just like with the single word, you want to go in and delete some of those tiny cuts. I click off the letter so I can see it without nodes, and choose the ones that are insignificant. Draw a box around the group of nodes and hit Delete. Do not change any on the edge, or any of the actual shapes, or it won't match the first layer.
Sometimes if you've selected a single node to delete, there might be another one hiding beneath it and you'll get these "handles" (the blue lines with little circles on the ends). Just click the node and delete. Or, try playing with those handles and see how it changes the image! Undo is always just a click away.
Now, we're going to offset this layer. Same process!
Select, duplicate, change colour, page down, Path--->Outset. If you are doing the Linked Offset, I think you need to Object to Path before doing this. I don't seem to need to here. Move the top layer out of the way, and clean up any tiny spots like before. Then create another offset from that one! That brings me to:
I thought this would be my last layer and I'd fill in those two swirls. But I thought, I wonder what will happen if I create one more offset?
The bottom swirl was still not filled in! I could have gone one more layer, but opted to finish with the green, which I turned to black, and changed the top one to the pinky colour and changed the other layers too. To make that green layer solid, I just deleted the few inner nodes that were left. The other option is to select the layer, go Path--->Breakapart, then Path--->Union. It'll become solid.
Put your layers back together, select them all, and use the Align and Distribute tools to center both horizontally and vertically. Then group, check your size, and save! That's all there is to it!
Before exiting, why not play with the colours? Here, I used one group of colours from the palettes at the bottom. It creates almost a blur effect. It would be more defined if cut from cardstock though.
Here, I used greens, but alternated light and dark shades, moving across the palette selections.
Here I put black at the very top. It really gives it definition.
How about exploring digital art now? Open the Objects panel (if it's not to the right side, go to Objects at the top, click Objects... and it'll open on the right. The first item in Layer 1 will be the top layer, and it goes downwards. Choose the top layer, and play with the Blur and Opacity sliders.
Blur just the top, choose a few layers to blur them together, have fun! Blurring the offset of a word or phrase can make it look like shadowing, or airbrushing. You can't cut these images, but you can print then cut, or save for posting on your Facebook and Instagram accounts!


No comments:
Post a Comment