Part 1: http://tracykm.blogspot.com/2021/01/layered-designs-tutorial-part-1-learn.html
Part 2: http://tracykm.blogspot.com/2021/01/layered-designs-tutorial-part-2-single.html
Once you're comfortable using Outset in Inkscape, it's time to get really creative! For me, much of my creativity comes from filling a need and not liking the options out there. I have kids with uncommon names, and personalized items are hard to find. So, time to create my own! This tutorial is based on the post I wrote earlier with the layered N with the name inside. I'm going to do a different name/letter combo this time, with more explicit instructions.
Open Inkscape, and if you're going to cut this on a Cricut, go to File--->Document Properties and set your Document Properties to:
This will let you visualize your project as it would be on the cutting mat, and also keeps it the same size when you import into Design Space.
Choose a bold, block font for the letter. I used Baskerville Old Face. You might find a different font that works better for the letter you have. Keeping the proportion lock on, make your letter almost as big as you expect to cut it. Keep in mind, you can turn the letter sideways on the mat. For the H, it's wider than it is tall, so I will turn it when I cut it on 8.5"x11" paper.
Go Path--->Object to Path to convert it to a path. Then, press/hold Shift and choose a colour from the colour bar at the bottom, for a stroke. Let go of shift, press the X on the left of the colour bar to get "no fill":
Do Path--->Stroke to Path.
Now, if you don't already have the Fill and Stroke Menu open at the right, you can find it in the second row of icons at the top, over near the right end, above the Width and Height:
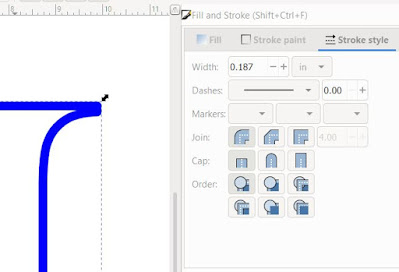
Clicking this icon will open the menu on the right. It's a great menu panel to keep "docked" over there. Here, it will open on the Fill options. Click Stroke Style. This is a fun menu!! Play with the style options for a bit, but come back to solid. You'll also want to consider how you're going to assemble this. If you're using the 0.125" (1/8") foam circles, you'll want to set the stroke width a little bit bigger. I'm trying 0.187" (3/16") but I won't be cutting this right now. I'll report back later how it worked. You can also adjust how the stroke goes around corners (the first option; we don't need to worry about the Cap or other options).

This is the very topmost layer. In my original project, I put the name on this layer too, because it helps hold the frame together. Depending on your letter, you might not need to, and you can keep this layer just as the fame. I'm going to add the name to this layer today, but before I do, I'm going to Ctrl + D to duplicate, and move that to the side. I like having duplicates! Also, now is a good time to save.
For the name, I used the Jokerman font. This is an old font that is available from different sources. I have not paid for any font I use. Many are the weekly free fonts from Font Bundles and Creative Fabrica. Search around, always try Dafont and there are other free font websites. If you want to sell items, make sure you have the Commercial License version/permission!
Okay! This looks much different than when I used it for "Nya". Let's see the uppercase letters:
To get a variety, I'm going to use lowercase u, uppercase G, lowercase h. That's alternating, so there's a bit of a rhyme and reason to it. I do that within the text box, then I do Path--->Object to Path then Object--->Ungroup. Now I can select just the u and make it a bit taller. The h already is the same height.
We need to do some alterations though. I don't like those floating dot and slashes. I'm not about to place them individually. So, open up the Nodes Editor, select the letter, drag a box around the nodes of the dot, and hit Delete. The slashes take a couple little boxes, or select each node with the shift key down.
Good time to save! Get in the habit of saving frequently. I just save as an Inkscape SVG while I'm still working on it.
Start placing the letters where you want them. If they are being jumpy, you might have your "Snap Tools" on. See the grey icons:
Selecting the one on very left will turn them all off. Now you can place the letters anywhere. You want a small amount of the letter to touch at least one side of the frame. For a letter like "I" you can angle it, or choose a different font--you don't want the letter to fill the whole width and you can't tell it's an I. To angle a letter, select it, then click again and the corner arrows with change and you can rotate now. I changed the letter colour to blue so I can visualize what it will look like when Unioned.
You can't use Align and Distribute, so you do have to eyeball the placements. I'm going to look at the bottom 'h' a bit more.
See the second bar down on the left, and where the right leg meets the bottom? I don't want to enlarge anymore, so I'm going to alter those nodes. No one will know! I select N on my keyboard so the Node Editor is activated, then click on the node at the bottom corner of the right leg of the 'h'. I pull it down so it's in the bottom piece. I also noticed the 'u' had a little piece to fix up. Zoom in and make it your version of perfect. Then save!
Then select all the items (each letter and the frame) and then, Path--->Union. It will blink and weld itself together. To check, go to View--->Display Mode--->Outline. See if any lines overlapped. If so, check at the bottom to see if any of the items are not paths. If your letters were a different colour, they will change, so the whole item is one colour. Save!
Now duplicate it and put it over with the frame duplicate in case you need it later.
Select your welded letter, duplicate, change colour, page down (just like the other tutorials), then Path--->Outset. I clicked it three times:
If you look closely (click on the picture to open the picture viewer), you can see the slash in the top H and the big circle in the G still have a tiny bit of white background showing. I was hoping for more, like in my original post. I think this is due to the size difference of the original letter. This letter is quite wide compared to the N. I could go back a few steps and enlarge those little circles but I'm moving on. I'm going to create one more layer of this.
Move the top layer aside, then the same process: Duplicate, change colour, page down, outset.
In the bottom 'h' there is a tiny hole that's not worth cutting. I zoom in, and use the Node Editor to eliminate this and any other random little nodes (just like in the other tutorials). Check your second layer too while you're at it, and then....Save!
Make another layer: Duplicate, change colour, page down, outset. Move the top layer out of the way. Check for useless nodes. Now this layer, we're going to get creative and fill in the white area that we haven't used yet. In my original design, I simply used circles. You can change the stroke size; you won't likely need to use the foam tabs. Make them with no fill. This time, I'm going to try stars! Create a bunch of stars of a variety of sizes, in the general area.
Spread them around, enlarge, shrink, rotate, etc. If you notice you want a point just a tiny bit bigger so it touches something, go Path--->Stroke to Path and drag the node. If there's two overlapping and a point is showing inside another star, same thing. Once you're happy, click on each star (I do about 4 at a time), and Path--->Stroke to Path.
Once they're all in place, and all are Paths, drag a big box around it all and Path--->Union.
Now, we need another layer! You know the routine now: Duplicate, change colour, page down, outset. Move the top layer aside and check out the nodes on the next layer down.
Here, I've already cleaned out a bunch of tiny cuts. Just click outside the letter box to see what's there, then click inside to show the nodes (use N on the keyboard) and compare. Don't change any shapes, just eliminate cuts that would be really tiny.
And make another layer and offset. Say it with me: Duplicate, change colour, page down, outset. I've been doing three outsets for each layer. Move the top layer aside. Save!
Clean up any insignificant nodes. What do you think? One more layer, or fill it in for the base layer?
There's still white showing in the new layer! We could have ended it there, and filled it in, but let's go one more, which we will fill in for the base.
The final layer only had one tiny spot I had to take out the node.
Stack up your layers again (if any got out of order, select it, then page up or down as needed),
select them all, then
Align and Distribute horizontally and vertically.
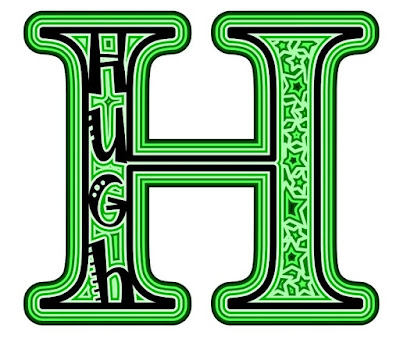
Stand back, and admire your creation! YOU did that! Now look again and be critical. I wasn't happy with how the name, especially the H blended in. The inner part between the H and the u seemed to make a cross. I was thinking of going back to the turquoise layer and filling that in.
I decided to play with the colours instead, making sure there was much more contrast between the very top layer and the next layer down. In real life, there will also be an actual difference because of using foam tabs to separate them. If you're having trouble picking out each layer to select it, go to Object, then the first heading down, Objects. This opens that menu at the side, and you can go through each layer one by one.
*These are NOT really layers in the graphic design world. However, if you sent this to the Cricut and cut it, each of these colours would be a layer of paper*

Draw a box around it all, and group. Check the sizing. Will it still cut on your paper? Remember that you can't cut the full size of the paper. Then Save as a plain SVG and go to your Cricut! You did it! Can you believe it? I couldn't when I did it LOL. You can also do this with other shapes besides letters. Have the outline of a heart? A house? A pumpkin? You also don't need to do filler shapes like circles, stars or squares. You can use swirls, drawn with the Bezier pen!
This item started with a clip art of a horse head:
Pretty much the same process was used. There's only 5 layers in this design. It was a real learning experience though! I still haven't got it cut out!
In the next tutorial, I'll go over how to use a geometric design over the item, rather than filling in with shapes. Let me know what you create! Share on Facebook and tag Tracy Kyla or email me tracykm at yahoo dot com!


No comments:
Post a Comment