Tuesday, October 06, 2015

Red!

After fine tuning Bill King's "Gold Star" pattern to suit my liking (click on the label over on the right sidebar to see them), I found out about another one of his designs, called "One Piece Waterfall", in Machine Knitting Monthly, Nov 2012.  I picked up the issue, and a while ago, gave it a test run, using a slubby red cotton.  I don't think I blogged anything about it, although I remember it giving me some headaches and I think I re-started a couple times.  Even looking at the end result, I could see quite a few missed stitches around the eyelets.  Once I had it done, I was not so enthused.  I had planned to extend the arms, so when I got to the cast off/on for the sleeves, I used waste yarn.  But I hadn't cast off/cast on again, so once the sweater was off the machine, the armholes were actually closed up and I couldn't try it on.  Putting it over my shoulders...

It came down to my knees.  It was heavy!  There was red fuzz EVERYWHERE on my machine.  Other projects became more important and I put this jacket on the shelf--where I could still see it, hoping to re-examine it later.

Later finally came this month, when my mom decided she wanted a family photo shoot and red would be one of the colours.  Knowing it could be quite cool, I figured now was as good of time as any!  I cut through the armhole waste yarn to make armholes...

 Yikes!  Look how long it is!!  It hadn't been washed, but I doubted it would shrink enough to make it reasonable on me.
 I liked the back though!
 Subtle angles, compared to the Gold Star!
 The front "waterfall" pieces were just so long!!
Here you can see the dropped stitches at the holes made when doing the short rows.

Of course, I didn't remember if I had taken any notes.  Like, tension?  Pbssst!  Just cast on and see if you can knit the first row!  Eventually I went from T7 at the cast on to T9.  I checked around on Ravelry, and found that making the waterfall panels with only two rows for each set of short rows, would shorten the front.  That sort of works, as the number of stitches is what gives the actual length, but the number of rows is what gave it the width, which when worn, droops to become part of the length factor.  If I do this again, I think I might stick with the two rows for the top 2/3, but then switch to the 4 row for the bottom third.  But I couldn't yet figure out which end of the piece was the neck and which was the bottom LOL.  I think the neck edge was the left side of the bed.

It started out really smoothly this time.  Until I didn't read the instructions for the back wedge properly.  I got to the mid-point and when reading the next bit realized I had done the last bit wrong!  That was a LOT of short rowing to rip out (I had put only one group of needles into work for each two rows!).  And then the gremlins started to appear.  My yarn was now really tangled, even though I had tried to be gentle.  Had to cut the yarn.  Had a thin spot in the yarn.  Dropped stitches.  I really started to fear I wouldn't get it done!
 This has been washed, but you can see there is much less volume now at the front!

I got the body off, and went to do the sleeves.  I couldn't get the piece to stretch to put the entire sleeve onto the mainbed, so I did each sleeve in two halves.   Of course, re-hanging the second side of the sleeve meant you're dealing with upside down stitches and they don't line up exactly.  The texture of the yarn hide it though.  I don't know how it would look in a smooth yarn.  And then I realized I could probably have done it in the round (or U shaped) if I had used the ribber bed too (although that wouldn't change the one side of the sleeve being picked up from the half-stitches instead of full stitches...hard to explain, but if you've ever picked up knitting from the bottom/cast on to knit downwards, you'd know).
 I like how there is a sort of panel that runs across the bottom.
 The sleeve eyelets formed by doing six rows (as per the instructions).  The eyelets end where the armhole is supposed to be cast off/on; where I picked up to knit a longer sleeve.  I was worried about that, but it looks fine.
 I decreased every tenth row on the bottom seam of the sleeves, but not the top seam, and did 60 rows.
I would have liked it to go more over my chest, so maybe the four rows for each group should be the top section.  I would have to look closer.  This is such a better length!
It actually looks a bit longer in the back than the original.  Partially because the original was still really rolled up as it hadn't been washed or blocked.

The unwashed piece left over from the original has a gauge of 29sts and 37 rows, measured in the 3x1 mock rib.  The empty needle spaces are more distinct, and this gauge does mean that my jacket was larger than Bill King intended.  The pattern gauge was 31st x 40 rows, so not a huge difference, but it could be enough to really change it.  The washed, finished garment has a gauge of 26st x 37 rows.  That would indicate that the finished garment should be bigger than the original unwashed garment, but what it seems is that the stitches bloomed and filled into the spaces left by the needles out of work.  This also explains why the back length is a bit longer than before, as that section has it's length determined by the stitch gauge.

Although this was not a "one day knit" as the pattern claims (maybe it could be, if you drink enough coffee and don't have to work and raise a family), I will certainly knit it again.  I like that it has much more shape and interest than the Gold Star jacket, and there is no seaming up of the two halves.  I really need a black cardigan.  Black.  Ugh.  Well, at least there's no transferring stitches and no seaming :)

Yarn In: 3825gr
Yarn Out:  448gr + 5015gr  = 5463gr
Balance:  1638gr more used UP than brought in
Costs:  $187.95 /279 days = $0.67/day

Monday, October 05, 2015

Slippers

I've let it be known before that I rarely knit "trendy" items...but as a professional knitter now, sometimes I get asked to. In August I got a request for a pair of slippers.  Pretty simple, she even supplied me with a photo of what style she wanted (for her husband).  It's the old standard slipper pattern that anyone who has been to a church bazaar at Christmas time has seen.  The pattern I located is called "Aunt Maggie's Slippers".

At first, she picked out a colour scheme, but then she found a Bernat boucle yarn online that she liked, but I couldn't find it in the store.  She wanted a blue and grey slipper, with some wool content.  I ended up with LionBrand "Homespun" and "WoolSpun".  I think I used 5.5mm or 6mm.  I didn't want to flatten the Homespun too much with too small of needle, but they still needed to be knit dense for warmth and longevity.

 The slippers used 124gr, not a lot, I think because of the Homespun not being a very heavy yarn.
Had to add my tag!  I also crocheted around the opening, but if you slip the first stitch of the row to make a chain edge, that would be nice too.  I also didn't do the lines of knit stitches that sort of delineate the sole.

Yarn In: 3825gr
Yarn Out:  124gr + 4891gr = 5015gr
Balance:  1190gr more used UP than brought in
Costs:  $42.87 + $145.08 = $187.95 /278 days = $0.68/day

Thursday, October 01, 2015

Yarn In Update

I made a yarn shopping trip earlier in September, after receiving a sudden flurry of inquiries and orders.  And, I decided that  the pink I had bought for the Christmas stockings was too pale.  I hate writing Yarn In  posts.  The calculator.  The honesty.  The reality of a growing stash....

Two balls   Loops & Thread "Charisma" for a wolf hoodie.  Total, 200g
One ball Bernat "Super Value" pink for the stockings 197gr (needed only a small amount, like maybe 40gr!)
One ball Woolspun in grey for slippers, 100gr
One ball turquoise  LionBrand "Homespun" for the slippers (170gr)
One ball Red Heart Soft in green for the stocking, as a back up, 141gr


Total yarn in:  808gr.  Ugh!  LOL.  I much prefer when I can use up my stash.
I can't find the itemized receipt, buy the other little receipt says $42.87

Yarn In: 808gr + 3017gr = 3825gr
Yarn Out:  4891gr
Balance:  1066gr more used UP than brought in
Costs:  $42.87 + $145.08 = $187.95 /274 days = $0.69/day


Tuesday, September 22, 2015

Sleepy Time

A lovely repeat client messaged me about making "pillow beds" for her two young girls who often come into her room in the night and have nowhere to sleep.  My initial reaction was no way.  Sewing, and all that stuffing...then I remembered about something I had seen on Pinterest.  They had taken a sheet, sewed it up making 5 compartments, and stuffed each one with a pillow!  I suggested she pick out a couple sheets that matched her room, but she wanted these to be for the girls and wanted something soft, like fleece.  And instead of a pillow sham opening, how about a zipper?  And not five pillows, but maybe three?

Fleece is not cheap but does come in a lot of patterns.  I thought a long zipper was going to be expensive, but the store had 60" "duvet zippers" in colours that worked well, for only $3.50 each (I think that was the price, maybe $3.75).

 (My girls are much bigger than the girls these were made for, but they still thought they were really comfy!)

My first attempt at sewing on the zipper was not good.  My fabric was 60" long, but when I got to the end of the first side of the zipper...I had a lot of fabric left.  The zipper was quite wavy.  I had somehow stretched the fleece as I sewed.  So, I unpicked it and used pins this time, and got a much better result.  When I did the top stitching for the divides, on the first one, somehow the fabric shifted and the zipper ended up not being exactly on the edge, but in a bit.  I think because I did the dividers first and then the top and bottom seams.  On the second one, I did the top and bottom seams first, and that held it together better.  I even remembered to check the fabric pattern to see if there was a distinct top and bottom!


I was proud of myself for remembering to include the strap when I did the bottom seam...and then forgot with the second one.  When I first held up the pillow fabric, I thought I was going to end up with a strip left over, which I could use for the strap.  It just seemed like a huge piece of fabric.  There wasn't any left over in the end so I found some bright pink fleece in my stash.  I think I like it better than a matching strap!  And I love the contrasting snaps (they have little hearts engraved on them).

I really over thought the strap at first.  But once I had the pillows in, and folded it up, I realized I could snap the end of the strap to itself if I made it long enough!  So much simpler than trying to figure where to put the snap on the bed.

I didn't have very good pillows to fill them with for photos.  We really need new pillows!

Friday, September 18, 2015

And Sew, a Week Passes

I had hoped to have something to show by now.  Last week was the first week of school and of course, it evaporated as quickly as summer did.  This week also went Pouff! and disappeared.  On Monday, this week seemed like it was going to last forever.  I had lots to do, places to go.

What have I done?

Well, I did walk to school/work several days, I did do a lunch time skate, and all the other stuff I usually do.  Add in that my daughter is skating one more session each week (four sessions a week now, plus off ice, and assisting at the beginner classes), and that band started up, and that my son got a job that requires being driven there and back (very late)...

I have been working on two "pillow beds".  Made in patterned fleece, each will hold three pillows.  I haven't shown and WIP pictures because...it started off looking like a 1.5m x 1.4m piece of fleece, and it doesnt' look much different now.  Just folded in half, a zipper down one side, and a strap with a snap.  I have posted a couple pictures on Instagram if you use IG.  I WILL show the final result soon.

Knitting?  Still working on those Christmas stockings, crocheting a slouchy hat, and I've got a few other orders to start.  I went from nothing, to enough to keep me busy for week, all in just a couple days.  Crazy.

Wednesday, September 09, 2015

And Another Mitten

A long time ago (well, probably just late last summer), my daughter decided she wanted to knit something for herself...mittens...I had a sideways knit, garter stitch pattern in an old Mon Tricot book, but the details were a bit lacking.  She picked out Easy Knits "Georga Wool" which I had gotten at Wal-Mart.  It says it's "mercerized" which is not a term used with wool. I think it's to indicate that this might be treated to be superwash, but the icons show hand washing.  There is a website but this isn't on it (BTW, the "DeLuxe" feels awful).    The gauge on the ball band says 18st/24rows on 5.5mm.  There is NO way this yarns knits to that gauge...remember Mission Falls 1824?  This is like, half the thickness.   Meg used 3.75mm needles!  I wrote the pattern out for Megan, row by row so she'd have an easier time marking where she was.  

She did really well for awhile.  Then winter passed and the allure of wool mittens waned.  She did pick it up now and then, but I did end up finishing the second mitten.  I had to alter the original pattern a fair bit to fit her and the wool, but they are so cozy and fit well.


I admit to being a bit of a garter stitch snob.  The only people who like garter stitch are either beginners who don't know the purl stitch, or people who use only fancy yarns so they don't have to do the purl stitch and make an interesting fabric for a plain yarn.  Right?  Sally Melville's "The Knitting Experience, Book 1:  The Knit Stitch" and Elizabeth Zimmerman's "BSJ" are the two exceptions.  And, I did knit an "Einstein Jacket" for myself and ended up feeling like a marshmallow (do you really need the link for that post? LOL).  I knew the knit stitch was enough for Megan and the sideways knitting added just enough construction interest for me.  There's not a lot of options on Ravelry for garter stitch mittens, and TO ME, most of them are not pleasing (or were the wrong size, wrong yarn, or too difficult for Megan).  Oh look...there's two pairs by Elizabeth Zimmerman...one of which is sideways...click on one of them, you'll see her sideways gloves...which are very similar.  I wonder if I have a pattern for them in one of the old Vogue magazines...

I started the mittens with waste yarn so that I could graft the start and end together; same thing on the thumbs.  But I kept thinking there's no reason to stop at the tip and knit back....imagine this.  You're starting at the outside edge of the hand, knitting from wrist to tip, up and down.  Then you get to the thumb, and these ones have a side placed thumb, WITH a gusset made by short rows.  You know I love me a side placed thumb with a nice gusset!  Then you knit the palm side of the hand, wrist to tip on each row...end at the edge and graft, then sew the top!
I finished this pair as the original pattern indicated, but the tops bugged me.  Surely you could knit from wrist to tip, shape, then continue over the top to the other side and down to the wrist....

I'll post the results of that experiment later as I still have to finish the second one.  Would anyone be interested in a well fitting, garter stitch mitten pattern, with NO grafting, no sewing?

Yarn In:  3017gr
Yarn Out:  100gr + 4791gr = 4891gr
Balance:  1874gr more used UP than brought in
Costs:  $145.08 /252 days = $0.58/day

Thursday, September 03, 2015

Three Little Mittens

I can't believe I didn't post about these mittens earlier!  What happened?  I was sure I posted about the first pair, but not the second pair.  I know I posted on my Facebook and/or Instagram page!  So none of this yarn is in my "Yarn Out" total?  Awesome.


I had this idea, back in the spring when business was slow, that I would start making mittens to have in stock.  I wanted a 100% Canadian wool, preferably machine washable.  I also wanted it to be worsted weight.  And affordable.  And available locally.  Well.  There aren't too many options for that!  I finally settled on Briggs & Little "Heritage", back in ....March.  This wool is great value.  The two skeins, 113gr each, cost me $13.45, and I got three pairs of mittens, ranging from large child to a large lady/small men.  I had just the swatch and a small ball left over.  I tested them in the machine, with a load of laundry on a gentle cycle, I think it was.  There didnt' seem to be any appreciable felting, though a hot wash/cold rinse might be another story.  Unfortunately, my gauge was something like 4.5st/in and the chart in Ann Budd's book of Handy Patterns only has full numbers.  I used 5.0mm needles (just for my own future reference).

I do hope to make more, in another colour and some smaller sizes, though I have to get more wool.  And, somehow, I suddenly got a huge influx of orders and inquiries, and I'm still working on those Christmas stockings!  Better get to work!

Yarn In:  3017gr
Yarn Out:  217gr + 4574gr = 4791gr
Balance:  1774gr more used UP than brought in
Costs:  $145.08 /246 days = $0.59/day

Friday, August 28, 2015

Ride 'Em Cowboy!

Back in May I was contacted by a lady who's daughter was having twin boys in the summer.  She wanted some newsboy hats, and then cowboy hats for the twin mom's wedding in September. Like most projects, the hardest part was deciding on the yarn.  This was Paton's "Decor" and in the True Tracy Way, I bought two balls...but had to go back for a third!  Crocheting eats yarn!

 They want to co-ordinate a ribbon or something with the wedding colours, but I wanted something for the photos.

 I made them with an extra round in the brim, for a wider look.
 They are very shapeable, if that's a word.
I hope I get to see a picture of the twins in them!

Yarn In:  3017gr
Yarn Out:  127gr + 4447gr= 4574gr
Balance:  1557gr more used UP than brought in
Costs:  $145.08 /240 days = $0.60/day

Thursday, August 27, 2015

Pink Shorts

My youngest, Megan, has a hard time with clothes.  She's 9, just shy of 5' tall.  Built solid, figure skating is sculpting her body but she still has a little belly...she prefers to wear her pants below the belly, but then they don't fit right, and shirts end up being too short to cover up the difference.  She likes simple clothes but not plain LOL.  I came across a pattern on Ohhh LuLu and thought it might solve her current obsession/need for "yoga shorts".  Back in 2011 when I first got my serger, I made her some "undershorts" to wear under dresses, using mainly old t-shirts.  It was a great way to experiment.  I don't think I showed them since there really wasn't much too them.

Megan didn't want the lace on the shorts, which was fine, so I lengthened the leg.  I cut a small for the leg and hip, then morphed out to a large at the waist.  I should have measured her thigh, but since she has muscular legs, I figured they would be alright.  I didn't expect them to be on the loose side.

 I found the instructions to be good, but I still had trouble visualizing how the gusset gets sewed in.  I like having the gusset though.
I tried doing a small rolled hem on the legs, but the fabric rolled up still.  After washing, the serger stitching came loose so I had to touch up both legs and did a basic serger stitch, and that seems to lay flatter.
For the waist, I used some glittery elastic from an old pair of her underwear!  I wasn't sure how to do though.  What I didn't realize until after was that you line the top of the elastic up with the top of the shorts, and stitch, and then trim the fabric on the wrong side!
The fabric was a Tommy Hilfiger bedsheet I had picked up long ago at Value Village.  I also made this dress from it.  She loved that dress and I still can't believe I made it LOL.  I still have a lot of this sheet left!  I made a matching headband for the shorts, but used a wider elastic from other underwear.

I'll probably make her some more, maybe even a pair for skating (they wear them over their thick tights).  Might make myself a pair, though my days of wearing a t-shirt and bike shorts are over LOL.  Would be nice for under a nightgown.  Like last summer when we went to family camp and I found out my nightgown was a little shorter than I thought, especially as I walked up the steep hill from the cabin to the washroom!


Tuesday, August 18, 2015

Christmas is Coming

Oh, c'mon now.  You can't stick your head in the sand forever.  You should have seen the shocked faces when on the last day of school I told people in the office there was only SIX months till Christmas.  You'd have thought I said it was snowing.  LOL.

 For a refresher, there is the stocking I'm replicating.

I was able to match all the colours really closely, except the green.  I thought one of these yarns would work, and in the above picture, the one on the right isn't too "bad".


But in brighter light, it wasn't right at all.  I just couldn't bring myself to use it.  I thought I'd wait until the fall yarns come out, and see what I can find.  I was using mainly Astra, and two weeks ago heard that there was a new green.  The colour on my computer looked promising, but when I saw it in the store?  Way too bright :(  I picked out a couple other colours and came home.  I took some time looking at Sirdar's website and found some colours that would work.  BUT...one store was closing for holiday (new grandson!) and the other store didn't have colour cards with yarn samples and I don't trust printed colour cards in this situation.  I might have had luck at another store, but it's further away and I just didn't want to make another trip.

One of the colours I picked up when I went looking at the new Astra colour, was really close.  But, it's Red Heart "Soft"...a worsted weight yarn with 4 plies.  I would have to pick out one of the plies.  Ugh.  I got started on the first stocking, using one of the bigger names, to see how it would look because the white section was going to be one row longer.  


Interesting, now my gauge is off compared to my solid coloured sample.  On one hand, the two coloured side is a bit loose and takes up more than half the swatch, and the solid white part (not seen in the photo, but is the back side of the stocking) is too tight.  I know blocking will even out some of this.  But this was a great working swatch, and I know somethings I want to do differently now.  Like, last night I sat there and while watching TV, picked out one ply of the "Soft" and made little balls, rather than trying to work directly from the large ball!  I see a blib of green next to the S at the end of Christmas, and I don't like the K in Patrick.  Also, the middle of Patrick somehow ended up using the full 4 plies of "Soft" and is a little lumpy.

Everyone who sees the picture seems to think it looks awesome.  So here's hoping the improvements work and Jason loves the end results!

Yarn In:  141gr + 2876gr = 3017gr
Yarn Out:   4447gr
Balance:  1430gr more used UP than brought in
Costs:  $5.53 +  $139.55=$145.08 /230 days = $0.63/day

Monday, August 17, 2015

Do Over Socks

Please don't ask me how long it takes to knit a pair of socks.  This pair is a great example of how it's never a simple answer.  I believe I started them early in the summer of 2014, when we were going to a Movie in the Park and wanted something simple to work on (in the dark).  Isn't that how it always starts?  "Something simple".  "Brainless".  Yeah, right.  Actually, these started before that...back in early 2010 I started to learn to use my ribber.   I made some socks, and tried this yarn--because I knew it needed to be knit rather plainly.  I think I made one sock, and it came out too big.  Rob said it fit him, but I knew he'd never wear them.  I always thought I'd get back to them but decided to HK this instead.

 Every part of these socks, except the leg, got a "do over" at least once.  Starting with the toes, two at a time on one circular, I wasn't happy with the increasing.  I don't remember now exactly what was the issue, but I think I got creative and did some increases in the middle of the toes...and it created a pucker I didn't like.  And maybe the stitch gauge wasn't good.  I don't know.
 I also quickly got bored with the "simple knitting".  I played around a bit, and decided to purl the stitches that landed on top of red stitches in the row below.  This instantly made them inappropriate for in the dark knitting, of course.
 I opted to do the increases over the top of the foot--since that's where my foot increases.  But I wasn't following any mathematical logic, or a pattern...and I ended up not liking what I did, so I ripped back and did it over.
 I wanted the Fleegle heel, but I didn't have the pattern with me at the time so I winged it.  I winged it wrongly, at least twice, before I got back to having the pattern.  Then I tried adding some short rows at the top of the heel, at the back since I have deep heels and normally do this.  It created a weird bubble, so I ripped back and did it over.
 I was concerned they were a little tight around the ankle, so I did some ribbing at the back.  I have shapely calves, so I added some increasing at either side of the ribbing, incorporating it into the ribbing.  This actually seemed to work out, and there was no do over and the legs just flew!
I would have liked to have had no yarn left over, but they were getting tall, so I ended with some simple ribbing around the top.  No fancy cast off, just did it "in pattern".
I haven't worn them yet, but they seemed to be functional.  A little odd looking,, both colour wise and pattern wise...but I don't care!  There is a time and place for odd socks.

I ended with a 2.5mm needle, though I don't know what I started with.  Not sure of the yarn!

Yarn In:  2876gr
Yarn Out:  75gr + 4522gr = 4447gr
Balance:  1571gr more used UP than brought in
Costs:  $139.55/229 days = $0.61/day

Of course, I did buy a bit more yarn for the custom Christmas stockings I'm doing, and I got started on them.  And another pair of simple socks...so far, I've only redone the toes once! :)

Friday, August 07, 2015

Quick Sewing

I wanted a headband in a colour I actually wear.  And that actually fit me.  Megan had a pair of yoga pants with a colourful waistband.  The pants had an unfixable hole, but I kept them around because I knew the waistband was worth it.  It didn't take too long to unpick it from the waist seam, and bonus--a length of clear elastic came with it.
 I worked with what I had, for the width.
 I'm not a selfie person.
 I tried to just serge the long edges of the band part, but it still rolled.  So I hemmed it.
 Super duper heat wave.  This thermometer is in the shade.
For the band, I didn't do the stitching close to the edges, but did do two lines down the middle, to create two casings.  However...it does some funky things on the head.  So, having the edge stitching helps the back band stay flat.

This one is quite wearable...though I haven't worn purple since.

Saturday, August 01, 2015

Top #2

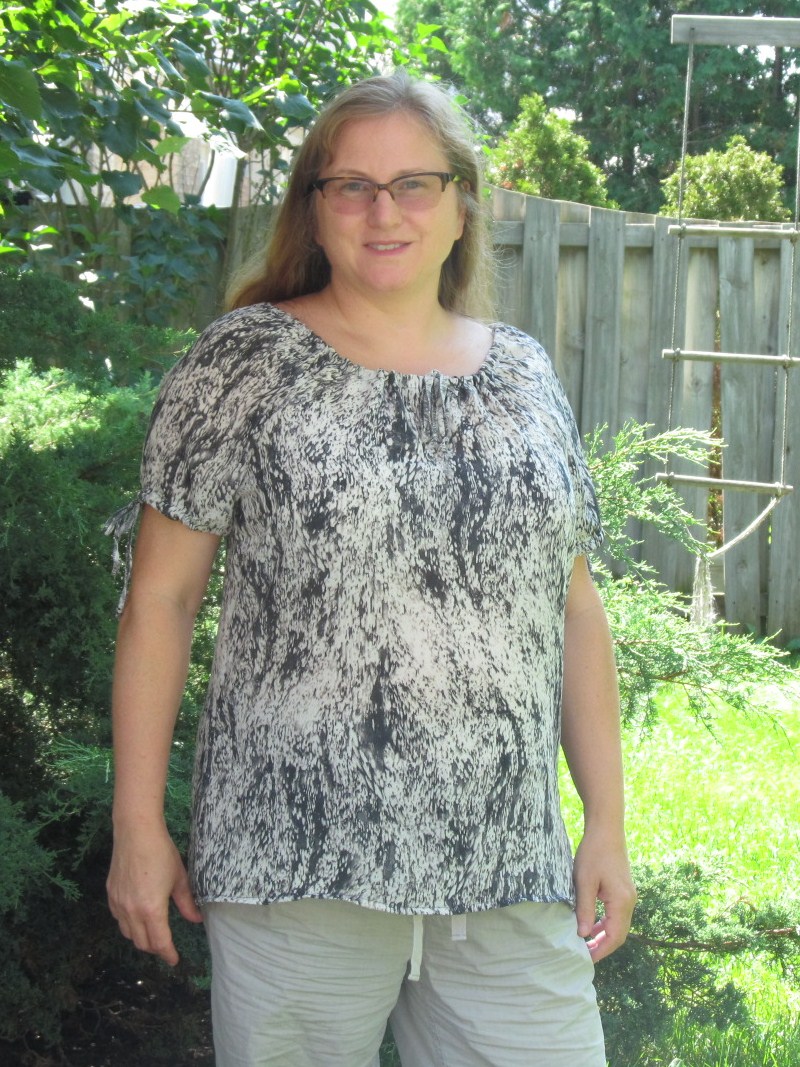
After the fairly good results of the first top, I went ahead with another one.  I sort of combined that pattern and one I've done before, a couple times already.  I dont' wear that top enough because for some reason, I hang it in my closet, instead of fold it with my t-shirts.  And it doesn't seem like something to wear in the winter.  But everytime I wear one of them, I think, "I need more tops like this!".  So much cooler than a close fitting t-shirt!  This time, instead of elastic for the neck and sleeves, I used skinny ties, like the floral shirt--but for the neck, I did it to go all the way around like the elastic in the original solid colour gauzey ones.  I didn't do the back darts--I figured I'd try it on first and see the fit.

 I'm quite happy with it!  A little disappointed when I found the stamp with the fiber content--100% polyester, but what could I expect for a $6 1m remnant?!

I did have to put my thinking cap on to figure out where to put the buttonholes for the neck and arm ties.  They were a little sloppy, but at least I did it mostly right LOL.
 I opted to serge this one.  I hadn't used the serger in a while, and thin, slippery fabric is probably not the ideal way to get back into it, LOL, but it actually went really well.  I used the book "Sew U:  Home Stretch" by Wendy, to get the order in which to sew the pieces.
 My bottom hem is a little sloppy and cutting this fabric was terrible, so it was pretty uneven.  I just try to pull it down in the front and keep myself in motion.
 The ties.  Ugh.  I saw in one of my serger books that you could make skinny ties by serging, then turning right side out.  Well...obviously mine were too skinny!  So I left them, inside out, with serging showing--different colours on each side.  Oh well.  If anyone gets that close to me and comments...their problem, not mine!
 I had a bit of fabric left (I had forgotten to length the sleeves), and knew I needed an infinity scarf.  I love the ones I knit, but they're not suitable in the summer!  I found some instructions through Pinterest.  I did have to piece my piece a bit to get the length (kept it on the shorter side still, because, well, I'm short) and kept it narrow since I don't have much of a neck.  Again, I did a crappy cutting job, which meant the very last seam was sewn REALLY crappy.  But I'm not expecting anyone to get right up in my bosom to check it out.
 And I still had a bit left!  I've seen girls wearing these gathered headbands--Megan has one but never wears it.  One day I saw a lady with it pulled out wide, covering most of her hair.  I thought that would be great on no-hair-wash days, or even instead of a hat!  So, again, Pinterest to the rescue.
 Wide...
 Narrow...
 I did have to seam it, I'm not what happened cause I thought I had measured right.
 Rough join!  The pattern called for making a row of stitching right near the fold of the band, on either edge, and then 3/8" of an inch over from each...but I could NOT get the edge stitching to stay tidy near the edge!  Then, I couldn't fit two more lines, so I just did one down the middle.  Then you use two narrow elastics, instead of one wide.
Here's the seam....A lovely flower could hide that!
I'm finding this a smidge tight on me.  I can wear it, but I sort of feel like it's giving me a headache.  If anyone's interested, I'm offering it as a giveaway on my Facebook page.

I promise not to wear all three matching pieces at the same time!